


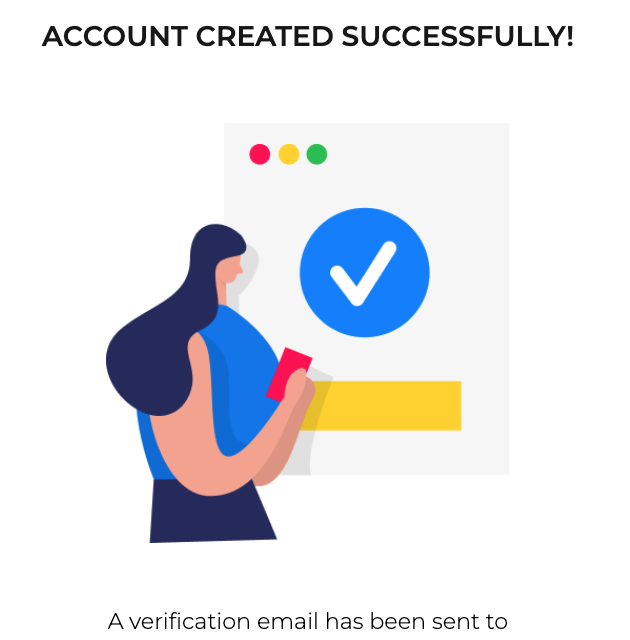

![]() Visit your inbox to find the registration email
Visit your inbox to find the registration email
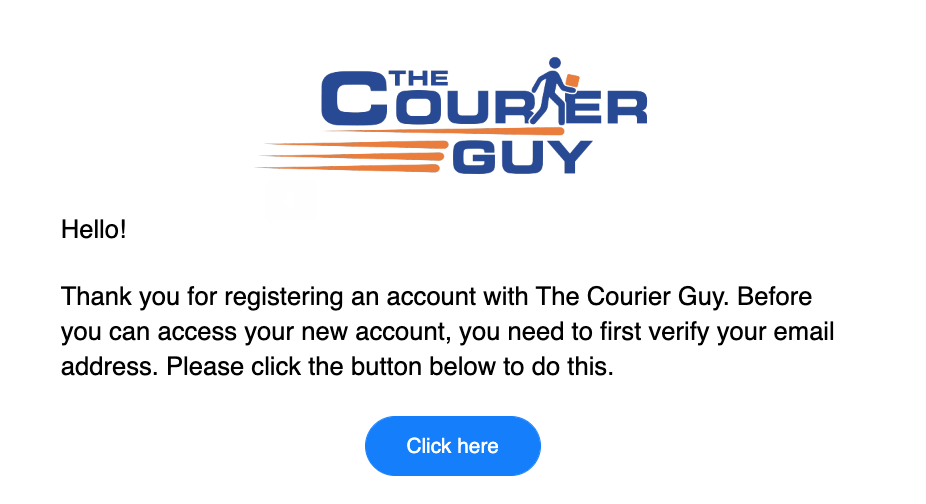
Click on the link to continue and complete the verification process.
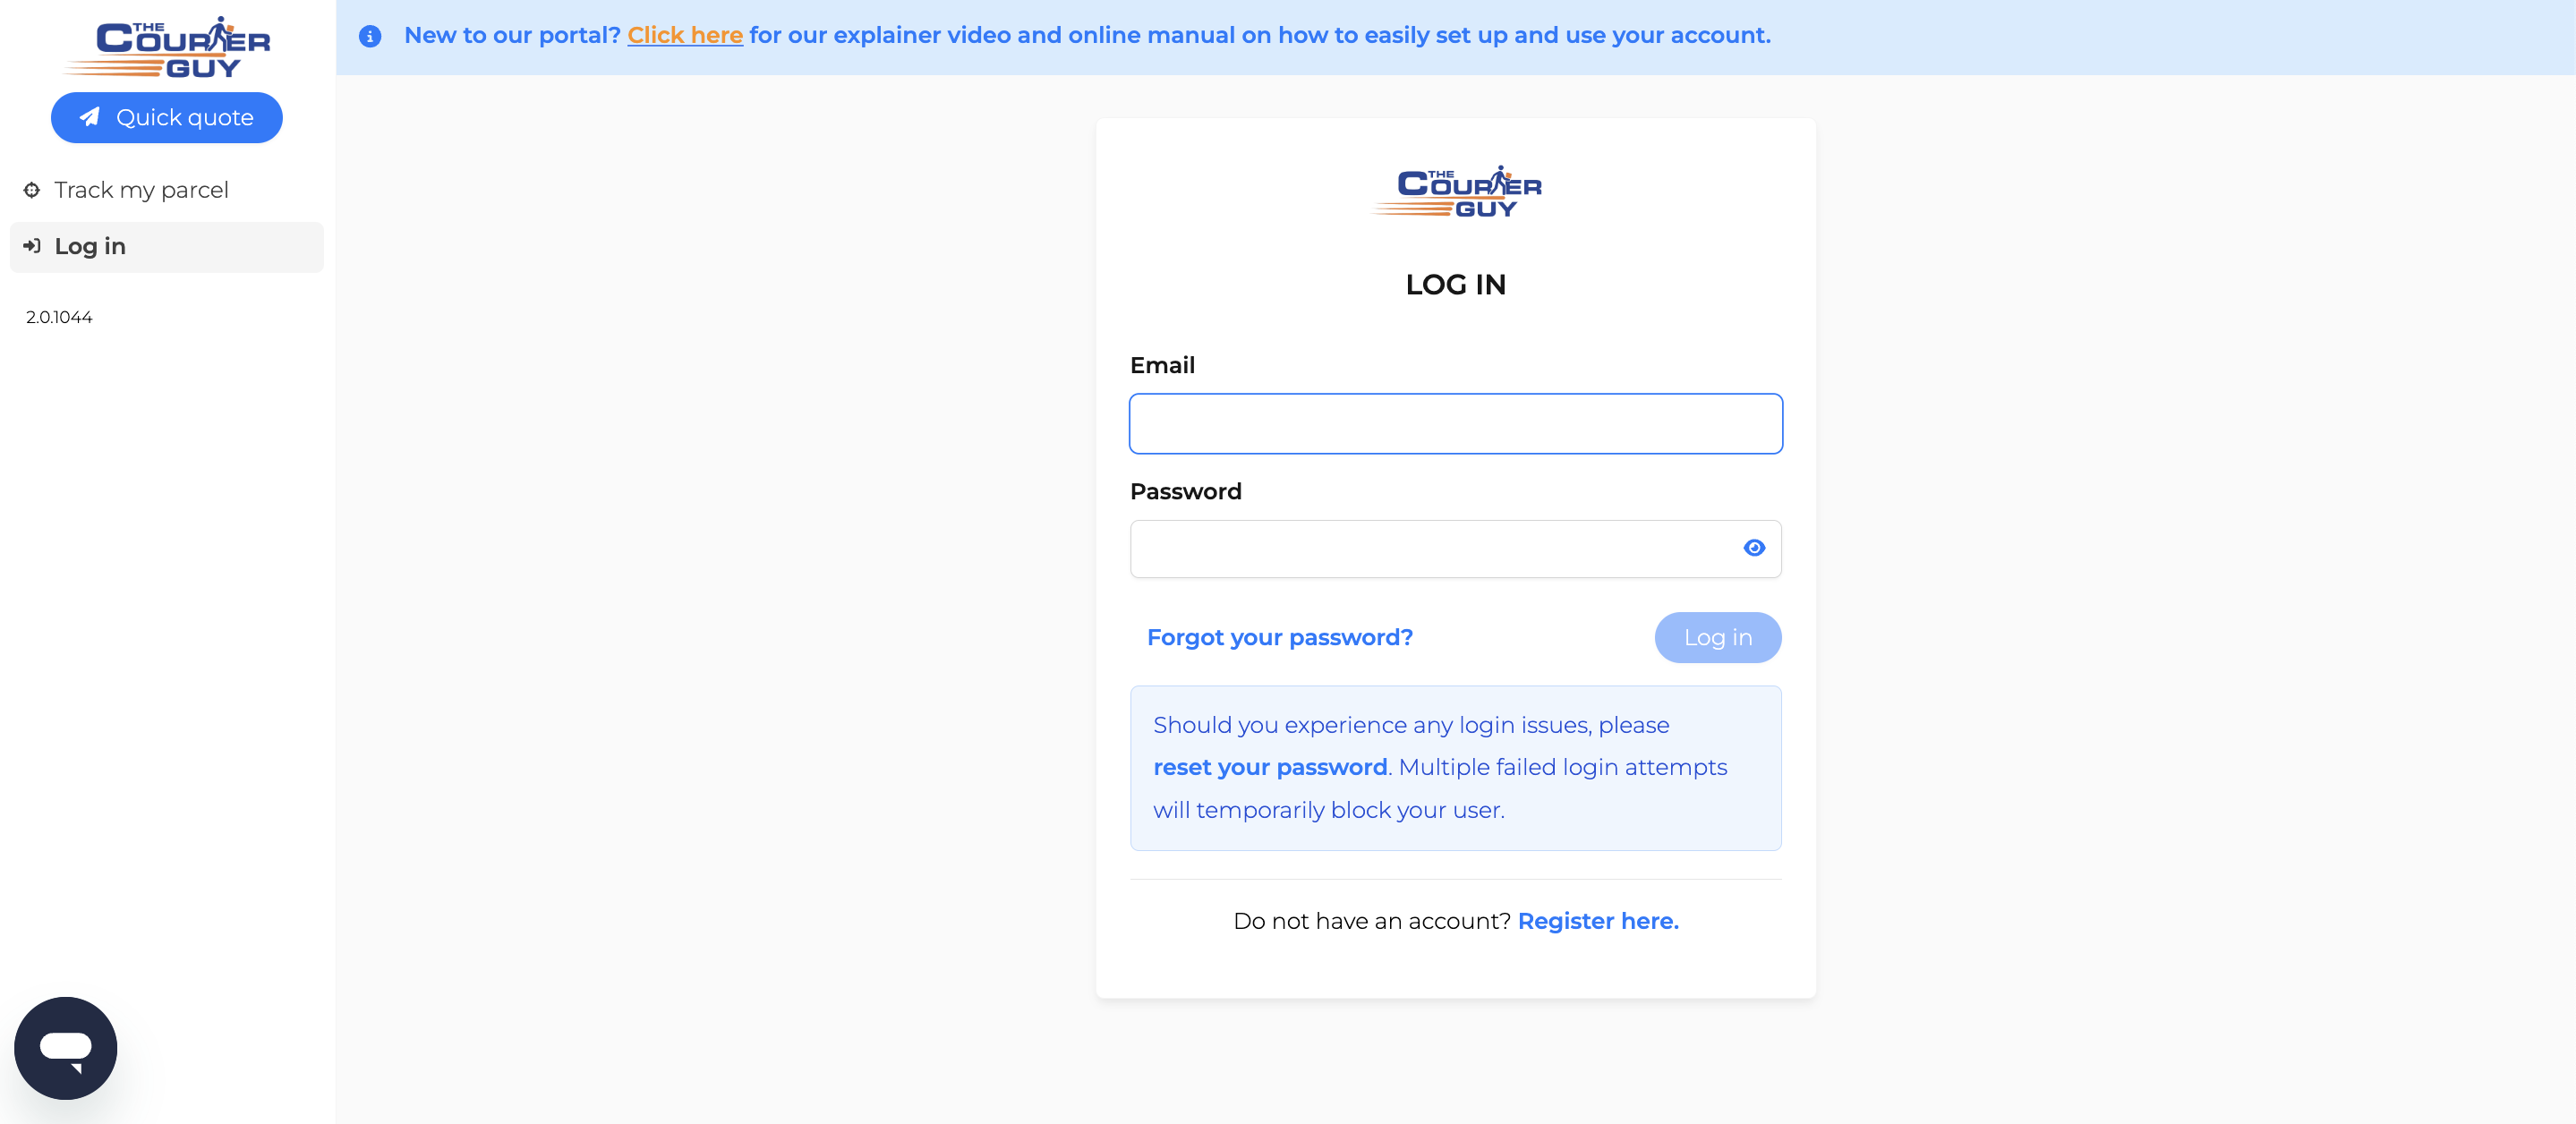
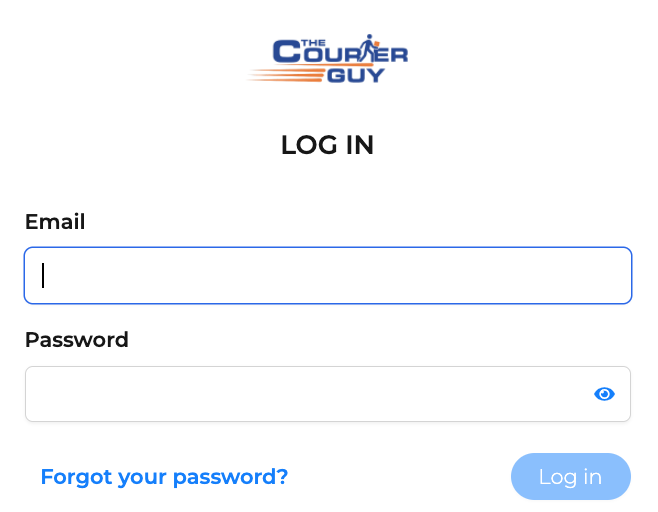
Log in with your email and new password to access your account.
![]() Get in-touch with the courier to finalise your account set up and start shipping..
Get in-touch with the courier to finalise your account set up and start shipping..
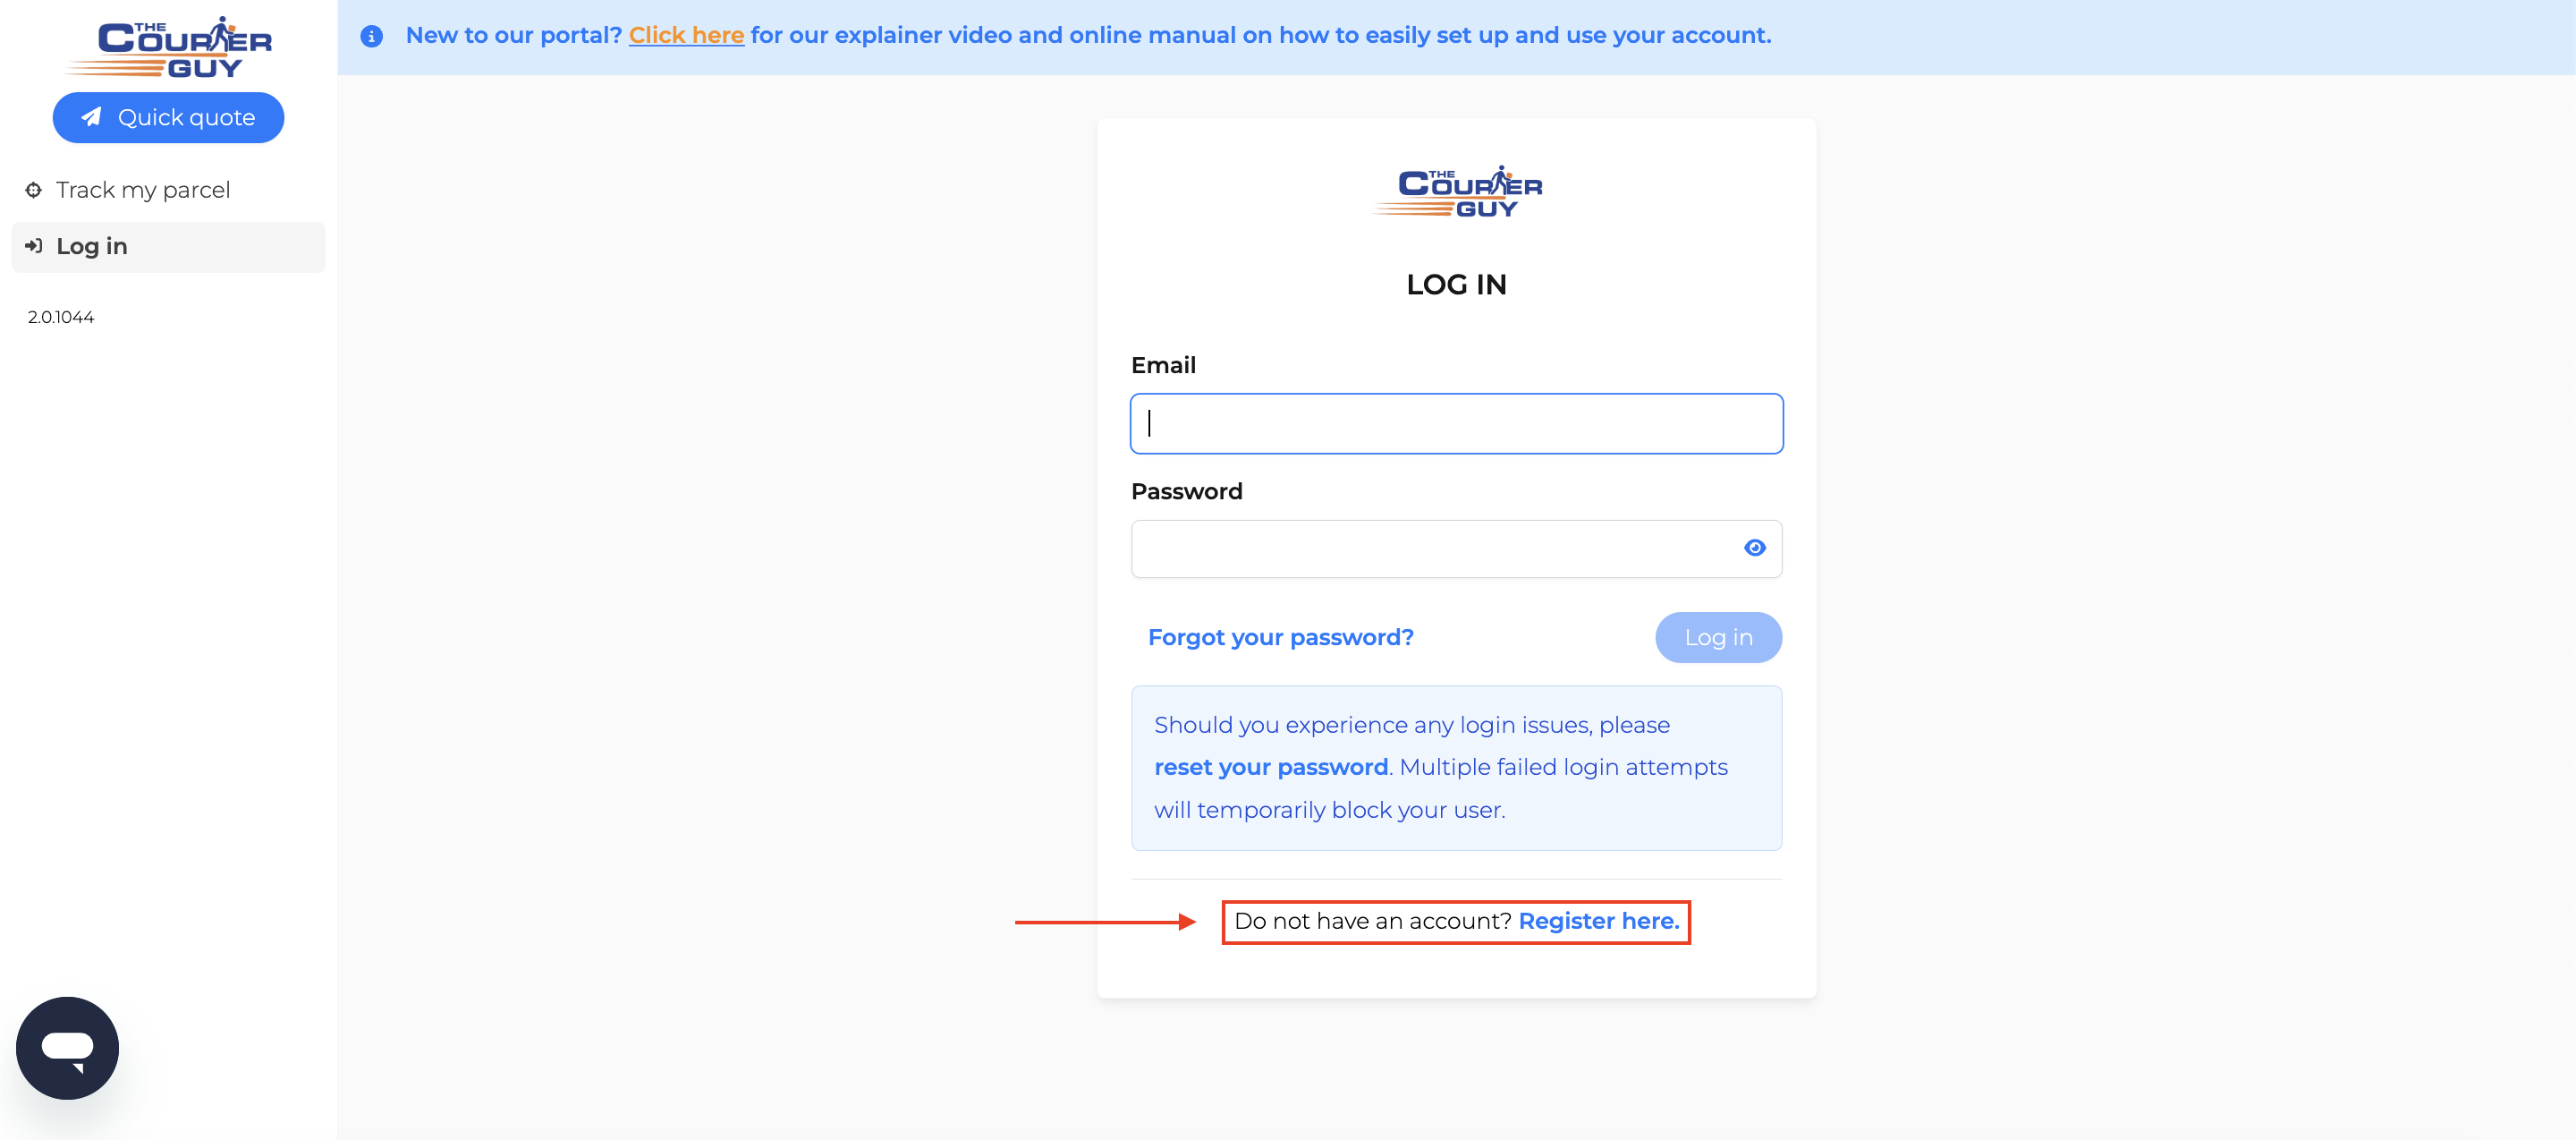
Log in to your Client Portal account by visiting the Log in page at https://portal.thecourierguy.co.za/login
Enter your email and password and click on Log in to continue.
![]() Please contact support@thecourierguy.co.za if you have not received any email notifications about your new account.
Please contact support@thecourierguy.co.za if you have not received any email notifications about your new account.

Click on Quick quote and complete the first step by filling in your address and parcel details.
Then click on Get quote to get some rates for your booking.
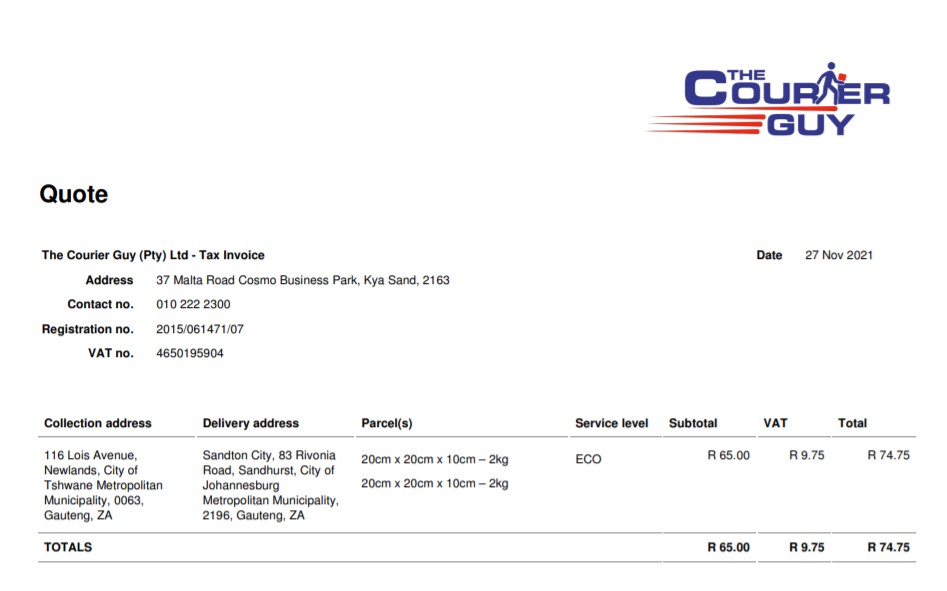
Download a quote directly from the rates screen.
![]() A PDF will download in a new tab on your browser. Please allow the pop-up, so to view and download your quote.
A PDF will download in a new tab on your browser. Please allow the pop-up, so to view and download your quote.


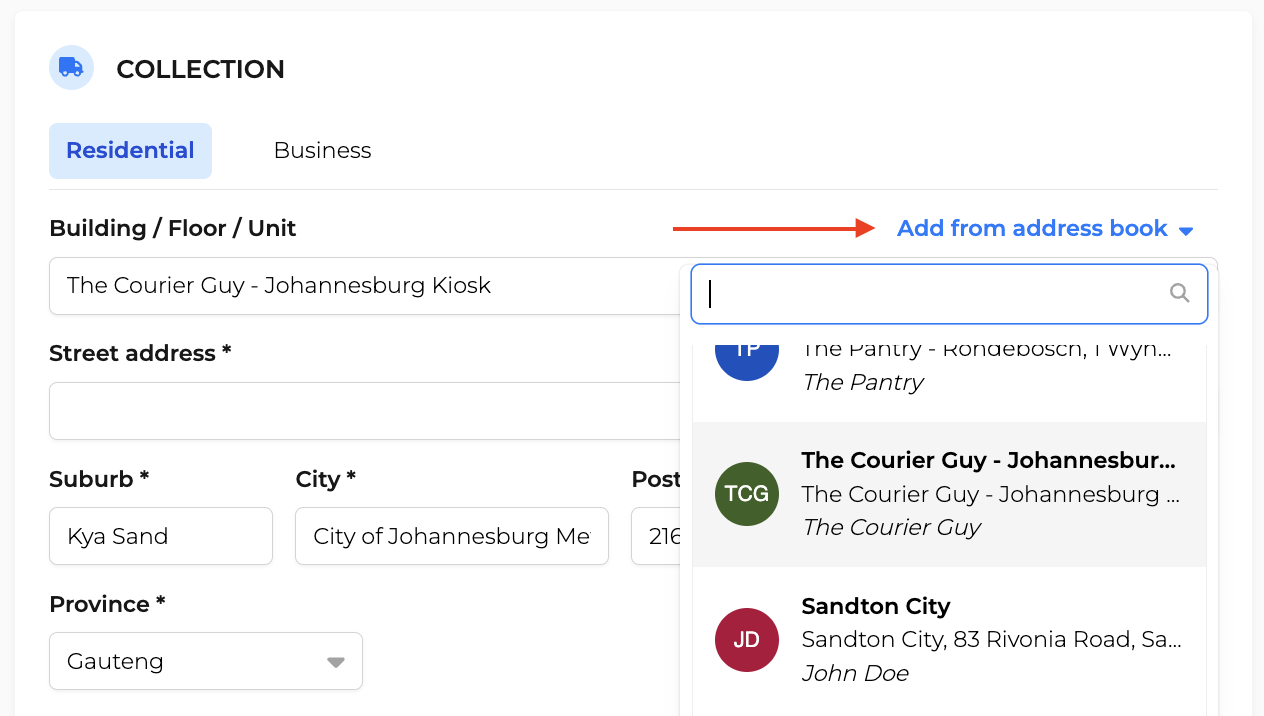
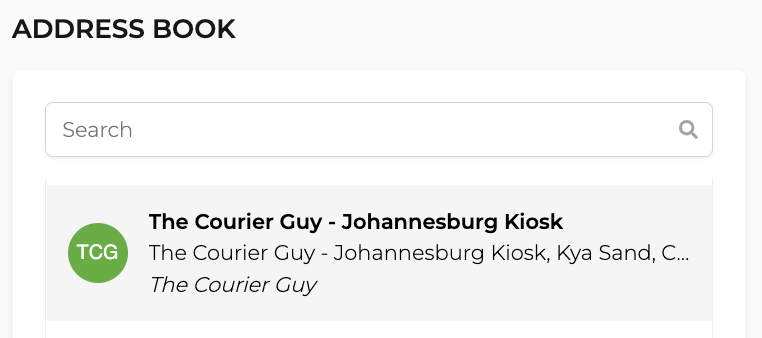
![]() All addresses are automatically added to your address book.
All addresses are automatically added to your address book.
This allows you to easily choose addresses for future shipments.
Click on Add from address book to access your address book.
Choose an existing address to save time and to ensure your address is correct.
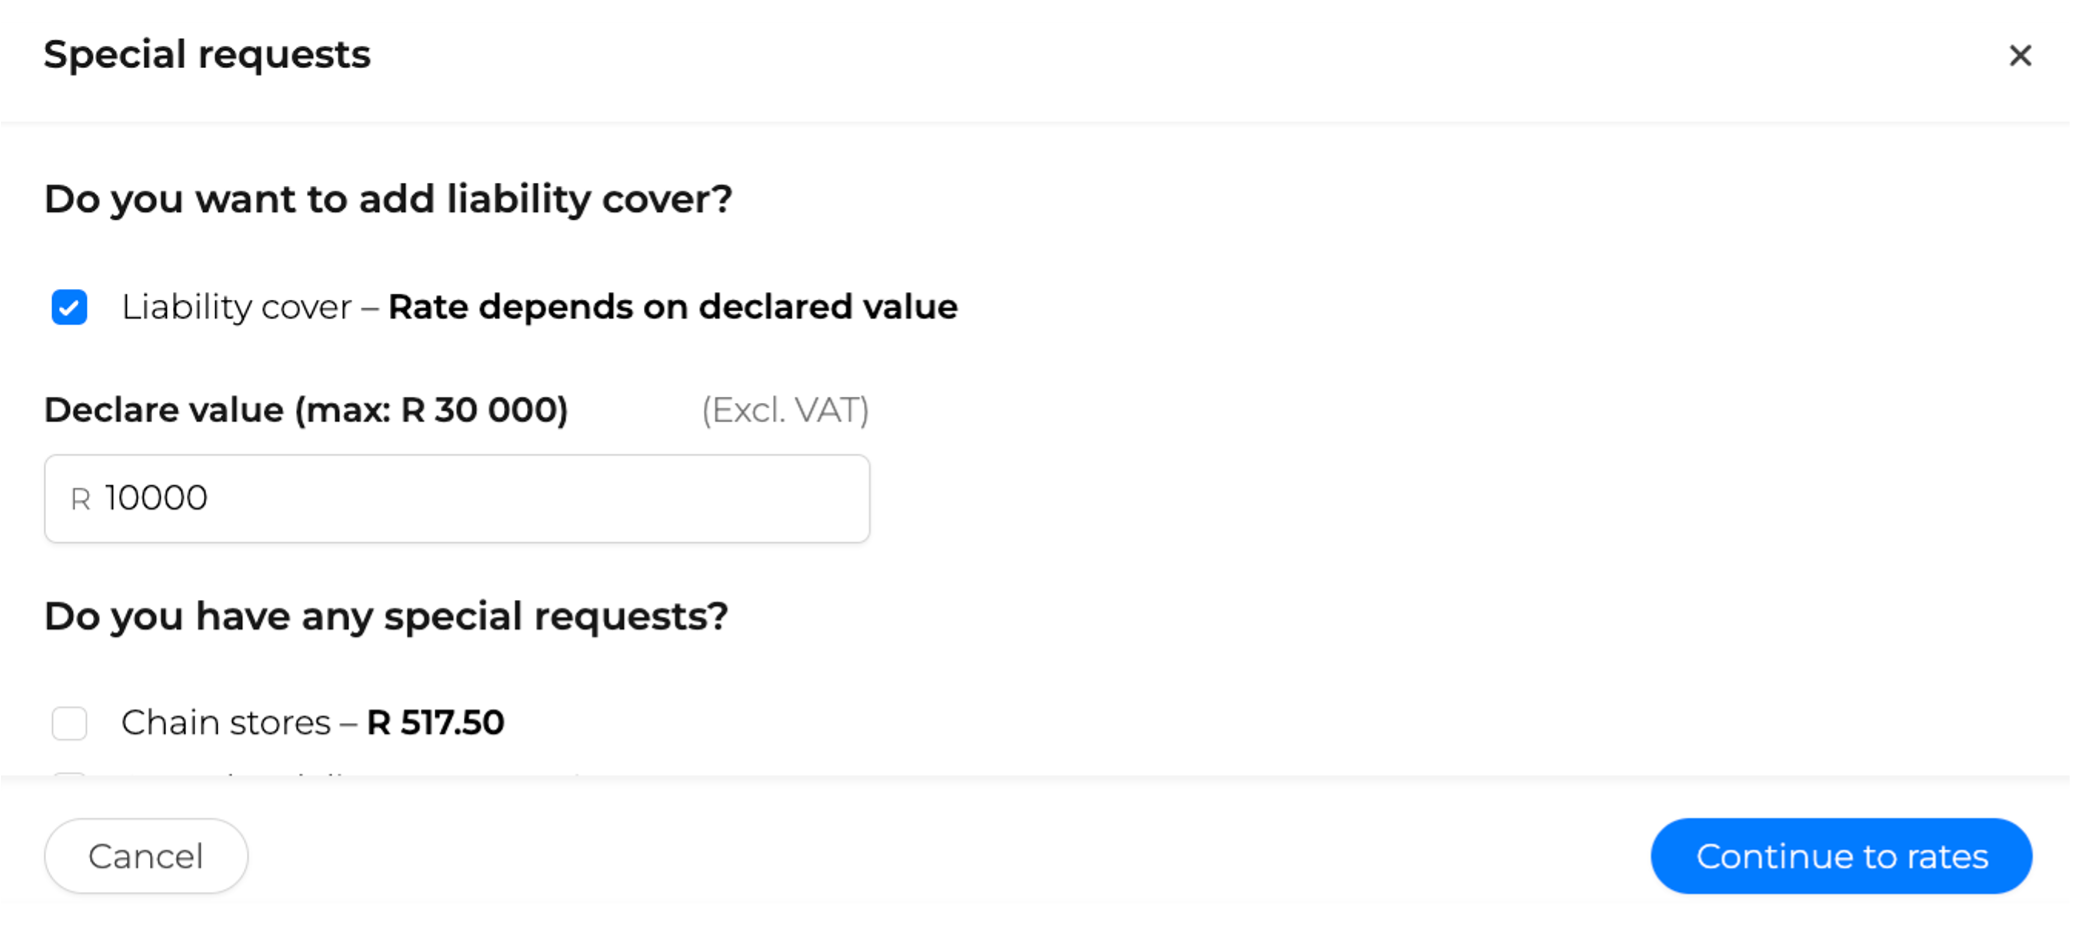
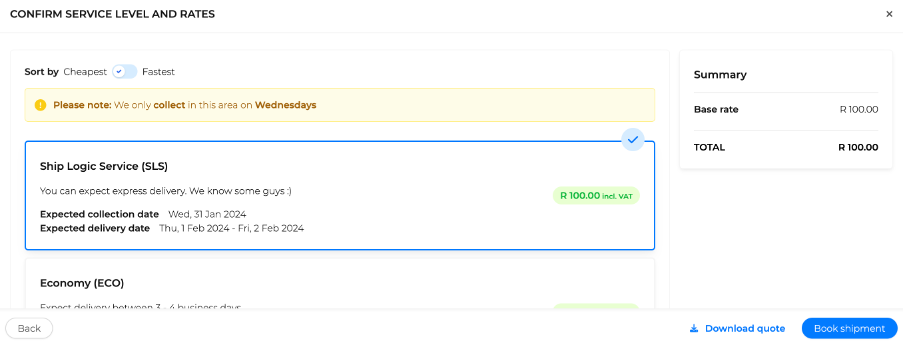
![]() Service levels and rates are set up by the courier and cannot be changed on the client portal
Service levels and rates are set up by the courier and cannot be changed on the client portal


![]() Your account will be billed accordingly and this shipment will be invoiced.
Your account will be billed accordingly and this shipment will be invoiced.


A new modal will open where you can start with creating your shipment.
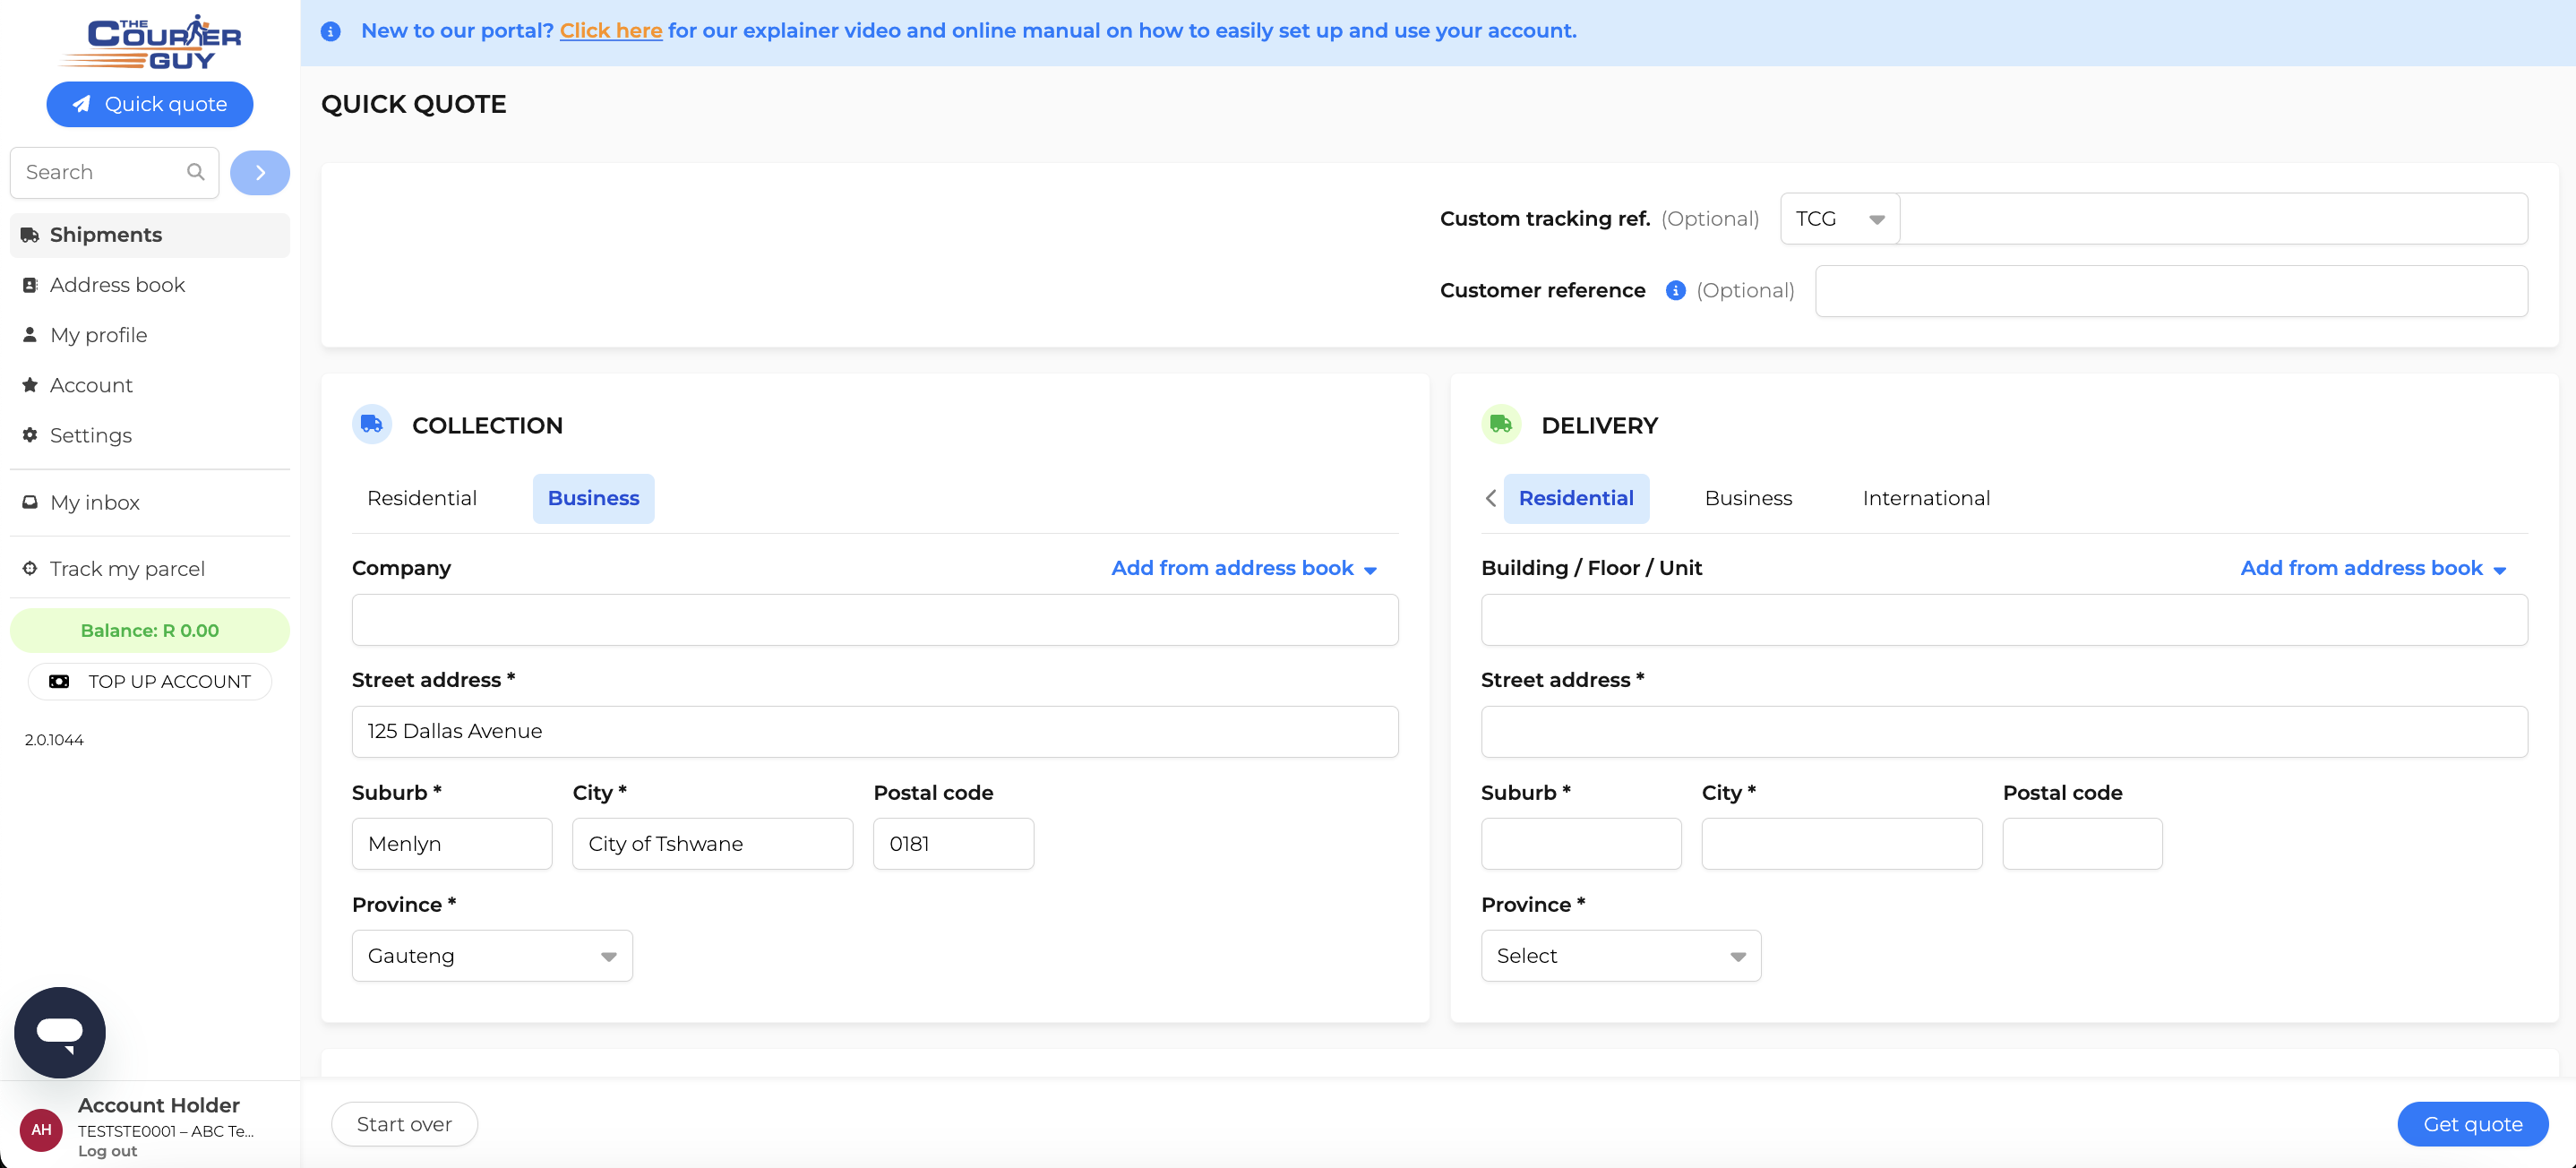
Step 1: Set your Collection and delivery details.
Use your address book if you have the address saved from before.
![]() Change the collection or delivery date and time by clicking on the pencil icon
Change the collection or delivery date and time by clicking on the pencil icon ![]() next to the Earliest requested collection/delivery date.
next to the Earliest requested collection/delivery date.

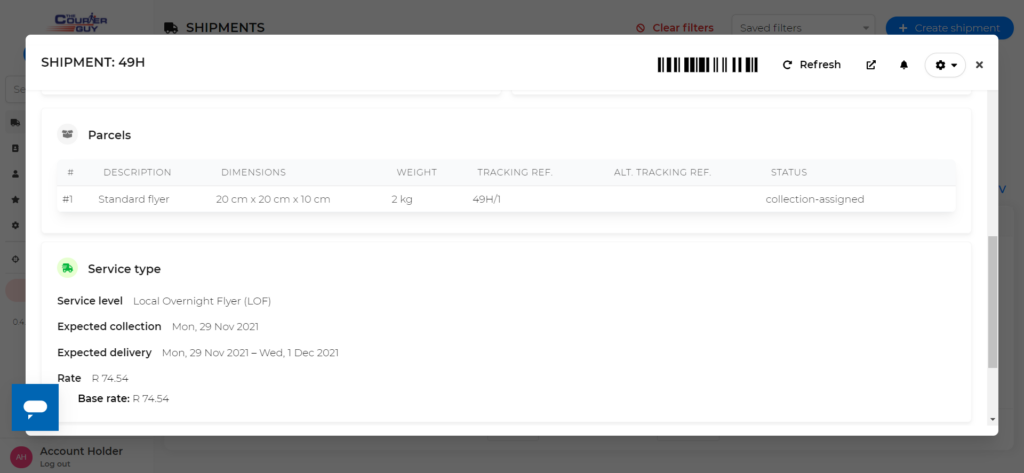
Step 3: Add your parcel details.
![]() Please note that while local rates do not rely on weight or dimensions (see rates guide for conditions), all national and international parcels must have exact dimensions and mass for the quote to generate the correct cost.
Please note that while local rates do not rely on weight or dimensions (see rates guide for conditions), all national and international parcels must have exact dimensions and mass for the quote to generate the correct cost.


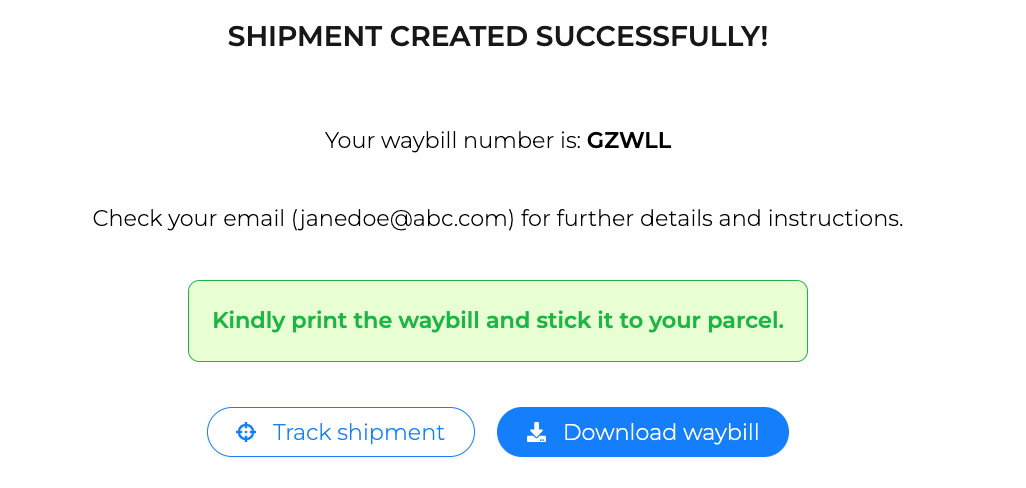
![]()
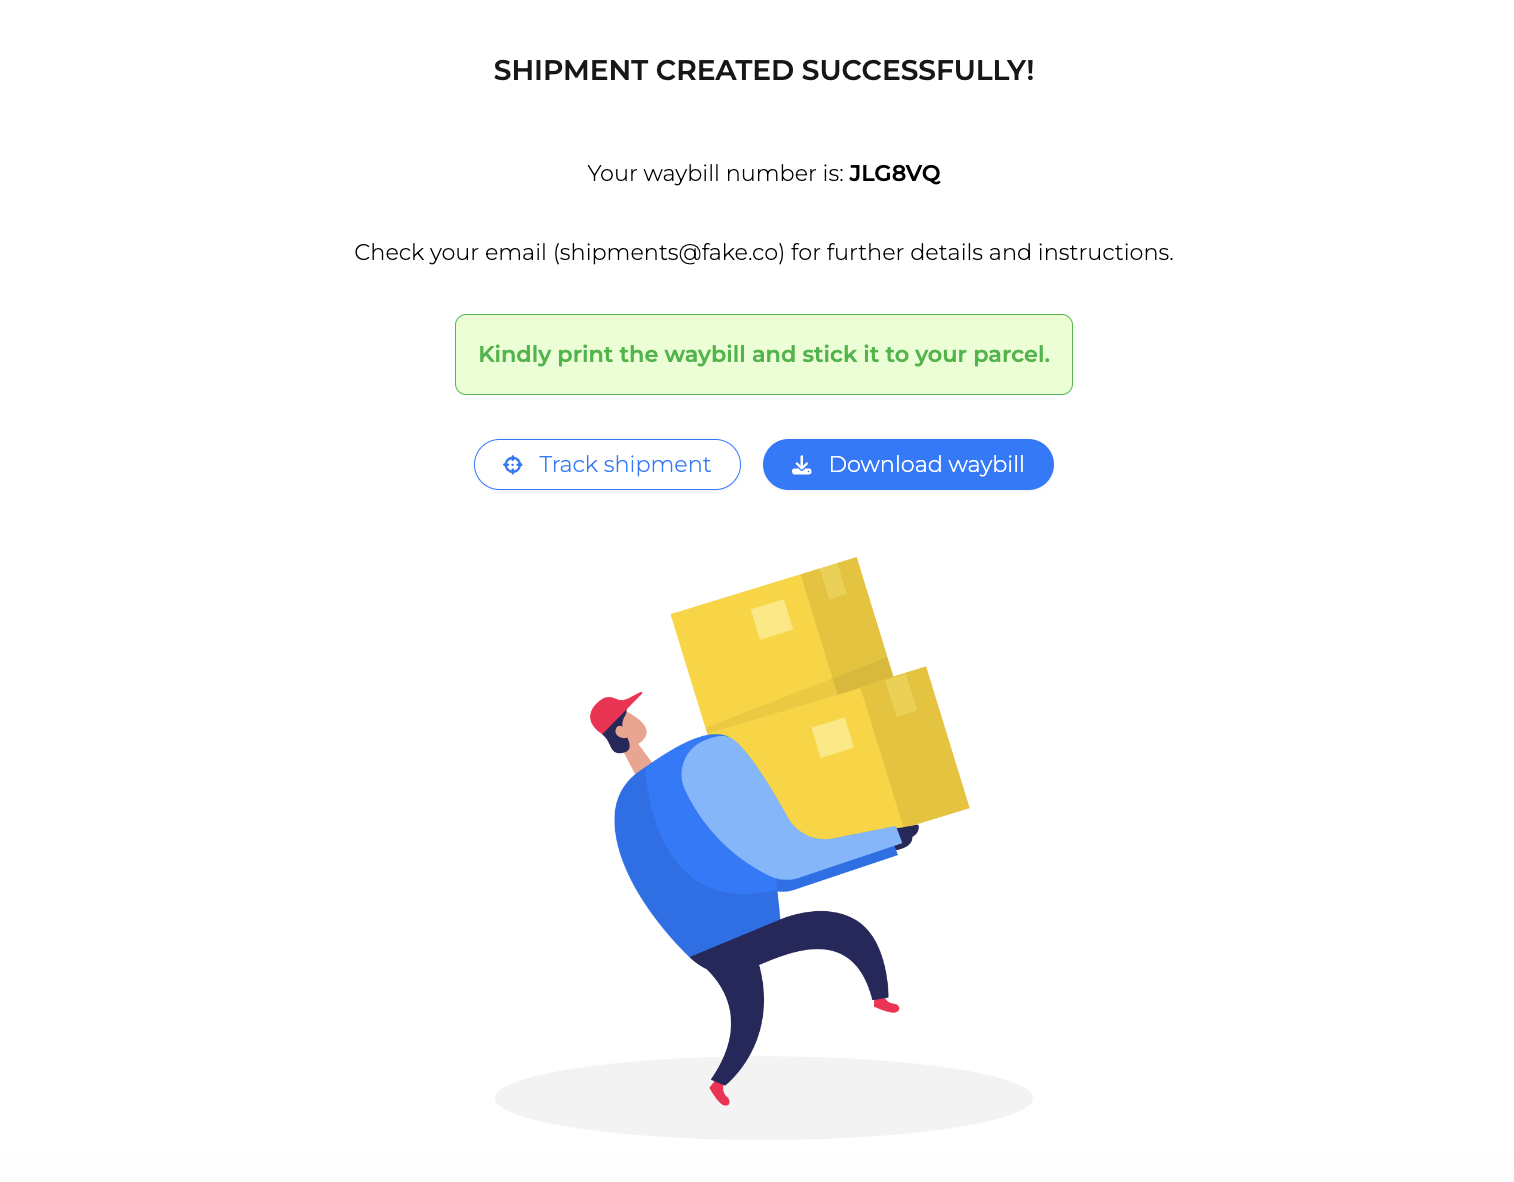
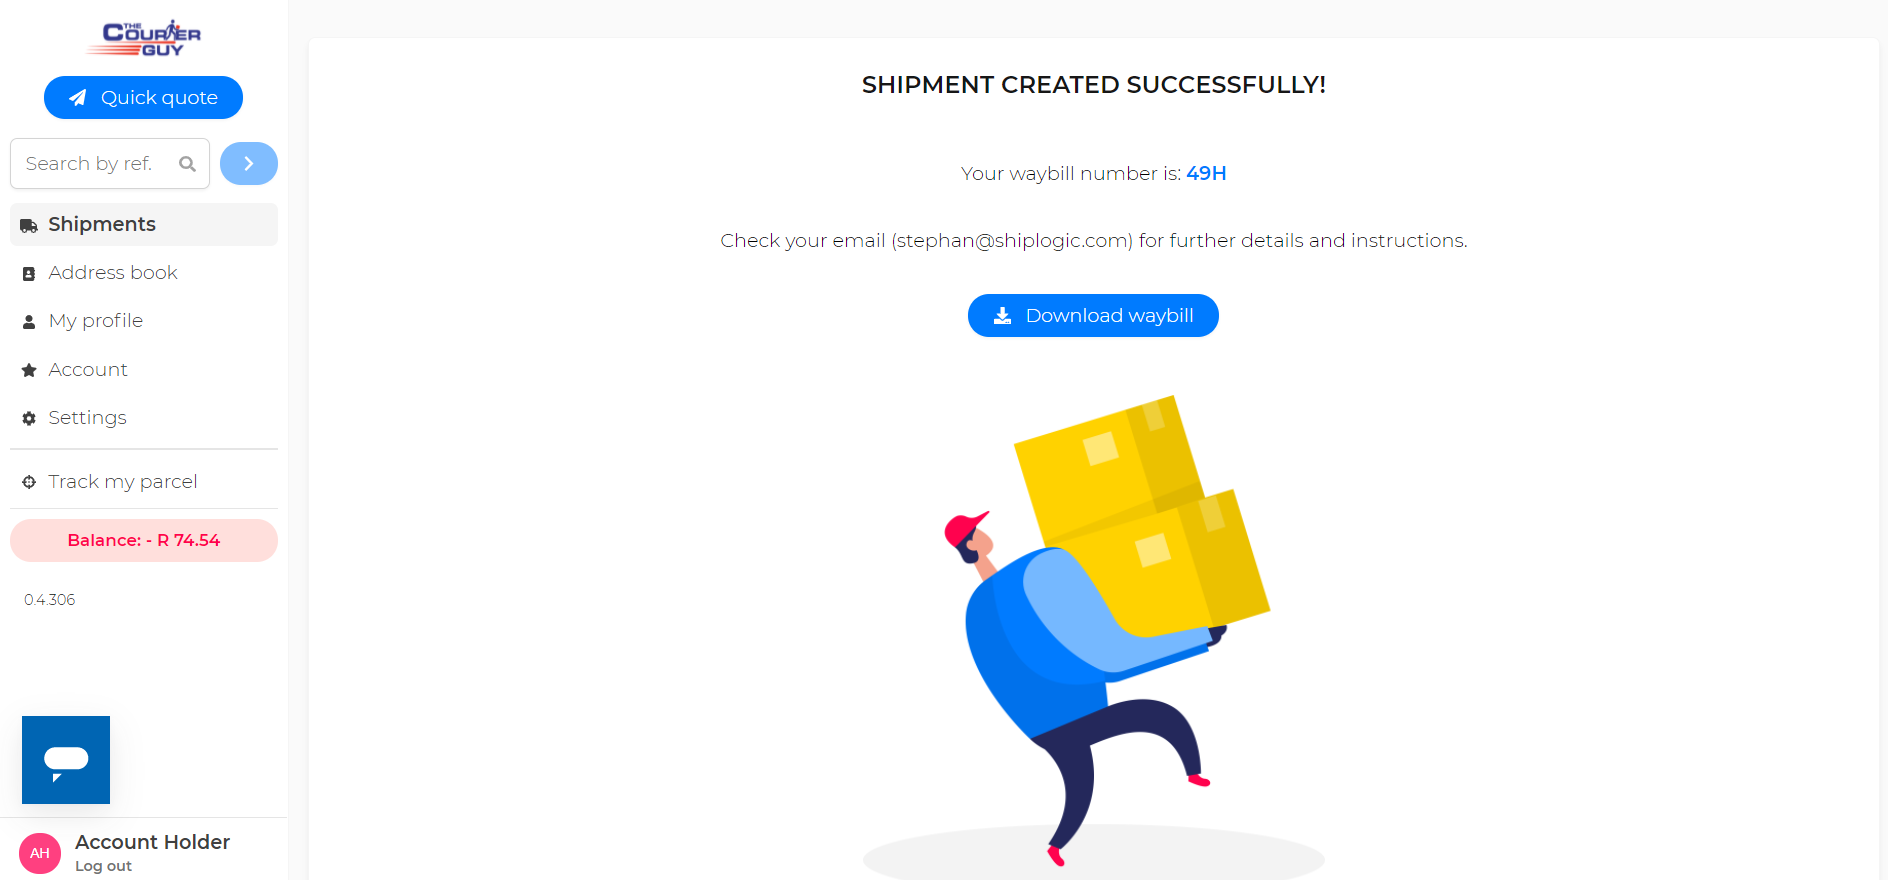
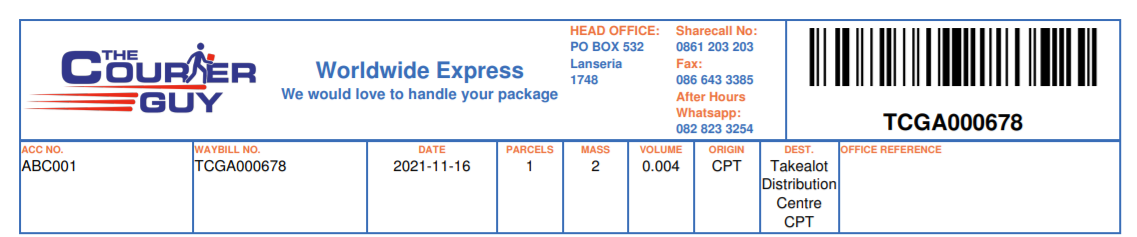
Kindly print your waybill and stick it to your parcel for the driver to scan and collect.
Your newly created shipment will now be available in your main shipment page.
Access and view your shipment details once it has been created successfully.

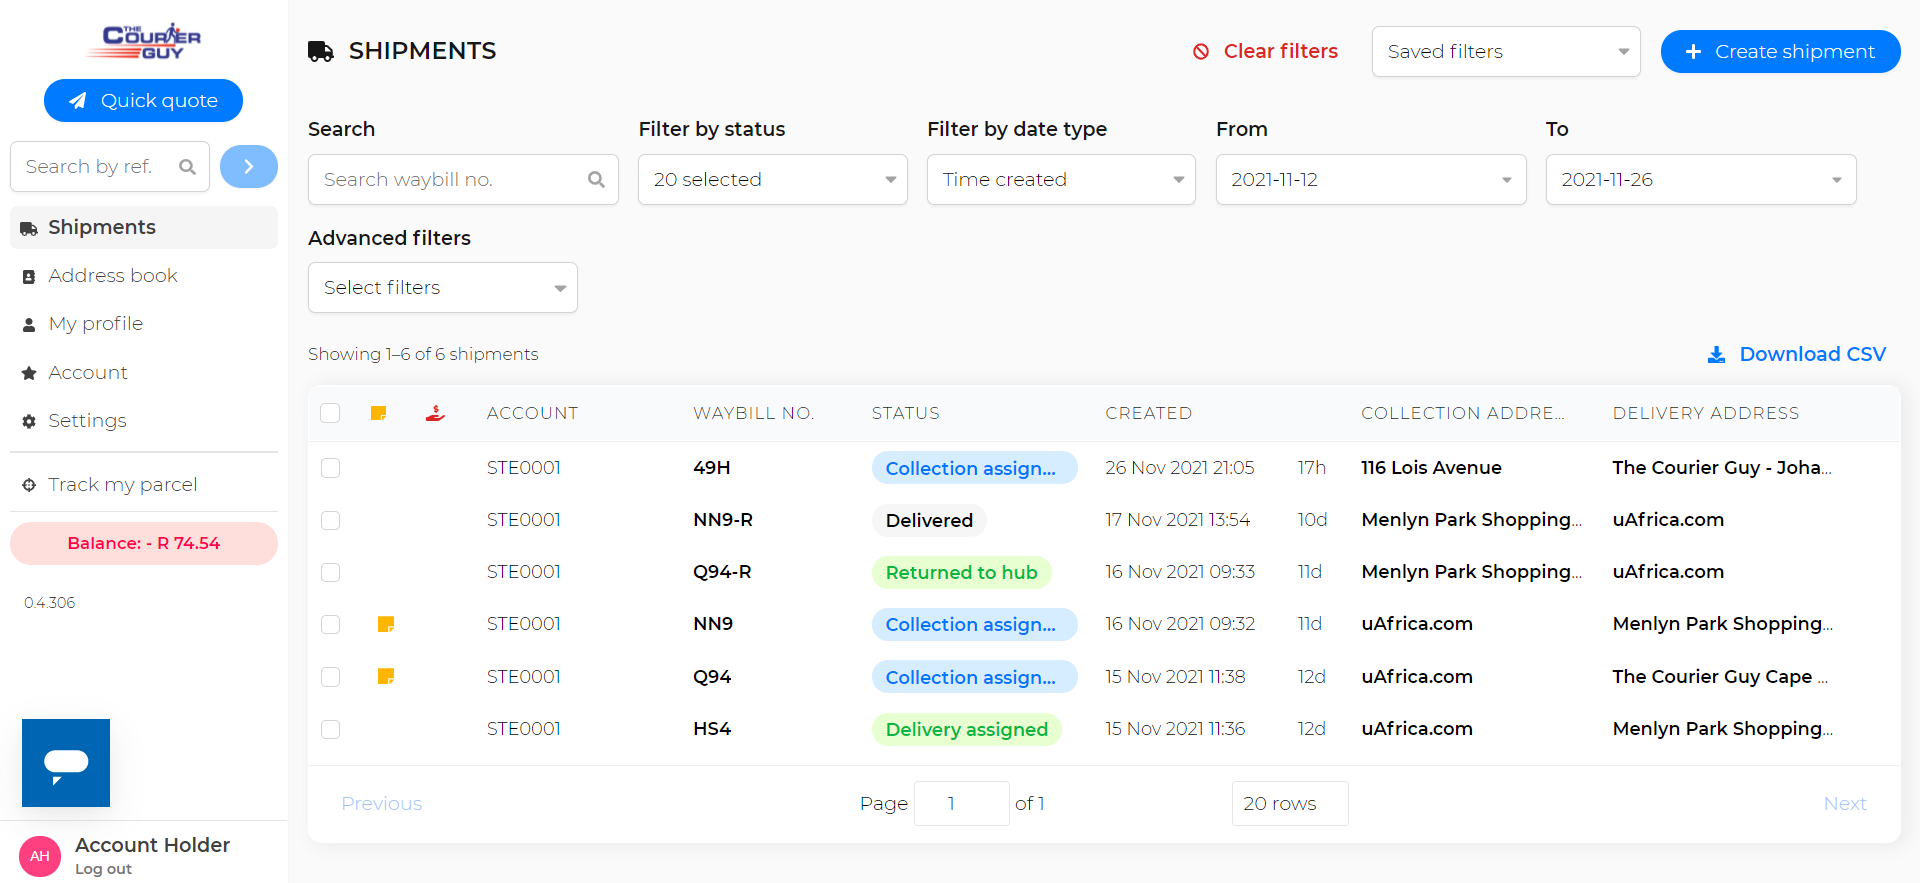

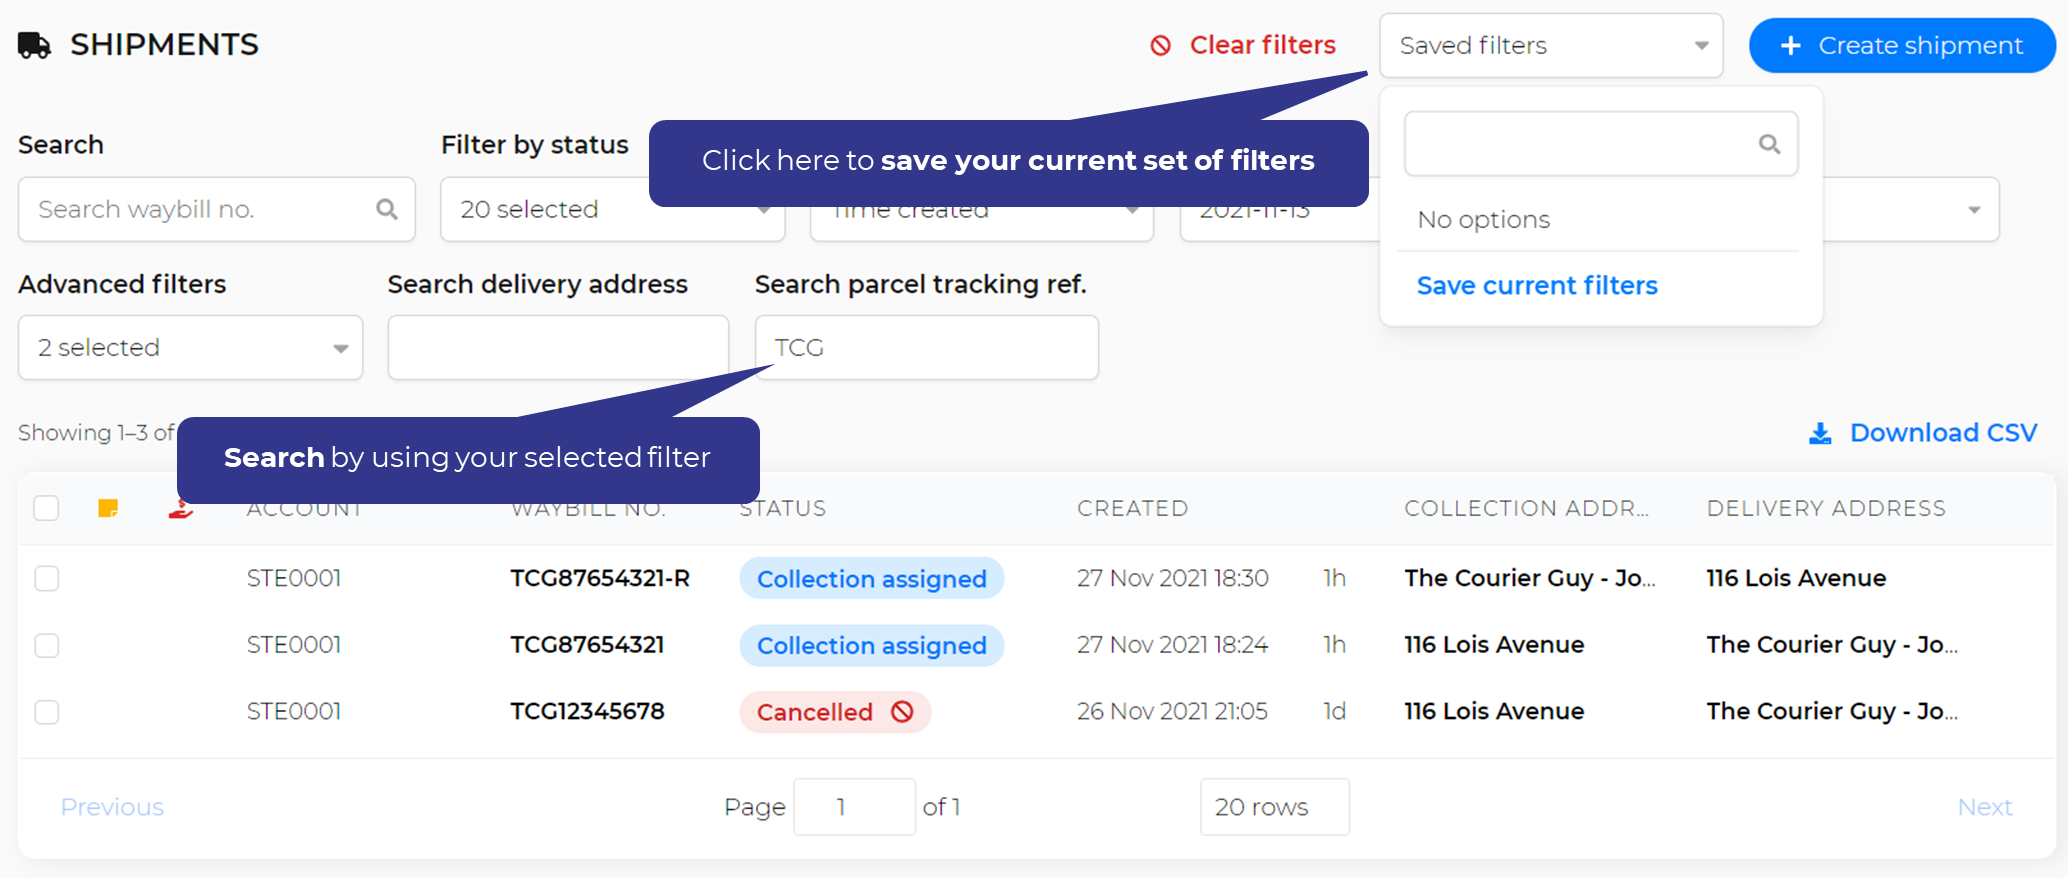
To start, go to your Search by reference bar in the top left-hand corner of the screen.
Type the relevant TCG reference number from your waybill and press enter.
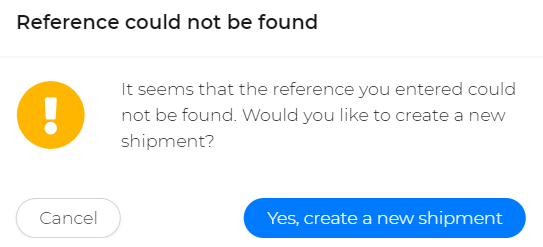
![]() When using the TCG reference from the paper waybill, please ensure that you type it out correctly.
When using the TCG reference from the paper waybill, please ensure that you type it out correctly.

Read the pop-up warning and click Yes, create new shipment.
This simply allows you to add an additional reference to the generated waybill – see it as a custom reference unique to your shipment and your business.
Use it to easily track your shipment throughout its journey.
![]() Custom references will be displayed on printed waybills
Custom references will be displayed on printed waybills


![]() In the meantime, while you still have TCG paper waybills, you can attach them to your parcel once your shipment has been made with the respective custom TCG reference.
In the meantime, while you still have TCG paper waybills, you can attach them to your parcel once your shipment has been made with the respective custom TCG reference.
![]() Complete your shipment info as accurate as possible and ensure that your address and parcel details are captured correctly
Complete your shipment info as accurate as possible and ensure that your address and parcel details are captured correctly
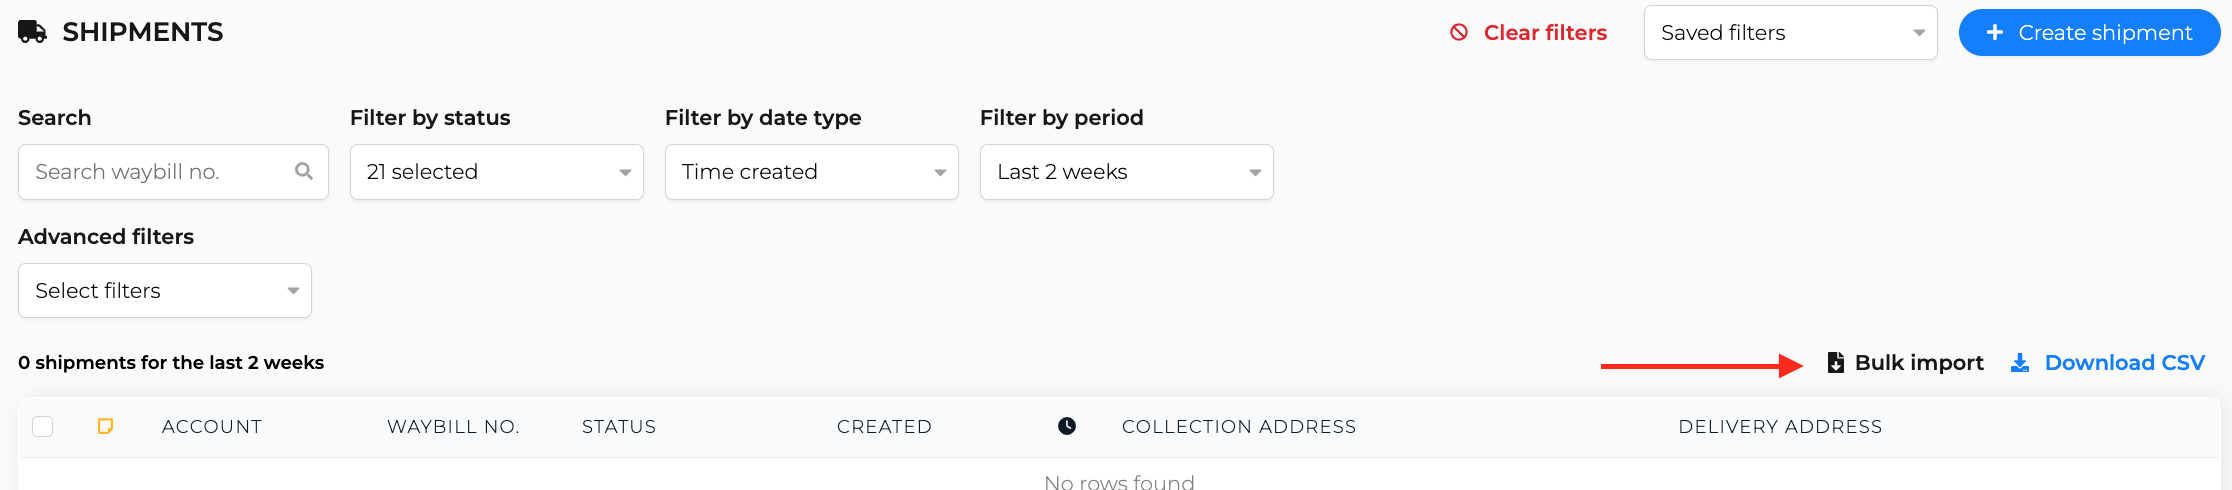
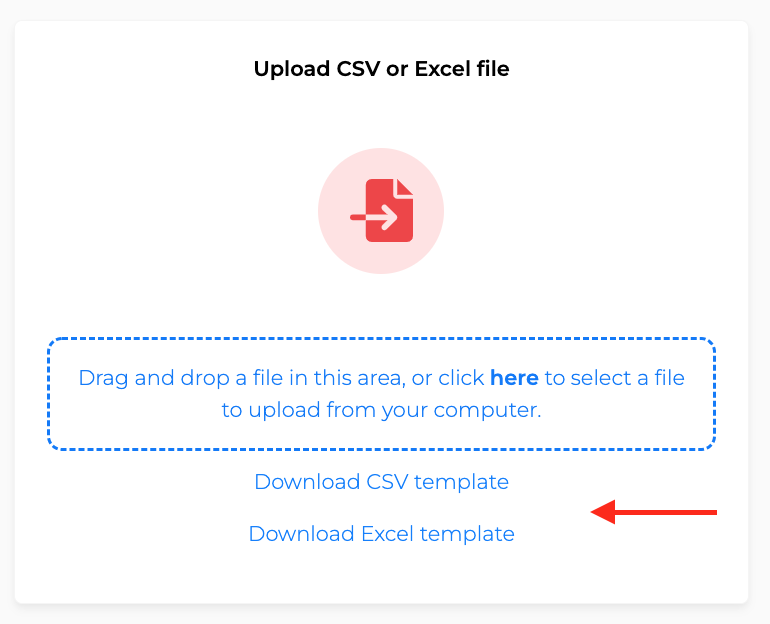
Download your templates here and upload them to your client portal
Drag and drop your file onto the bulk importer page or click in the upload block to open your files from your device.
![]() Shipments will be created automatically on the next page after you have uploaded your file
Shipments will be created automatically on the next page after you have uploaded your file
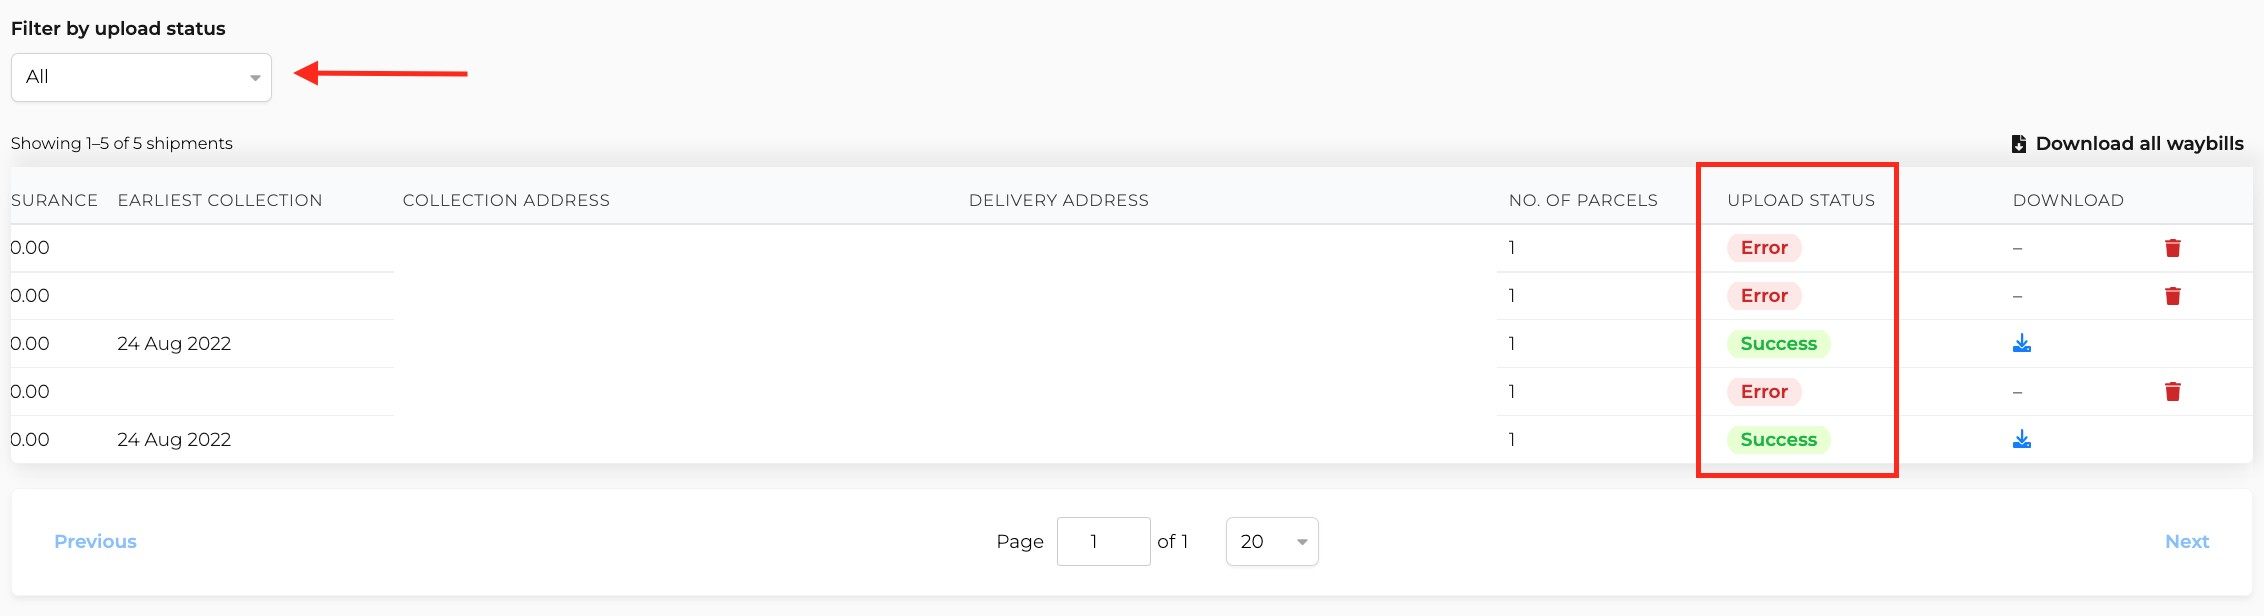

Last step will be to download all your waybills in bulk or individually once all your shipments are successfully imported.
![]() Note that you can remove shipments from the import list if you can’t fix the error
Note that you can remove shipments from the import list if you can’t fix the error
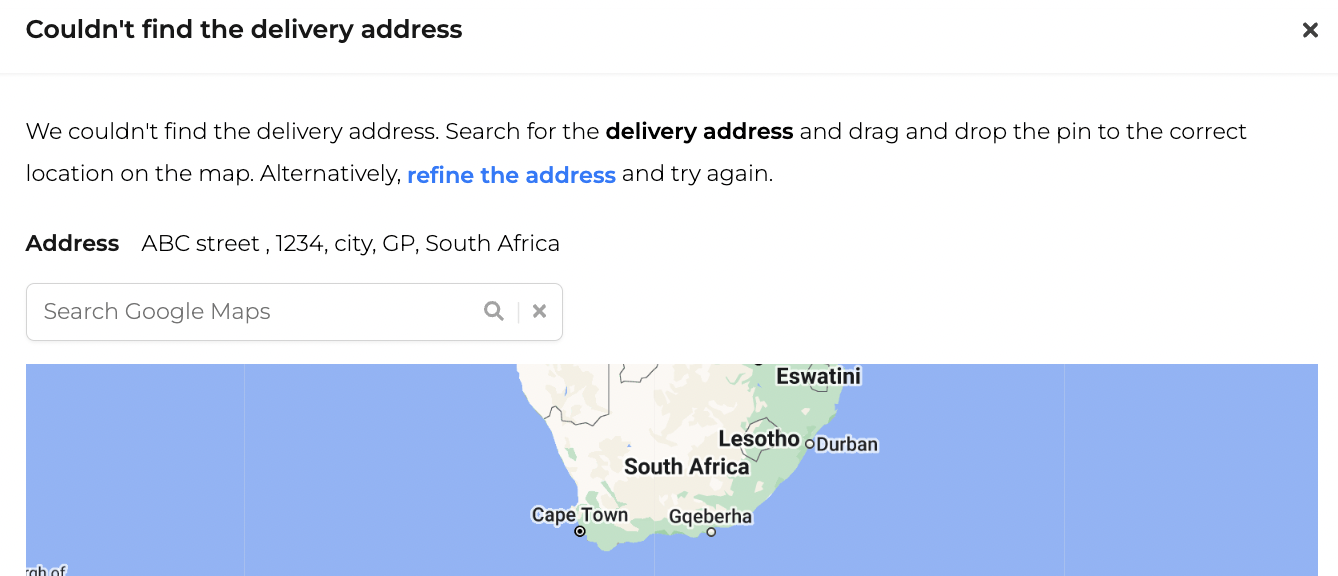
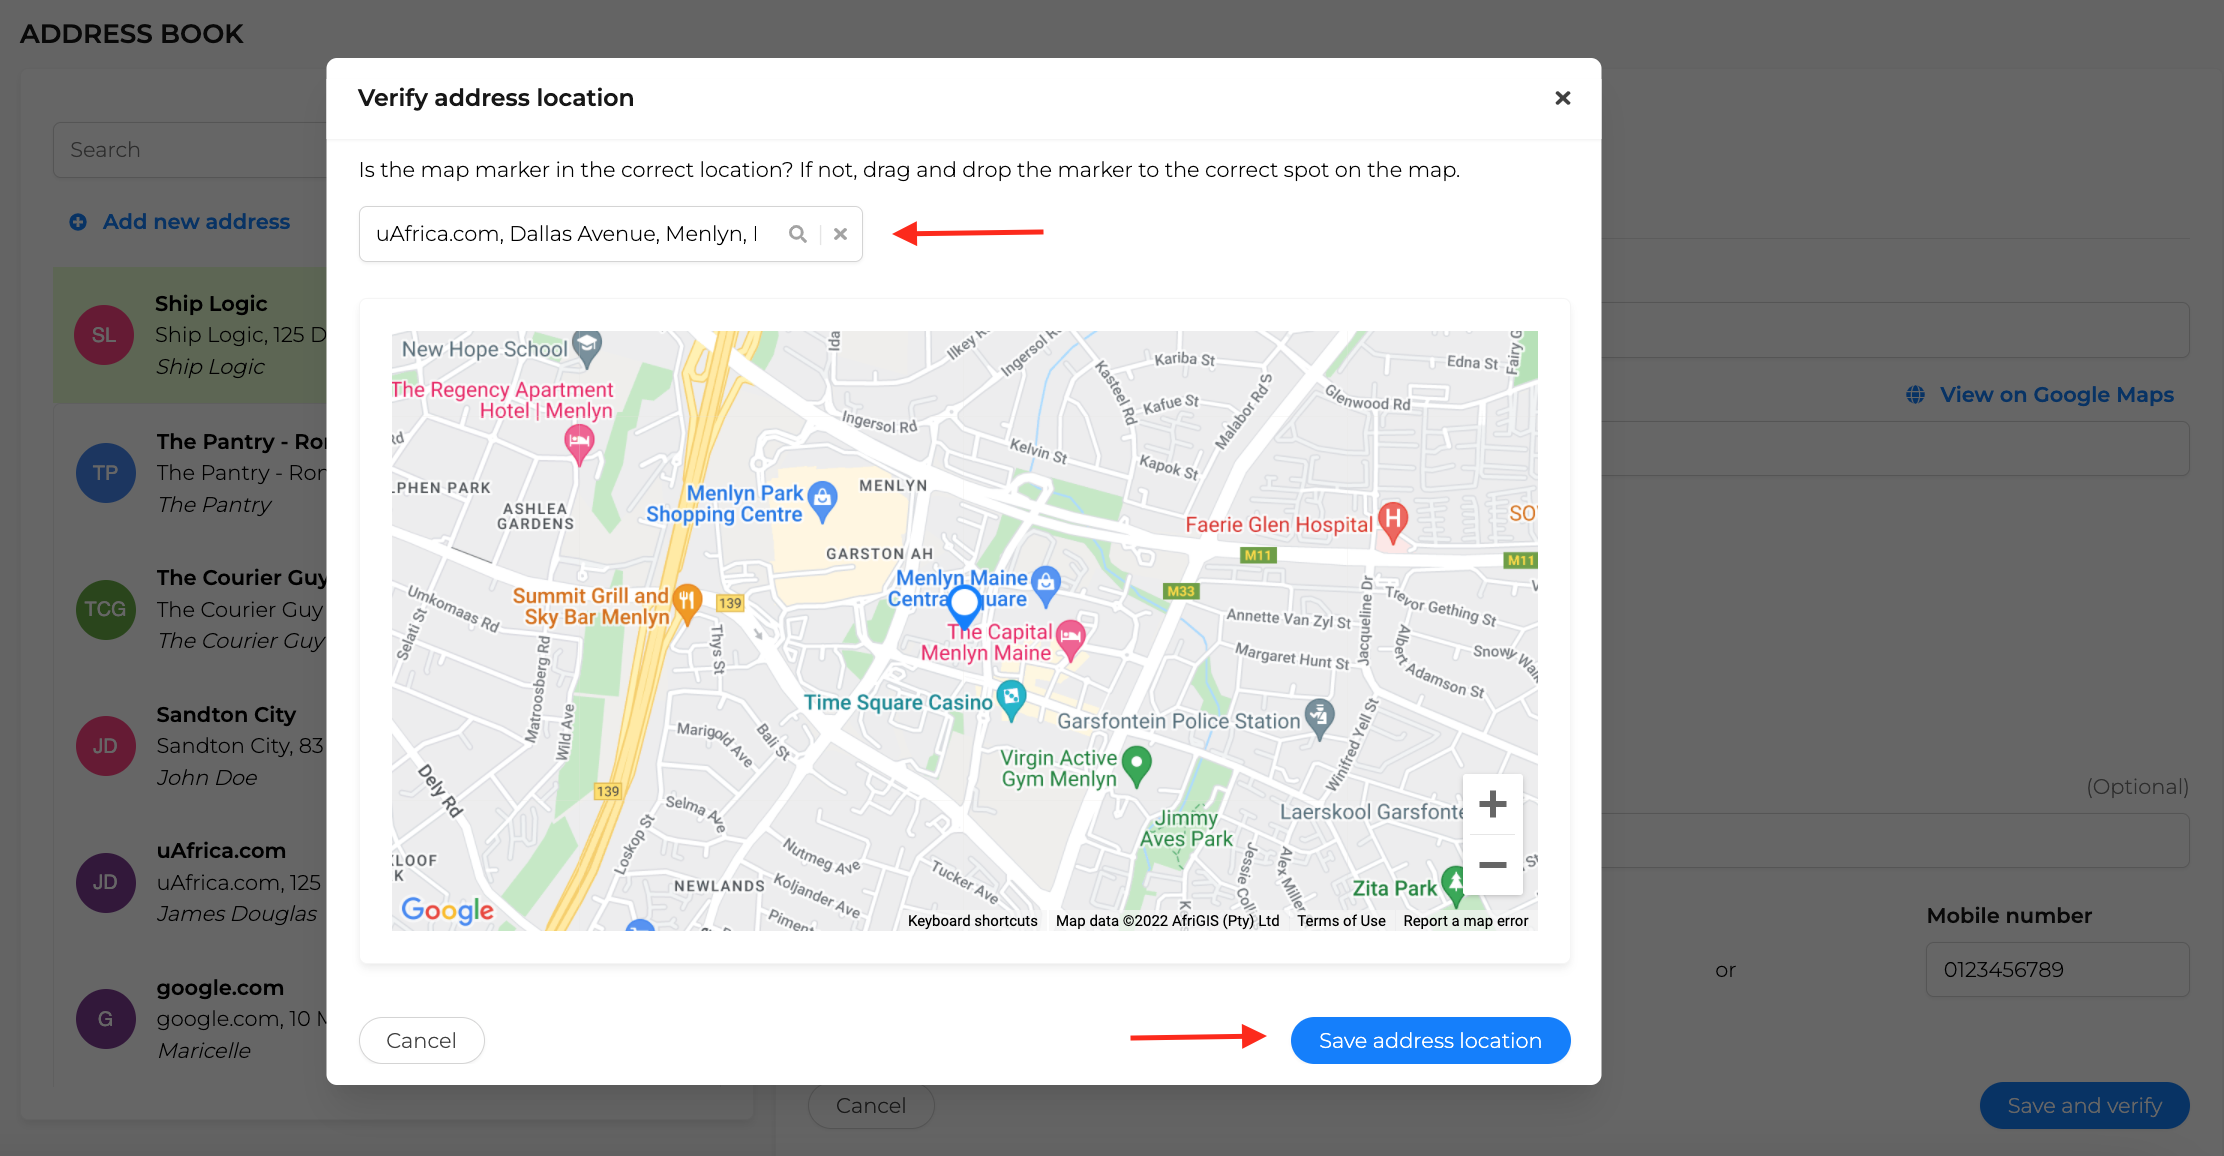
When creating a shipment and you cannot find the collection or delivery address.
A modal will pop up with your requested address and a Google Maps search option. You can use this page to search for your address using the search bar provided.
![]() Once your address is found and pinned on the map, use the Pin to drag and drop your address into the perfect spot. This will override the original address input and replace it with your newly pinned coordinates to ensure the driver knows where to go
Once your address is found and pinned on the map, use the Pin to drag and drop your address into the perfect spot. This will override the original address input and replace it with your newly pinned coordinates to ensure the driver knows where to go
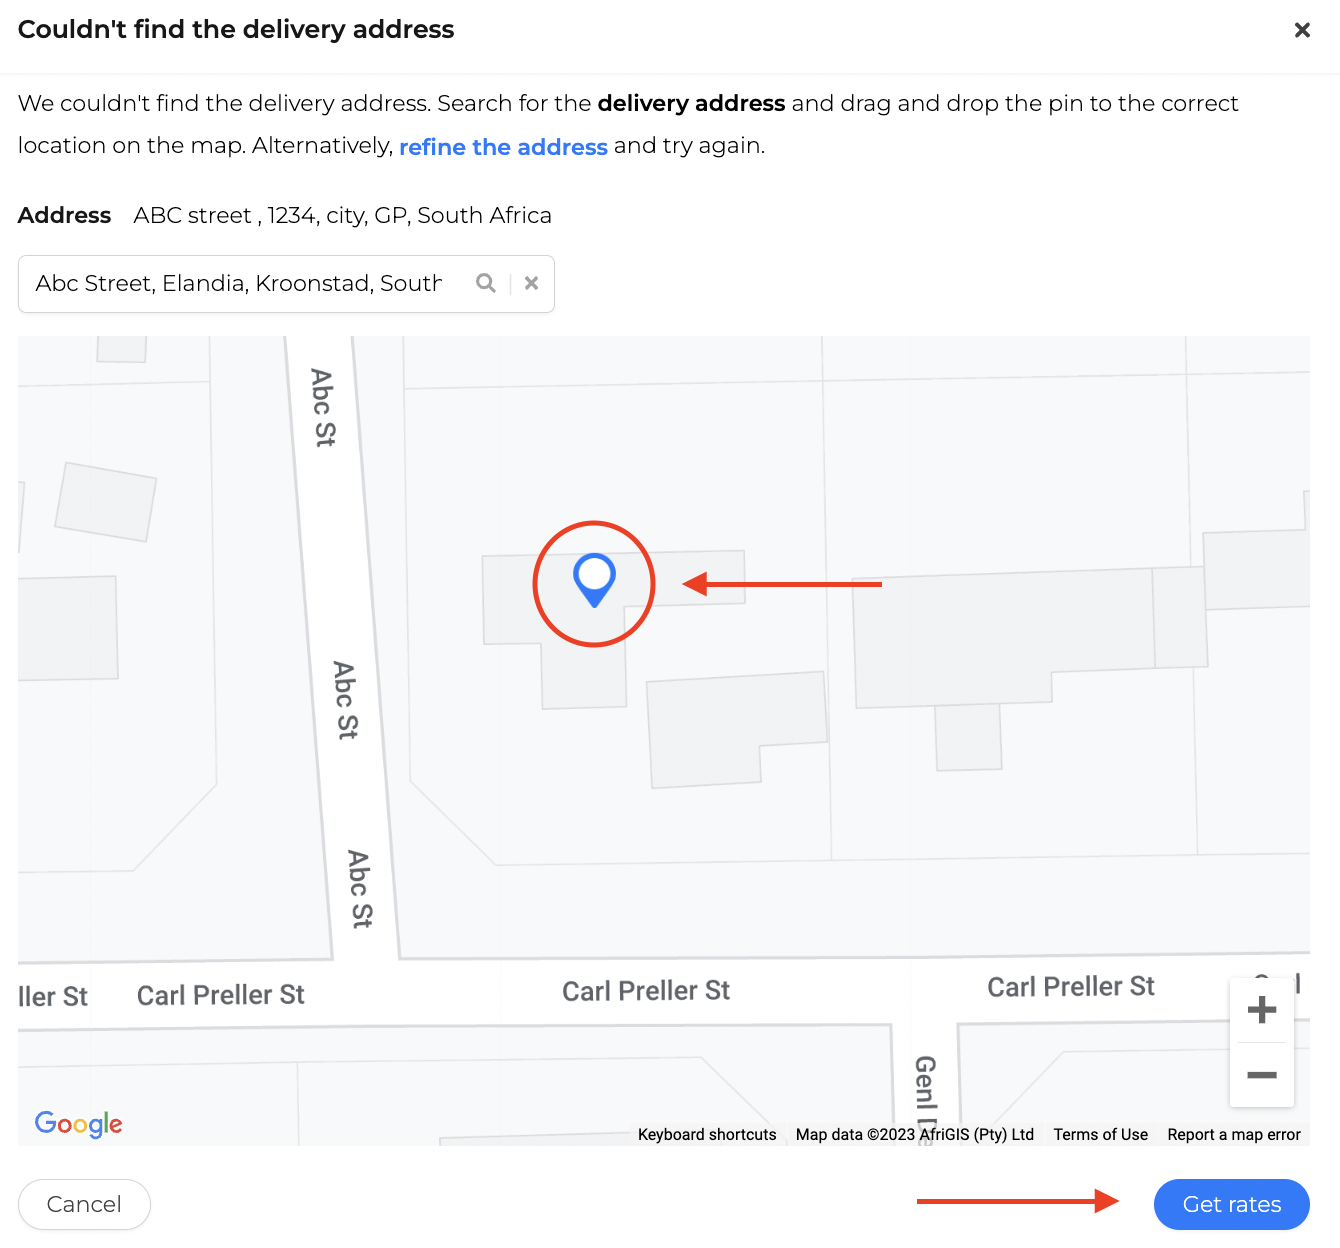
![]() Note that you might be able to refine your address by making sure you have filled in all the fields correctly and as accurately as possible. Google will always try and find you the best match based on the information you provide.
Note that you might be able to refine your address by making sure you have filled in all the fields correctly and as accurately as possible. Google will always try and find you the best match based on the information you provide.

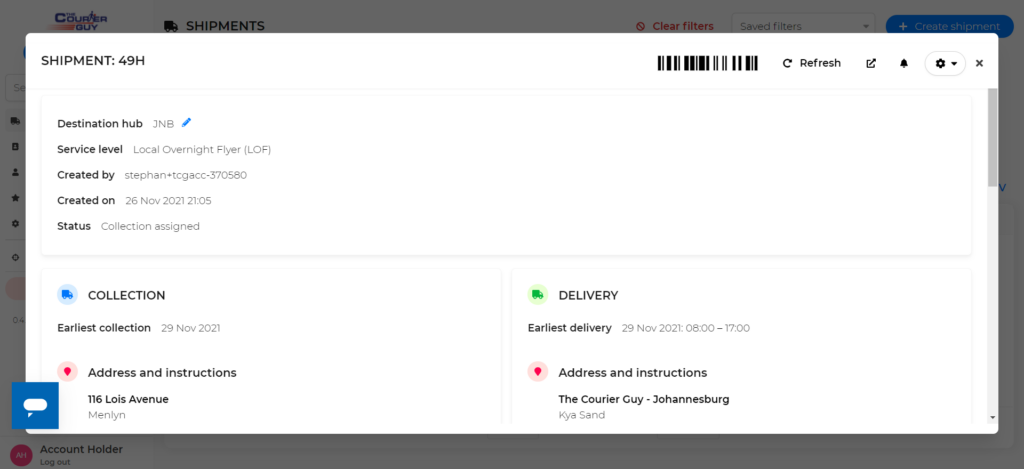
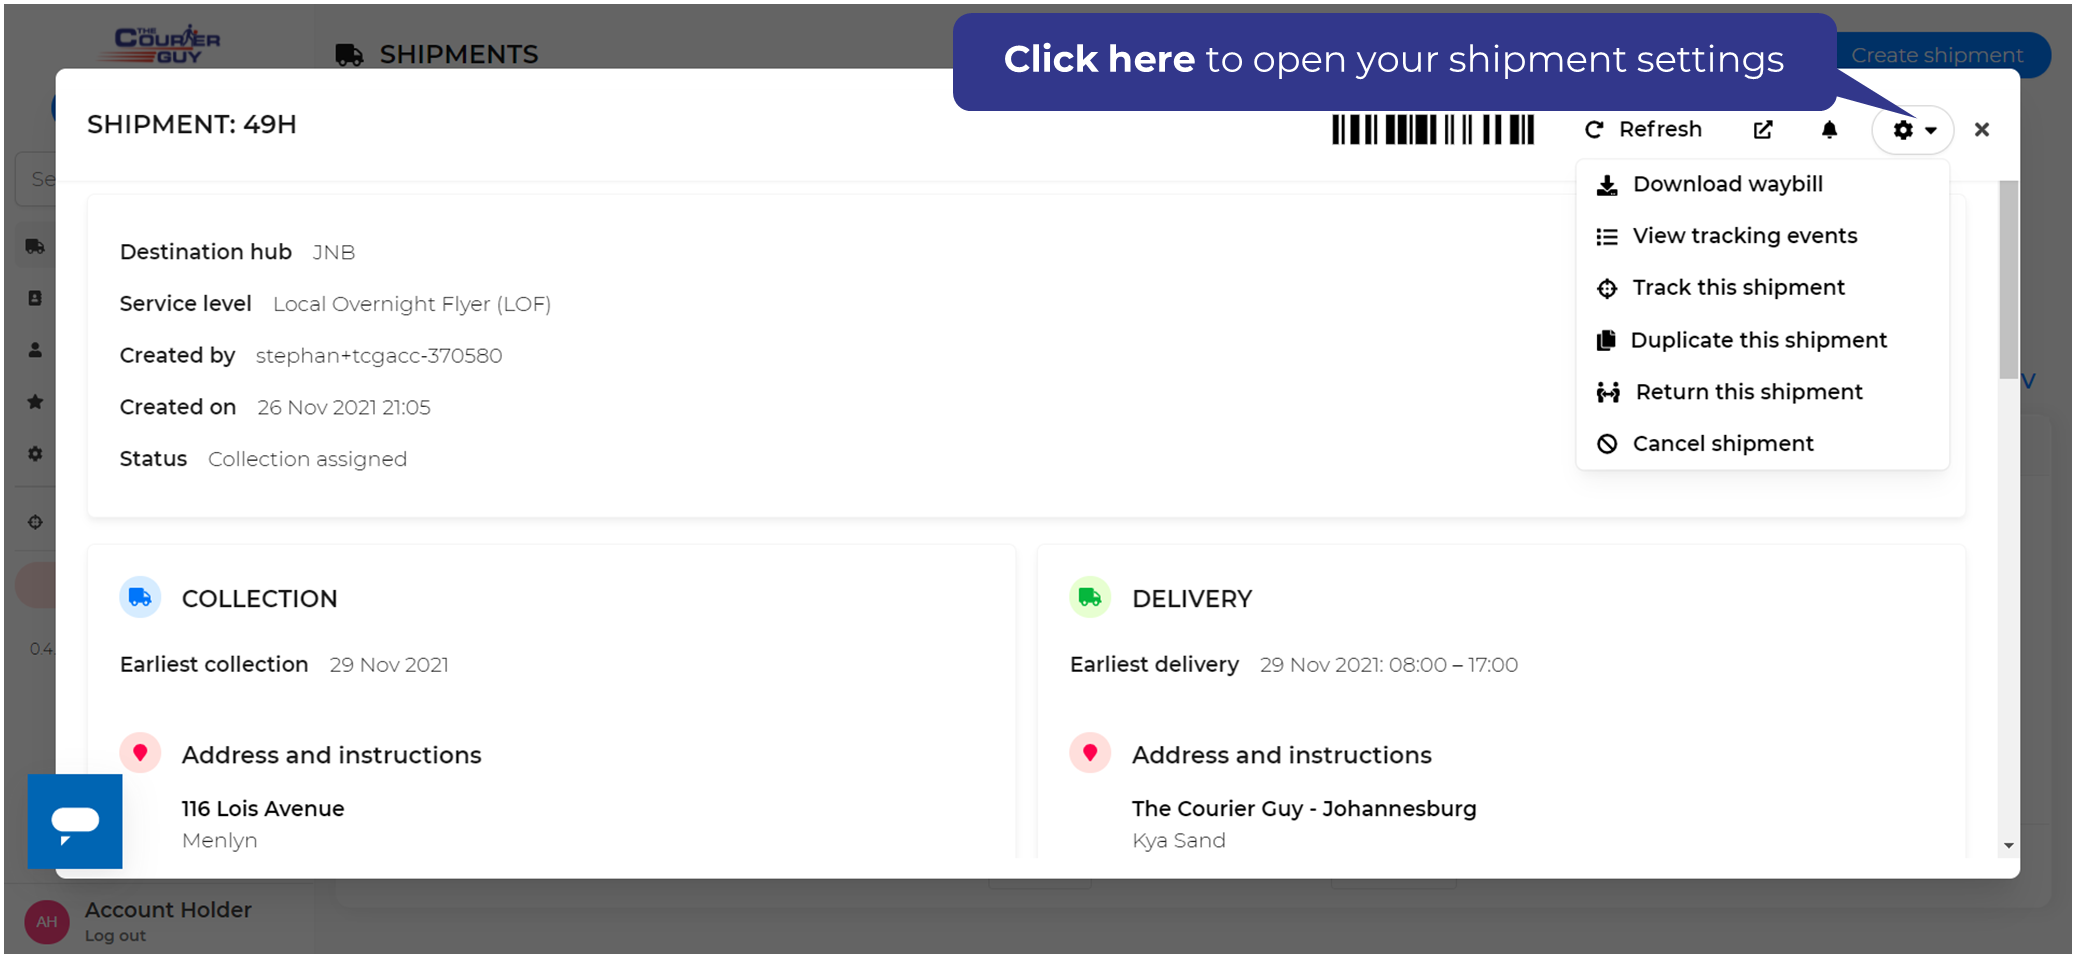
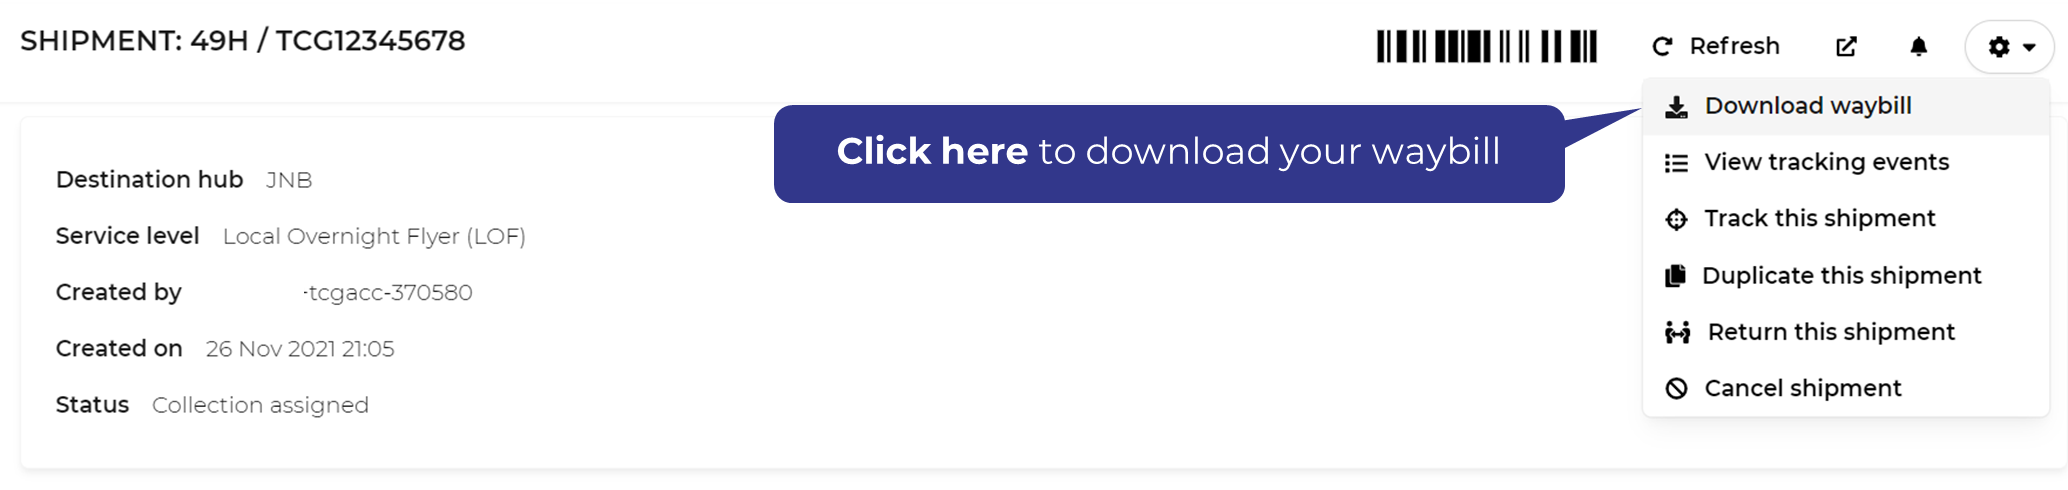
Open your shipment settings by clicking on the gear icon ![]() to access more features.
to access more features.
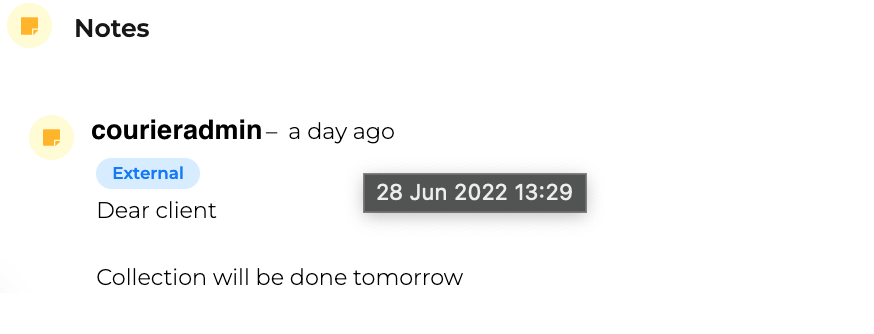
![]() Please Note: There is a possibility that these notes have been sent to you via email. You can contact the courier for more information if you did not receive these note updates.
Please Note: There is a possibility that these notes have been sent to you via email. You can contact the courier for more information if you did not receive these note updates.

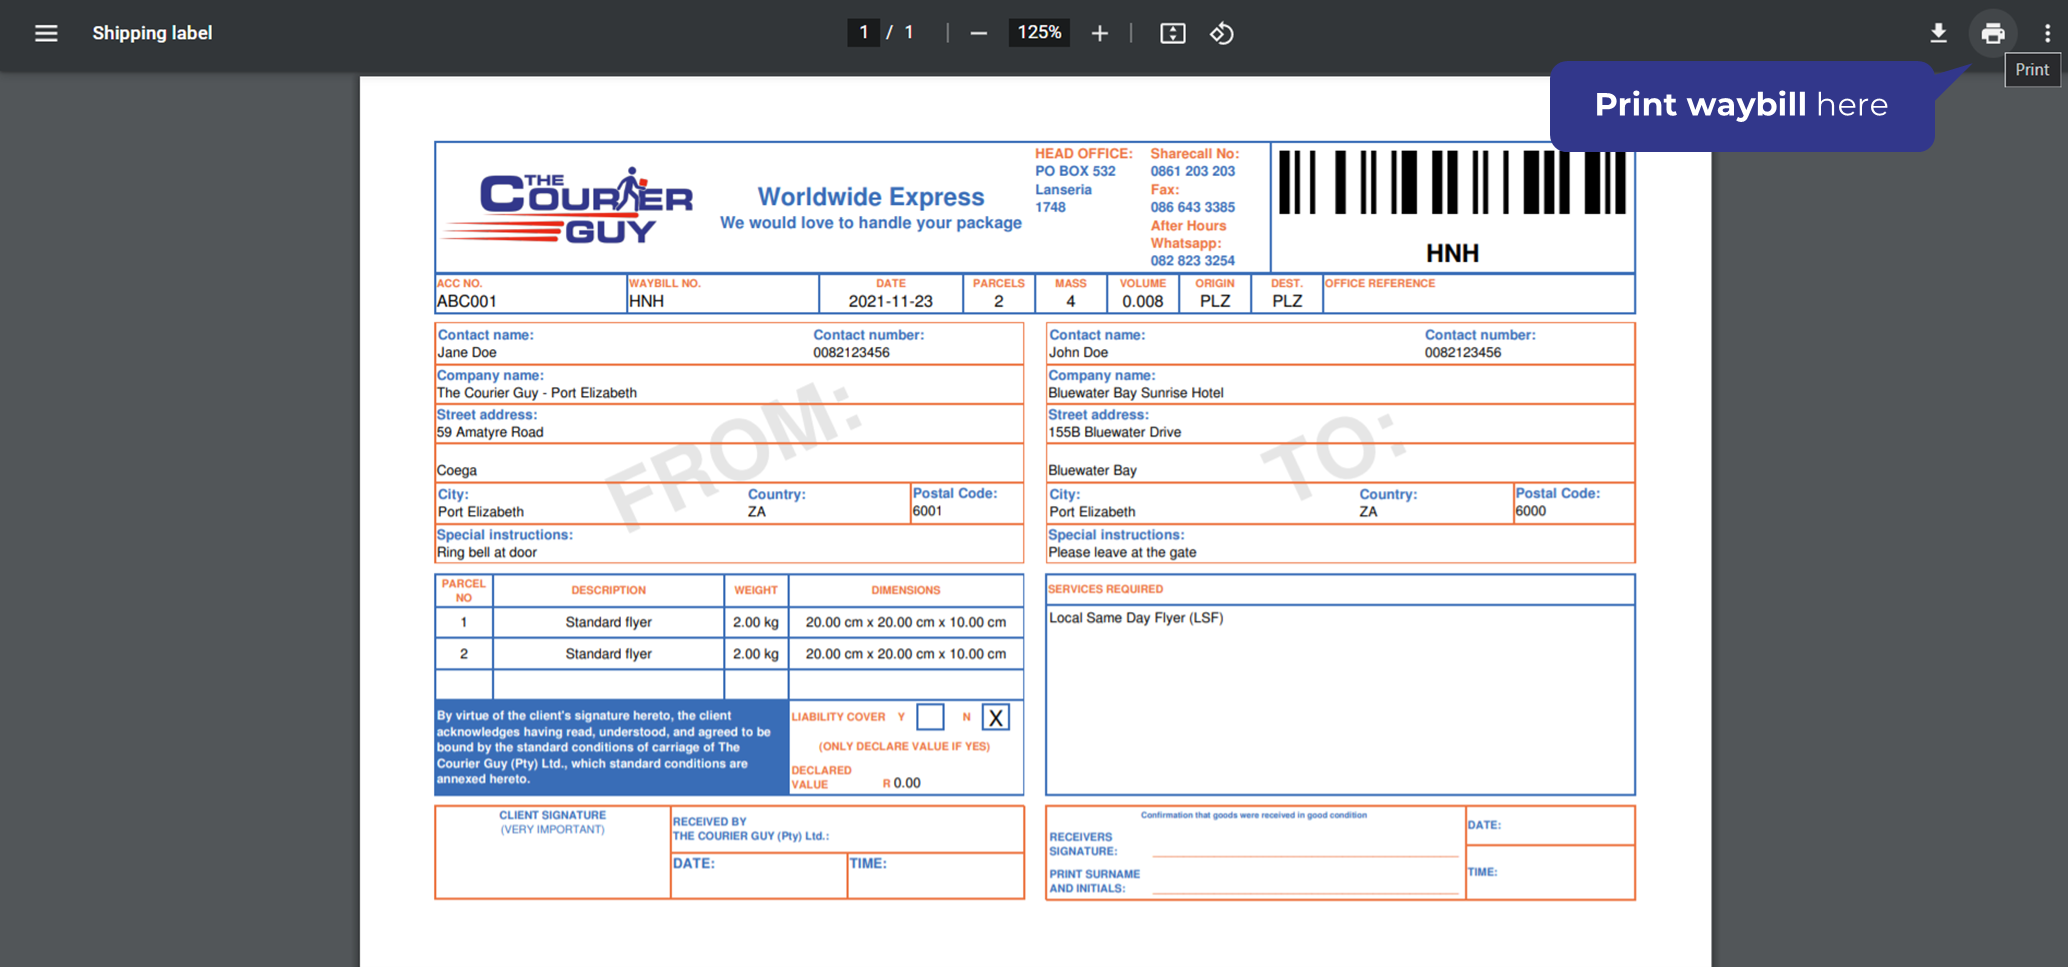
By clicking on the gear icon ![]() in the top right corner, you can open settings and then click on Download Waybill.
in the top right corner, you can open settings and then click on Download Waybill.
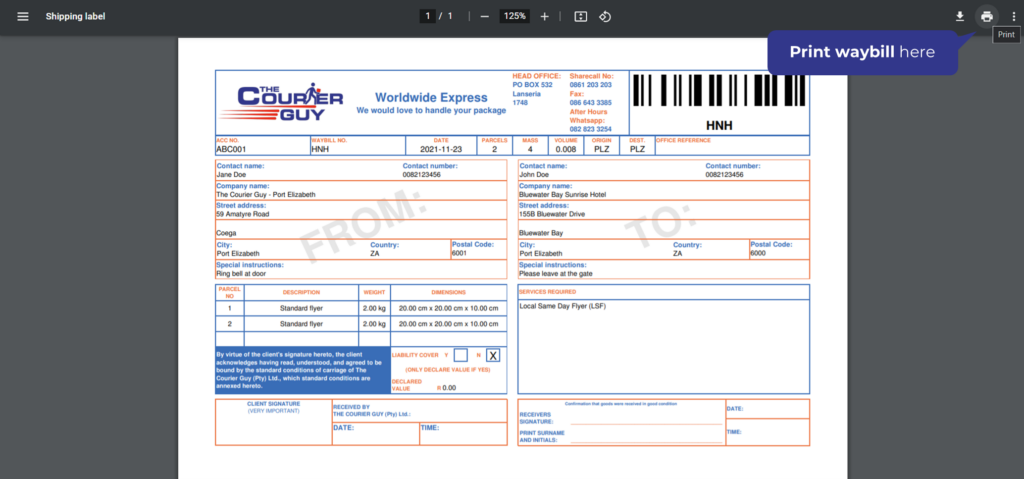
![]() You can Print the waybill once it has been downloaded.
You can Print the waybill once it has been downloaded.
![]() Allow any pop-up warning that you might get once and then redownload the waybill
Allow any pop-up warning that you might get once and then redownload the waybill
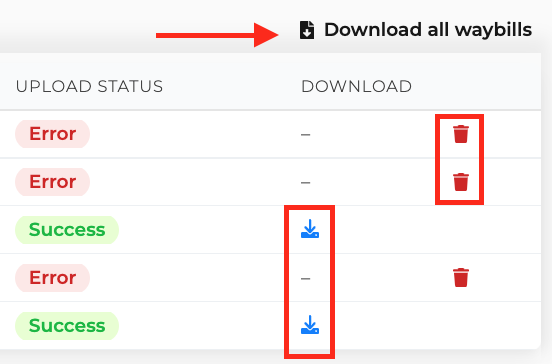
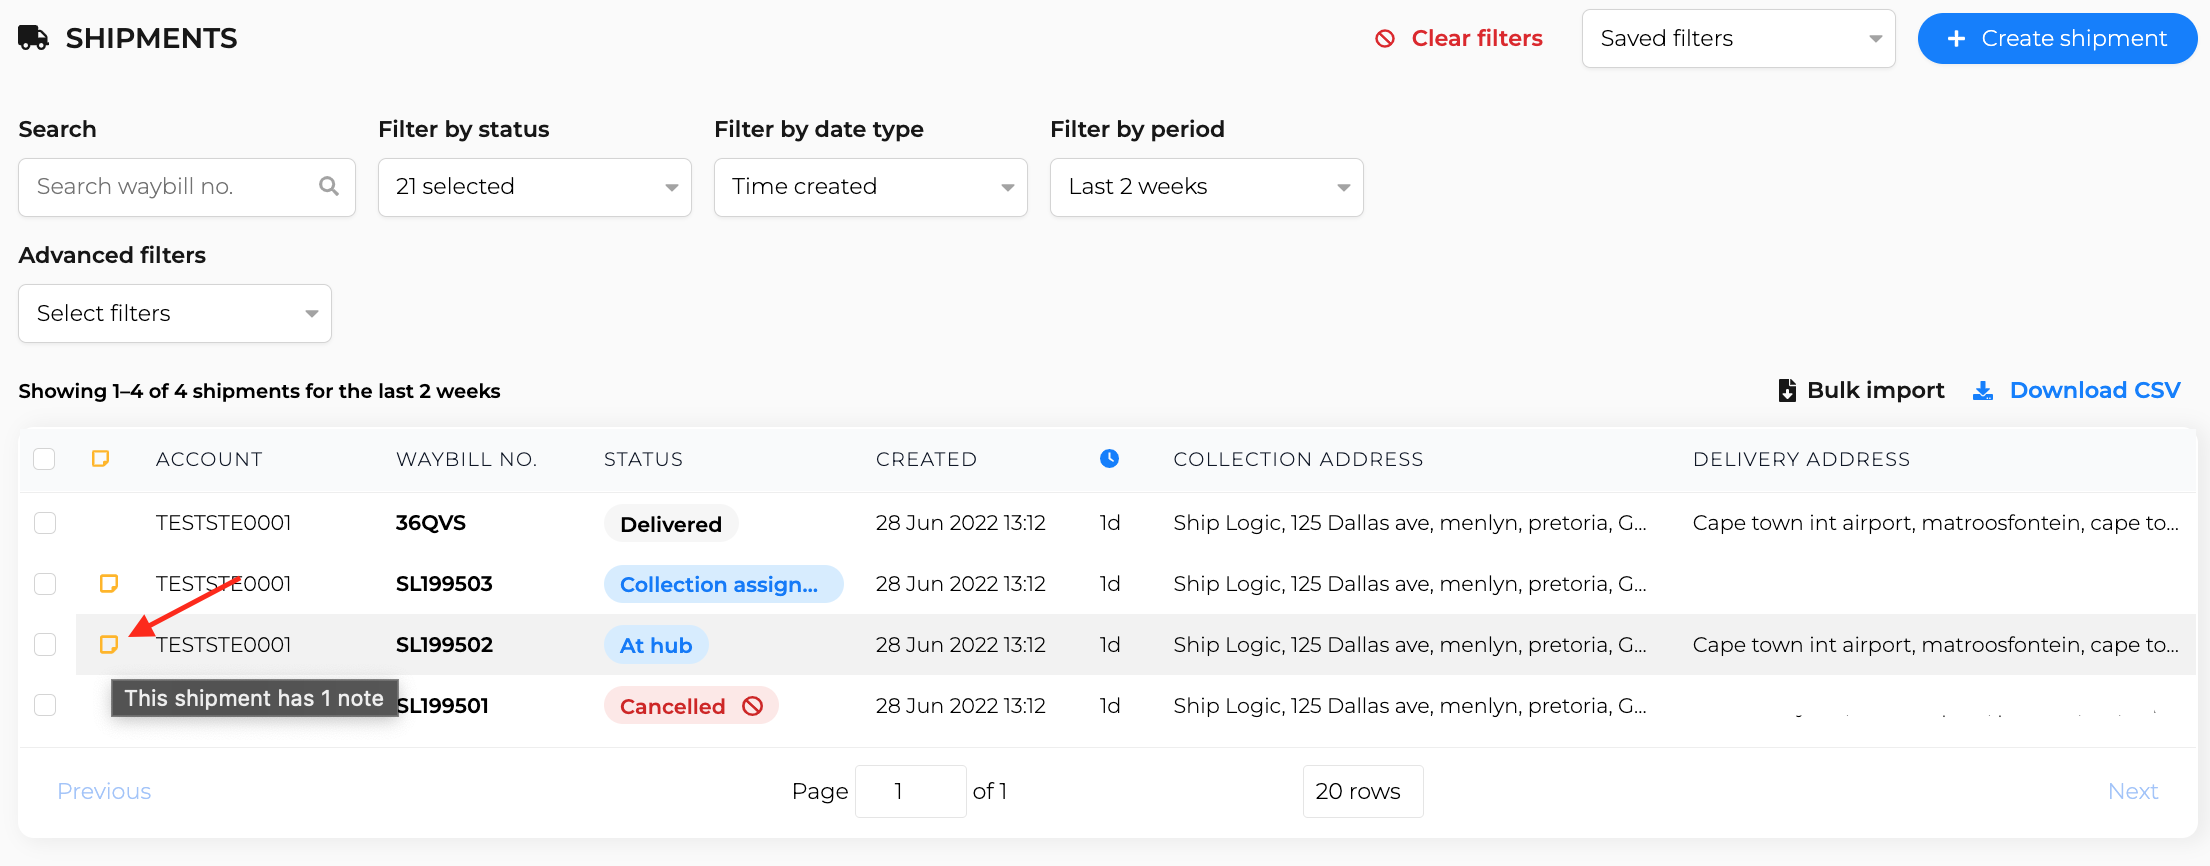
![]() If you need to download and print waybills from multiple shipments.
If you need to download and print waybills from multiple shipments.

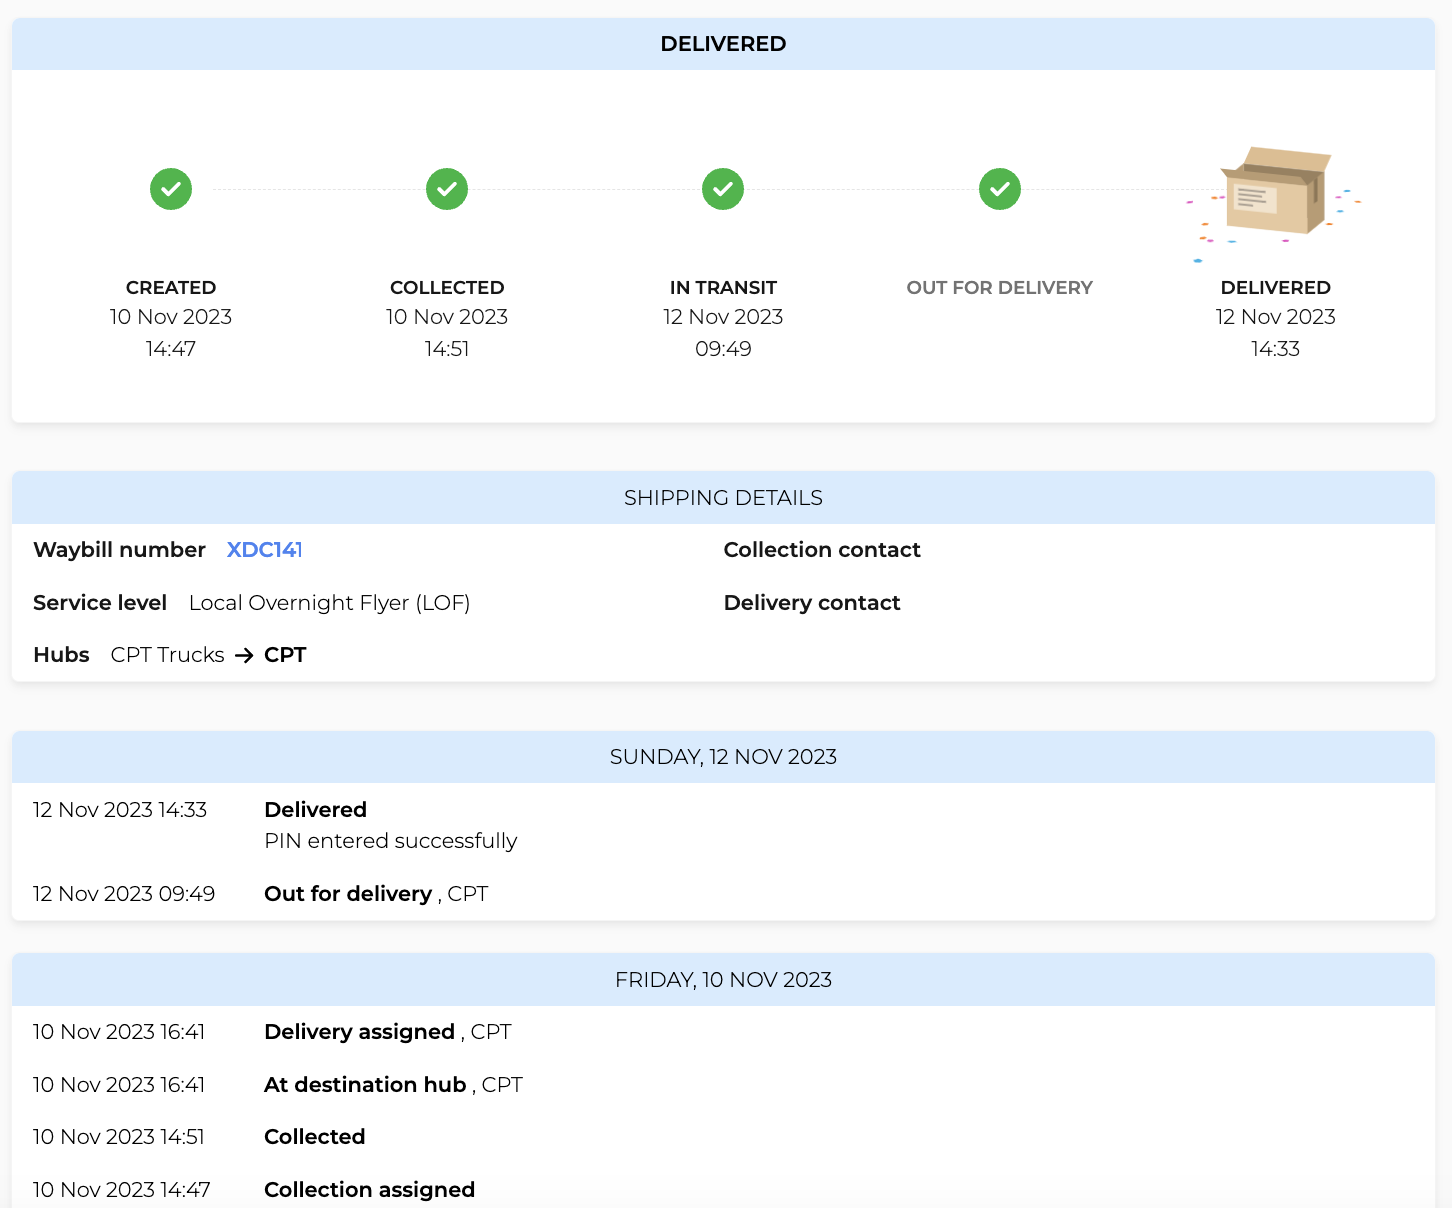
Select the relevant waybill and open to view the shipment details.
- Open the gear icon
 in the top right corner of the screen.
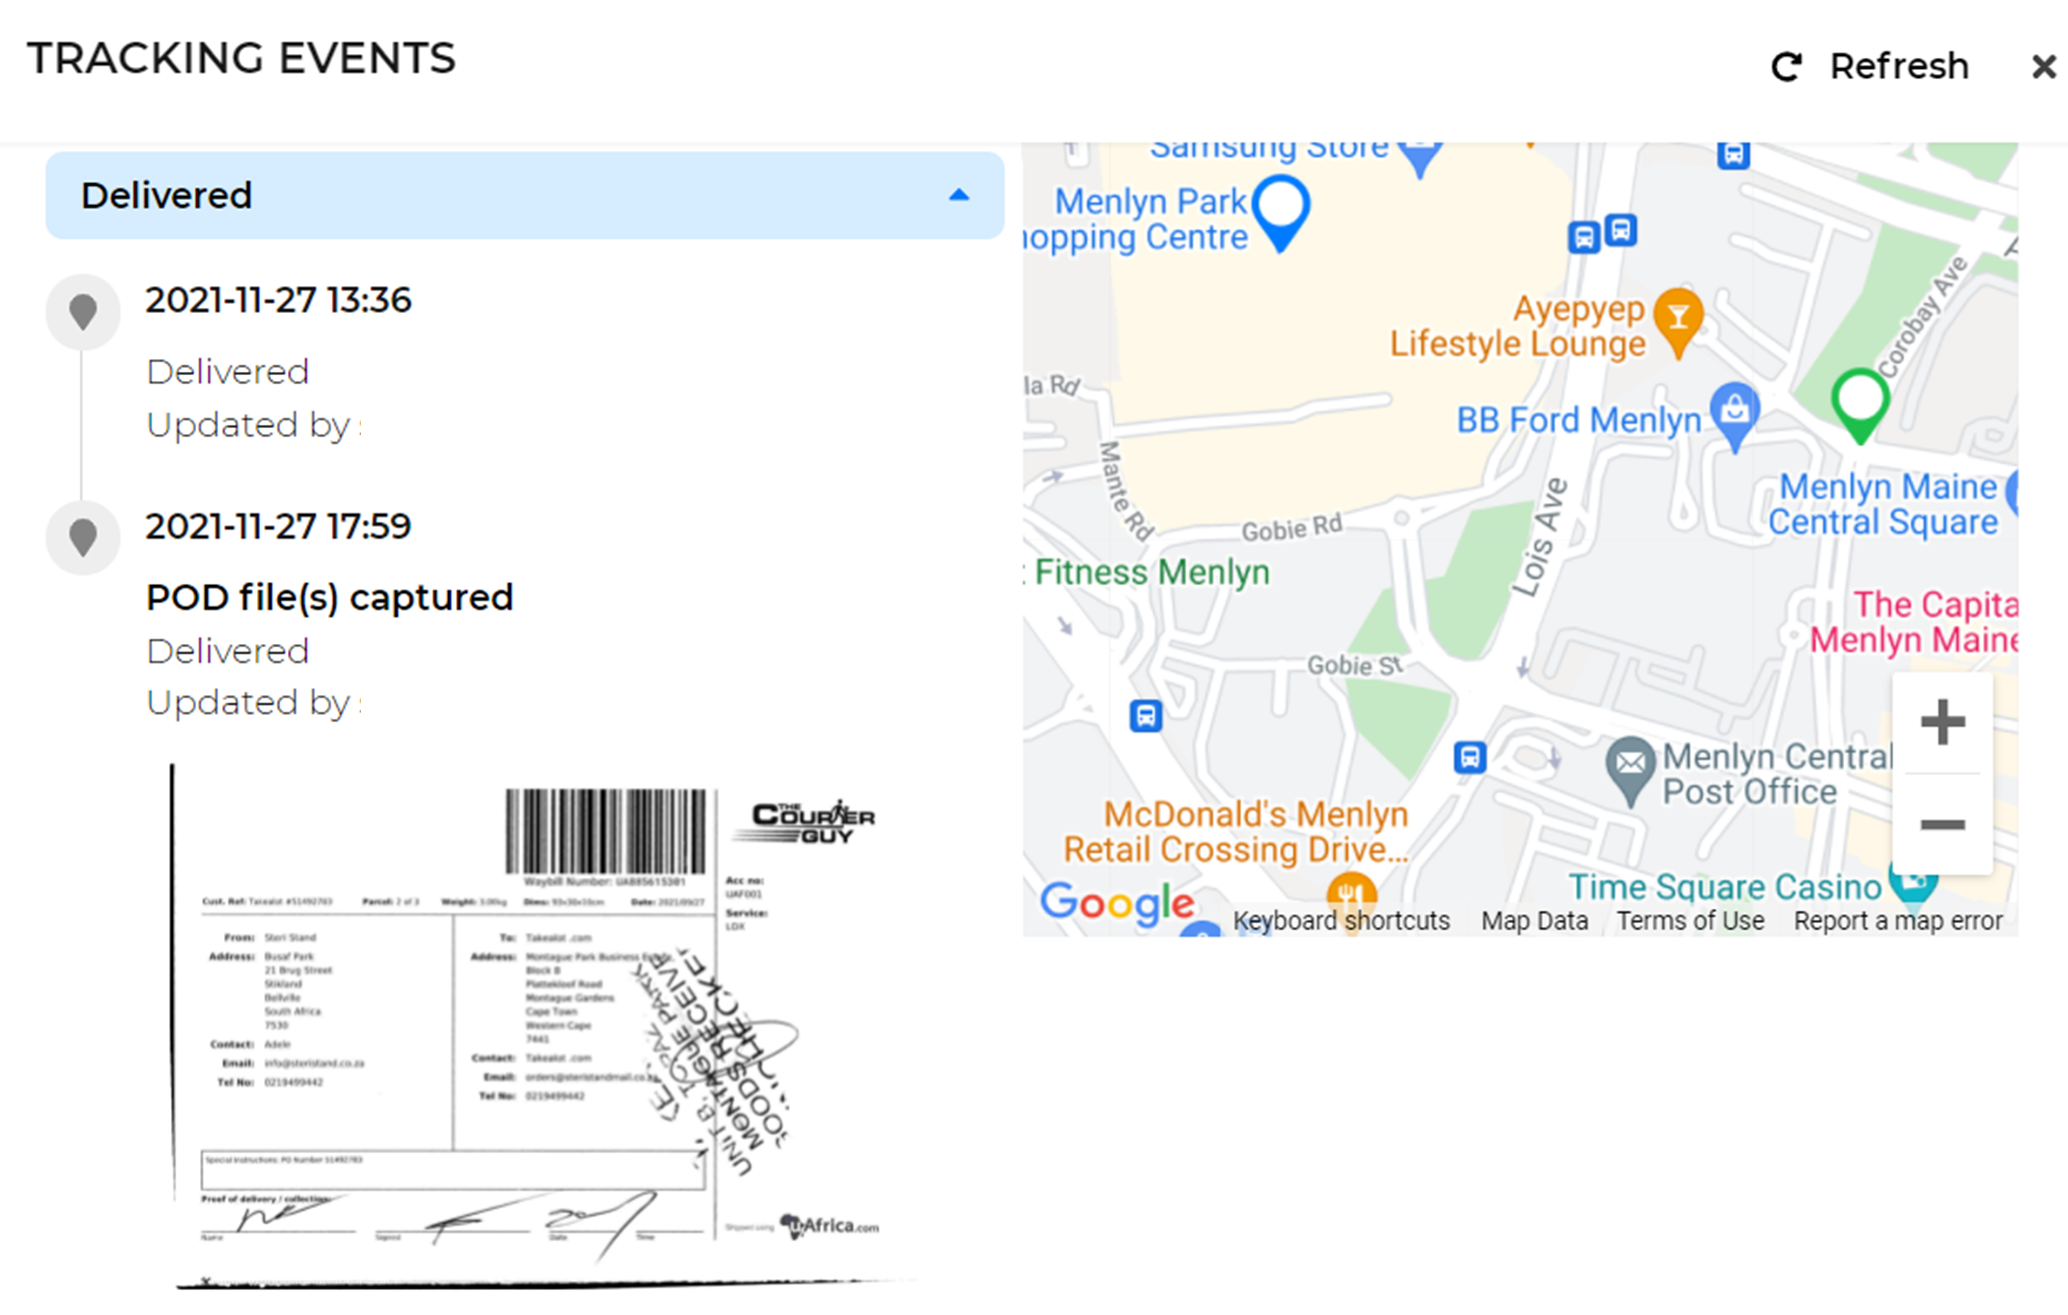
 - Click on View tracking events.
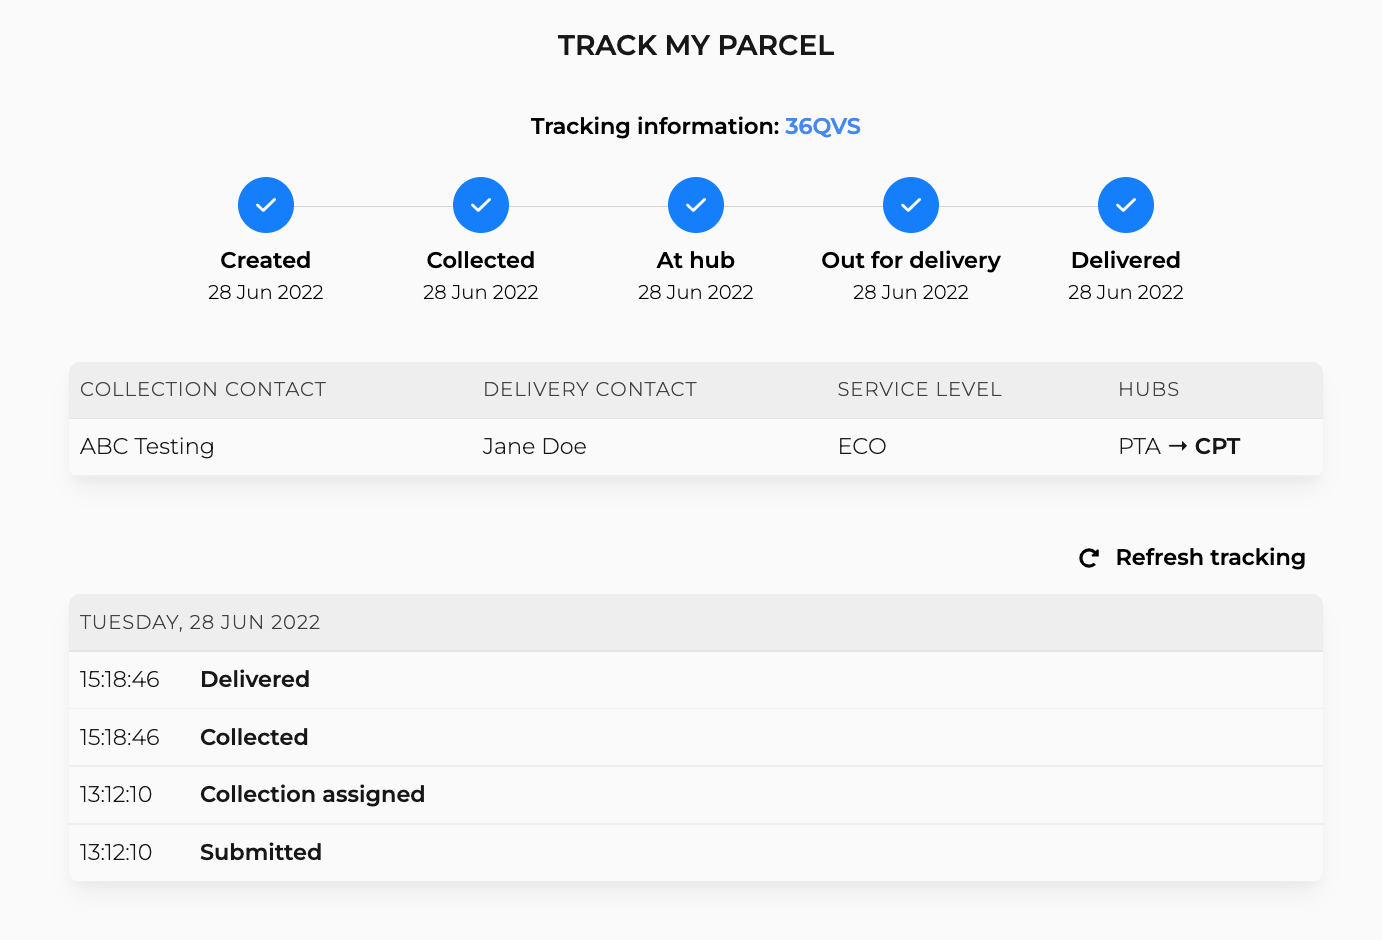
Switch between shipment and parcel tracking by clicking on the different tabs.
![]() POD images and digital signatures will be visible and can be downloaded directly from the tracking page.
POD images and digital signatures will be visible and can be downloaded directly from the tracking page.
![]() PODs will be sent to you as attachments via your delivery email.
PODs will be sent to you as attachments via your delivery email.

Select the relevant waybill and open to view the shipment details.
- Open the gear icon in the top right corner of the screen and click on View tracking events.
- Scroll down to the delivered tracking event and click to download the digital POD
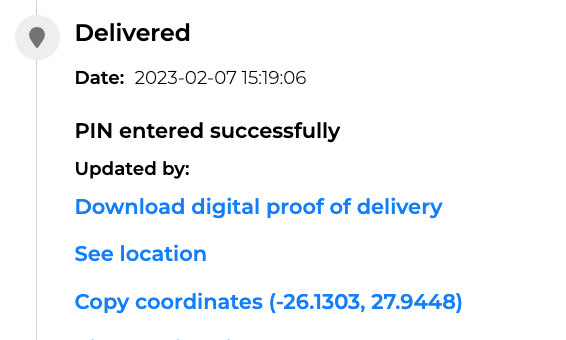
![]() Please note that a digital POD will only be available once the shipment has been delivered by a driver
Please note that a digital POD will only be available once the shipment has been delivered by a driver
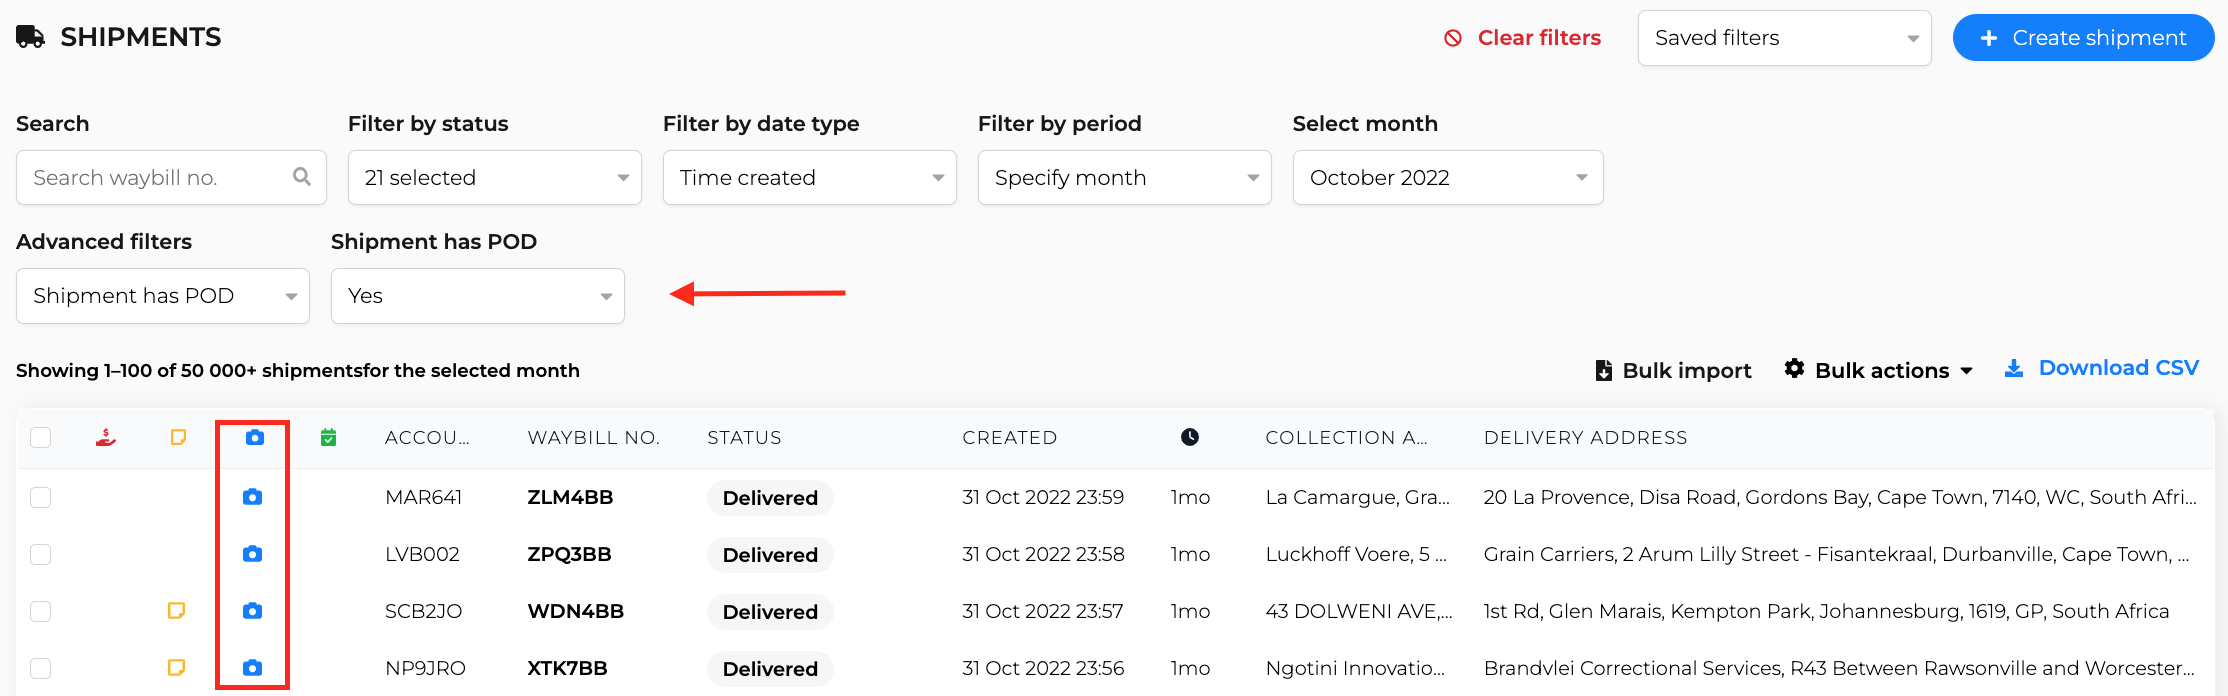
![]() Open a shipment and go to the tracking events to view and download the attached POD.
Open a shipment and go to the tracking events to view and download the attached POD.
Select the relevant waybill and open to view the shipment details.
- Open the gear icon in the top right corner of the screen.
- Click on View communication log.
All communication sent out regarding this shipment will be saved in the communication logs.
![]() Communication logs are proof that emails and/or SMSes went out successfully
Communication logs are proof that emails and/or SMSes went out successfully
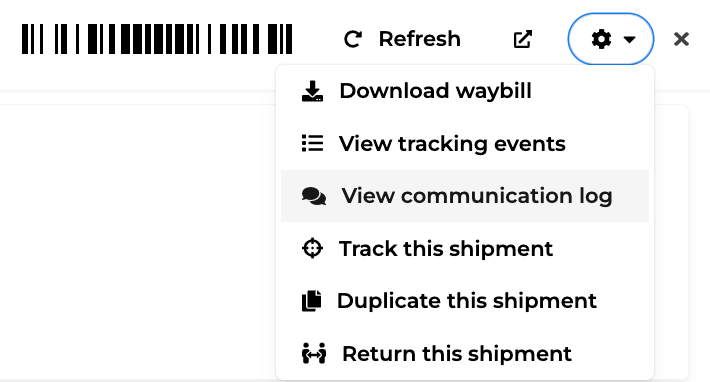
Select the relevant waybill and open to view the shipment details.
- Open the gear icon in the top right corner of the screen.
- Click on Duplicate shipment.
- Create a new shipment with the same shipping details

Select the relevant waybill and open to view the shipment details.
- Open the gear icon in the top right corner of the screen.
- Click on Return this shipment.
- A new shipment is created where the collection and delivery details are swapped, ready to be returned to the sender.
- Note the new waybill number assigned to the returned shipment.
![]() Note the new waybill number assigned to the returned shipment.
Note the new waybill number assigned to the returned shipment.


Go to Shipment settings by clicking on the gear icon ![]() and then Click on Cancel shipment.
and then Click on Cancel shipment.
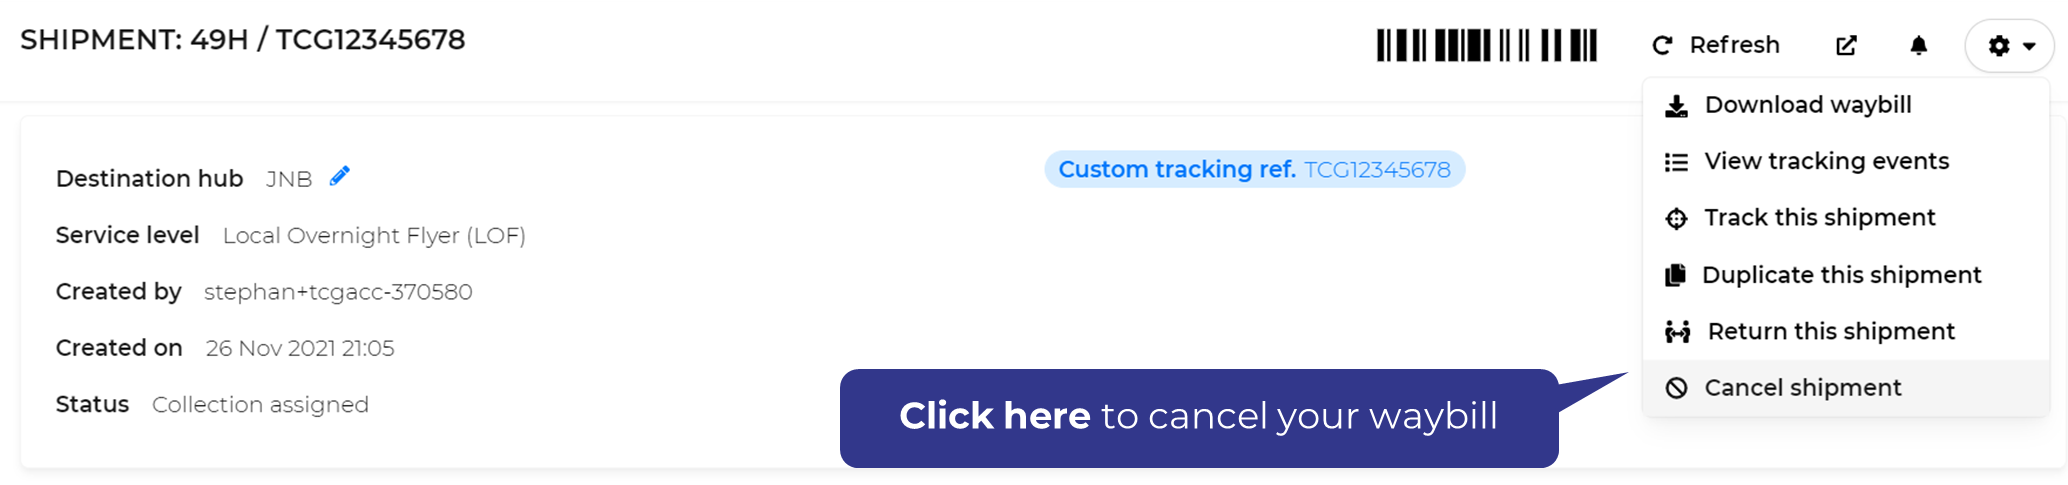


![]() If you need to cancel multiple shipments at a time
If you need to cancel multiple shipments at a time

![]() Note that you can only cancel uncollected shipments. This action will reverse the shipping charges on the selected shipments
Note that you can only cancel uncollected shipments. This action will reverse the shipping charges on the selected shipments


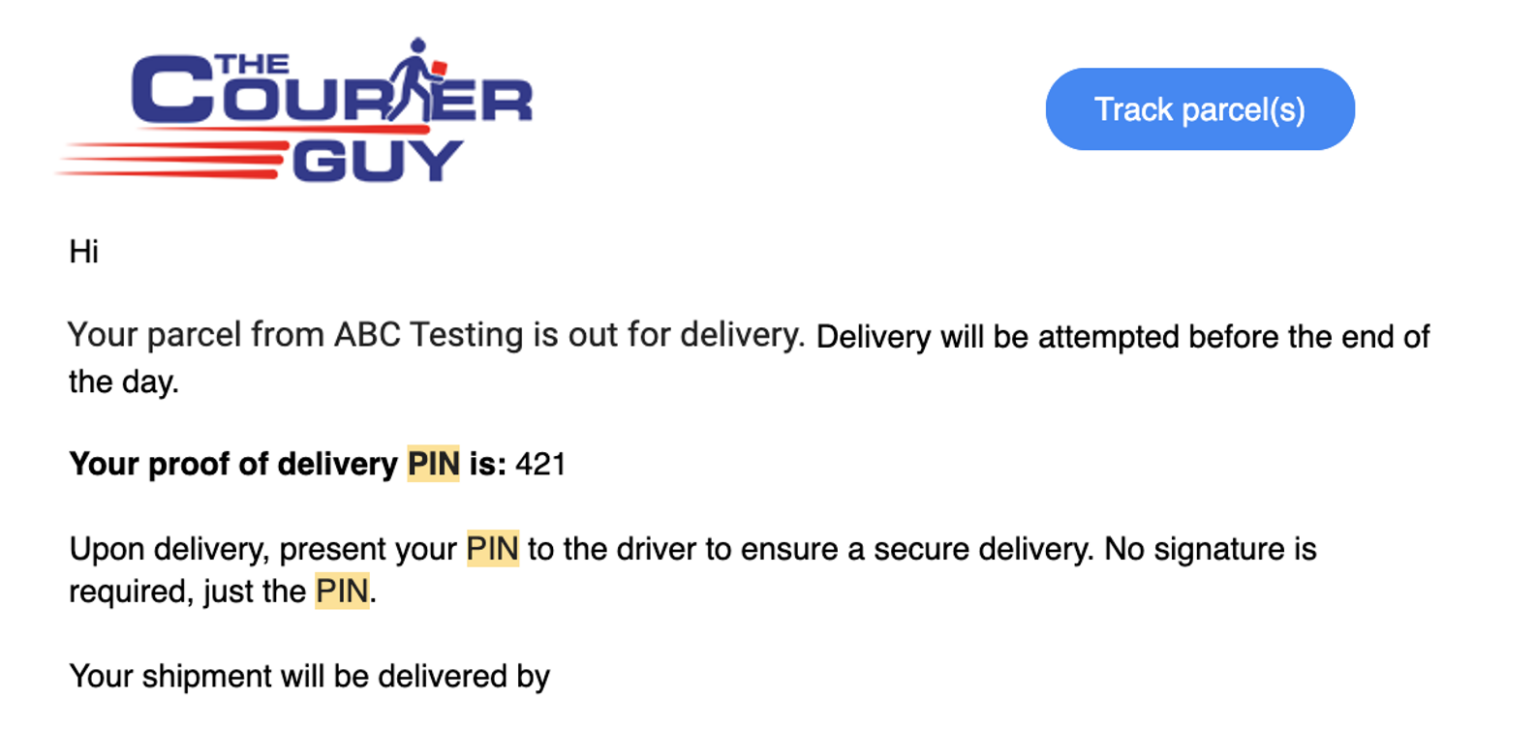
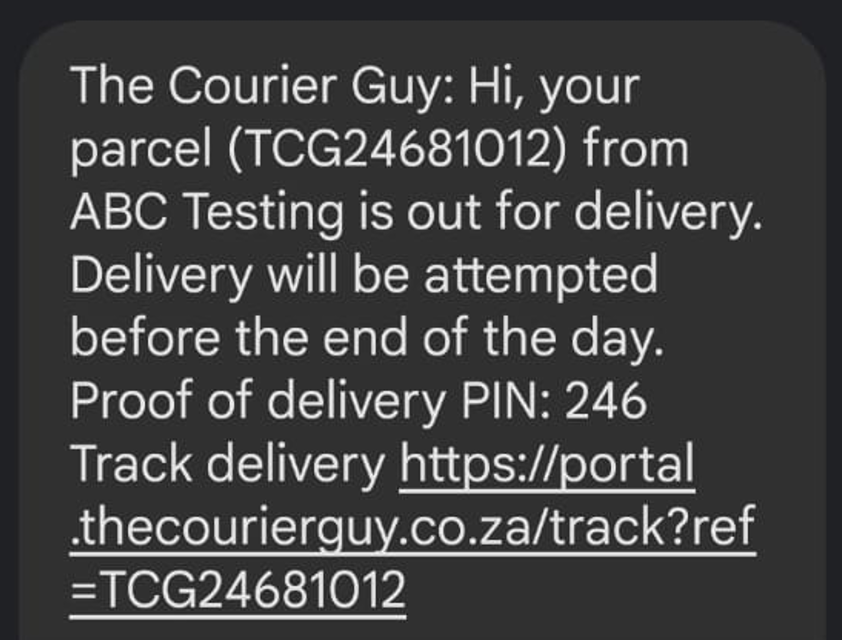
![]() This unique OTP pin cannot be accessed or viewed by the Courier or anyone else, ONLY by the receiver of your parcel.
This unique OTP pin cannot be accessed or viewed by the Courier or anyone else, ONLY by the receiver of your parcel.
The courier driver will have the option to resend the pin should your receiver not have the pin.
This pin will act as proof of delivery, no signature required. Using the pin is a safer way to confirm delivery for both your receiver and the courier.
![]() The courier driver will require the OTP pin at first but will also have other options for delivery should your receiver not have the pin for any reason.
The courier driver will require the OTP pin at first but will also have other options for delivery should your receiver not have the pin for any reason.

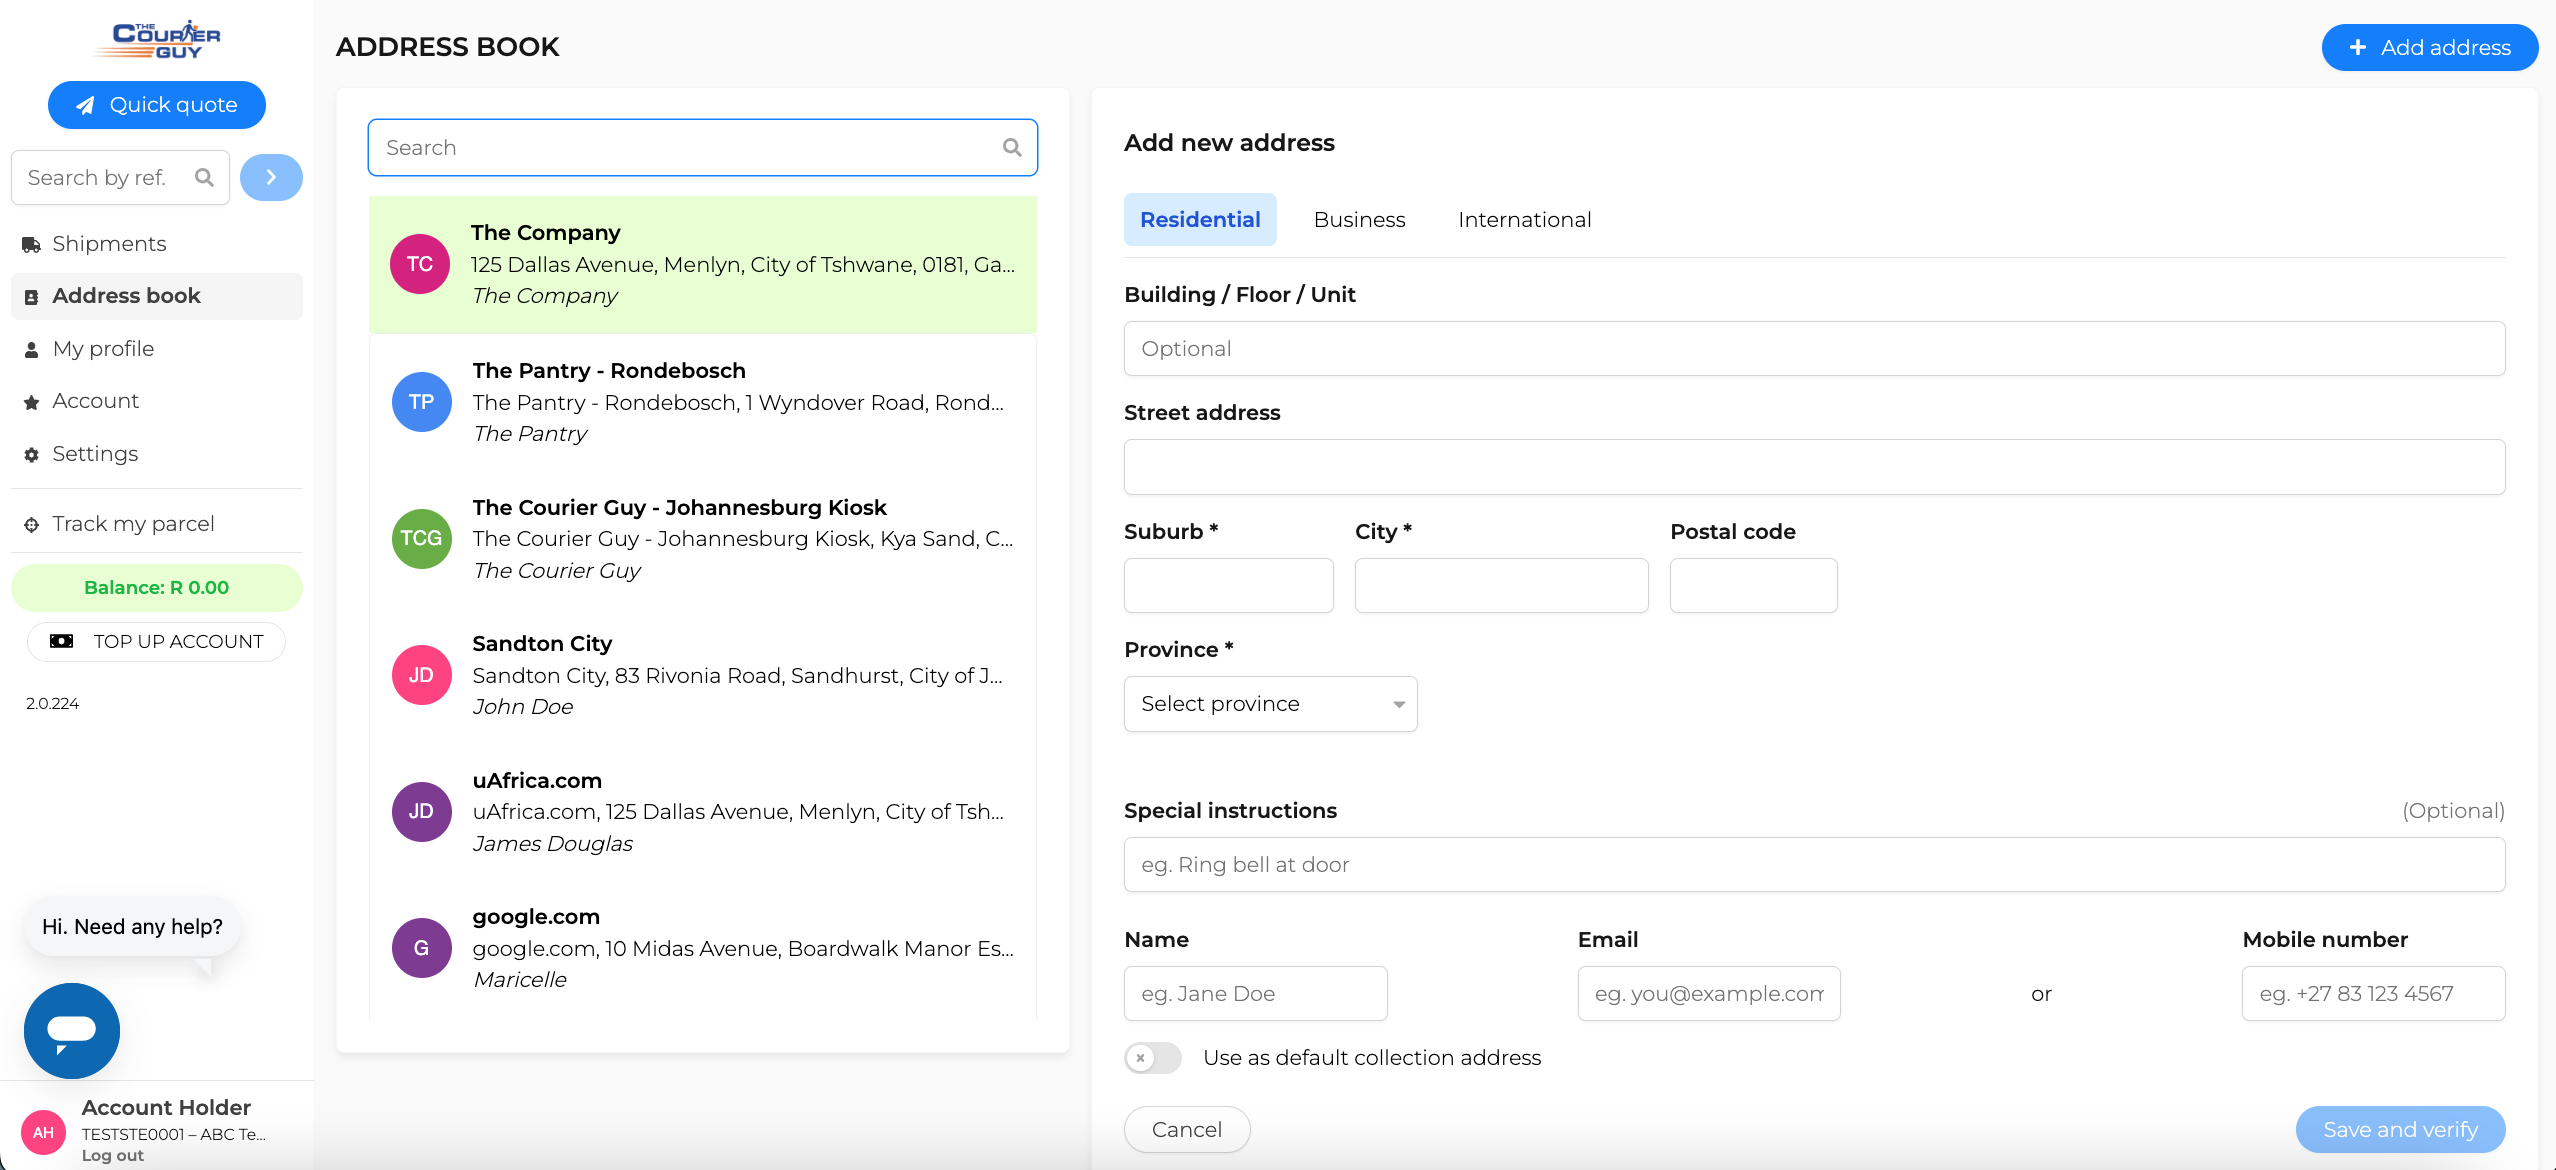
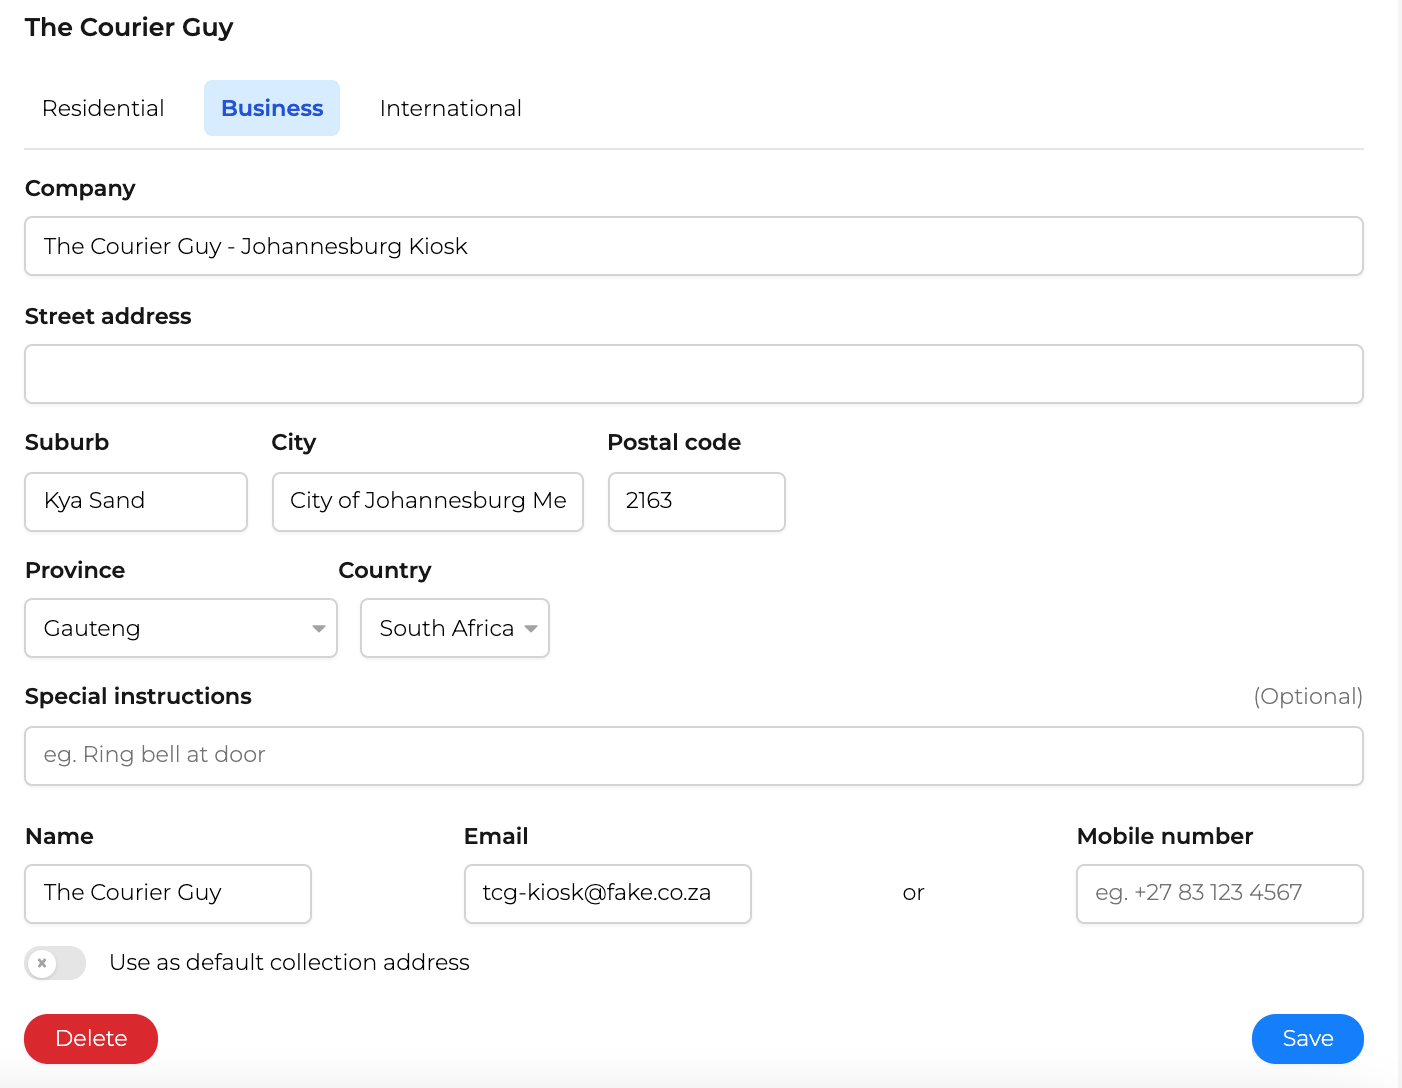
Please add enough information to make the address complete.
Click on Save and verify to continue.
![]() We require that you at least have a street address, province and suburb.
We require that you at least have a street address, province and suburb.
This is to ensure accurate collection and delivery by the courier. Your address will be geocoded and submitted to the courier for rates. If you do not get any rates, retry you address or contact the our support for assistance.
![]() If you struggle with your address, try searching for it on Google maps first and then fill in the fields accordingly.
If you struggle with your address, try searching for it on Google maps first and then fill in the fields accordingly.

![]() All new addresses are automatically added to your address book. This allows you to easily choose addresses for future shipments. You can disable this setting by going to your settings page
All new addresses are automatically added to your address book. This allows you to easily choose addresses for future shipments. You can disable this setting by going to your settings page

Use the example found in line one and complete the rest of the sheet. Be sure to remove line one when done.
![]() Please ensure that you have correctly added your address info to the sheet. Grammar plays an important role. Your address info will be sent to Google Maps for Geocoding so make sure your info is accurate enough to be successfully geocoded.
Please ensure that you have correctly added your address info to the sheet. Grammar plays an important role. Your address info will be sent to Google Maps for Geocoding so make sure your info is accurate enough to be successfully geocoded.


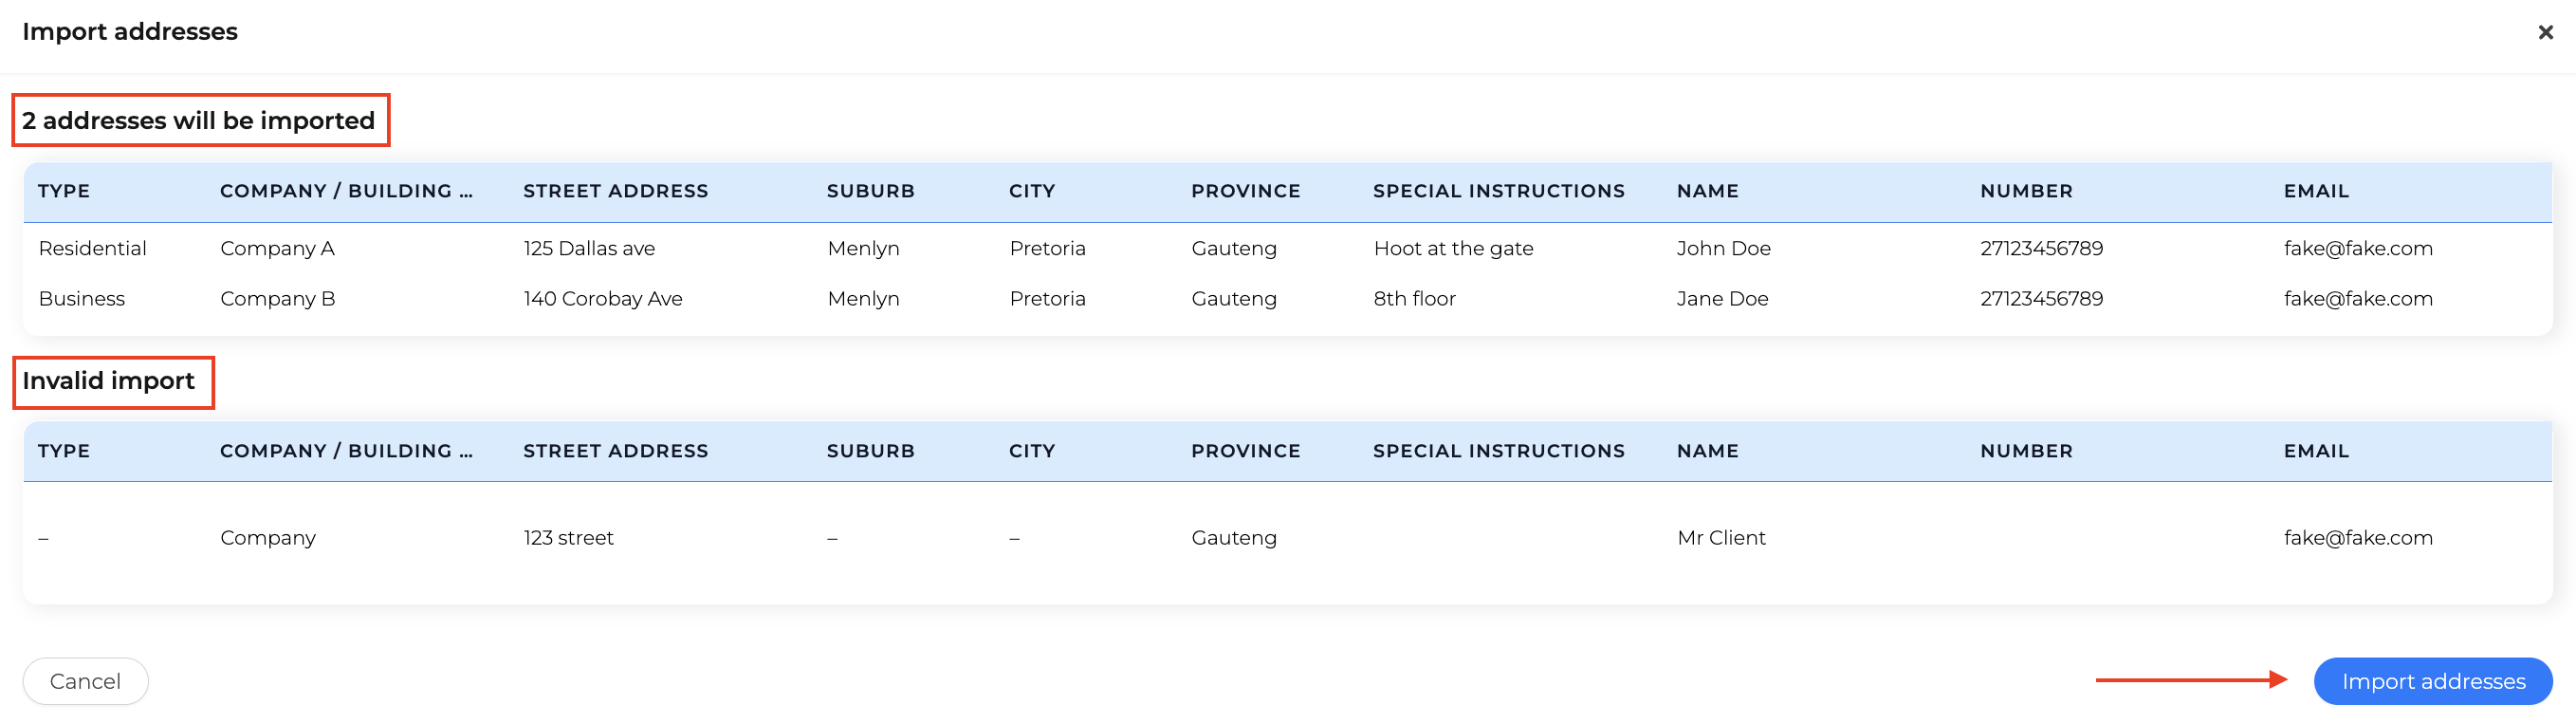
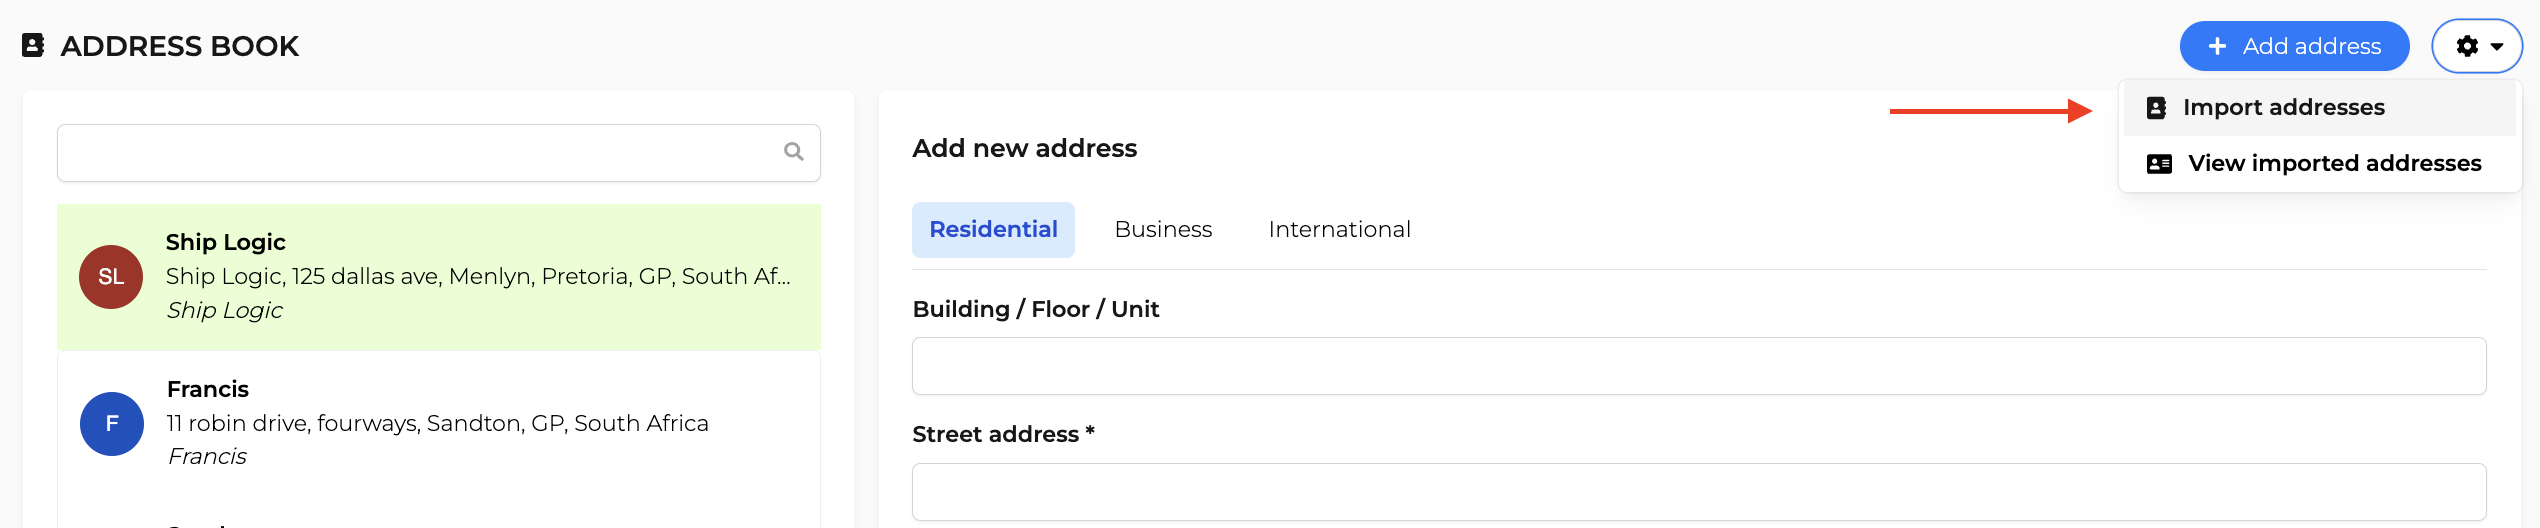
Click on Import addresses to complete the upload.
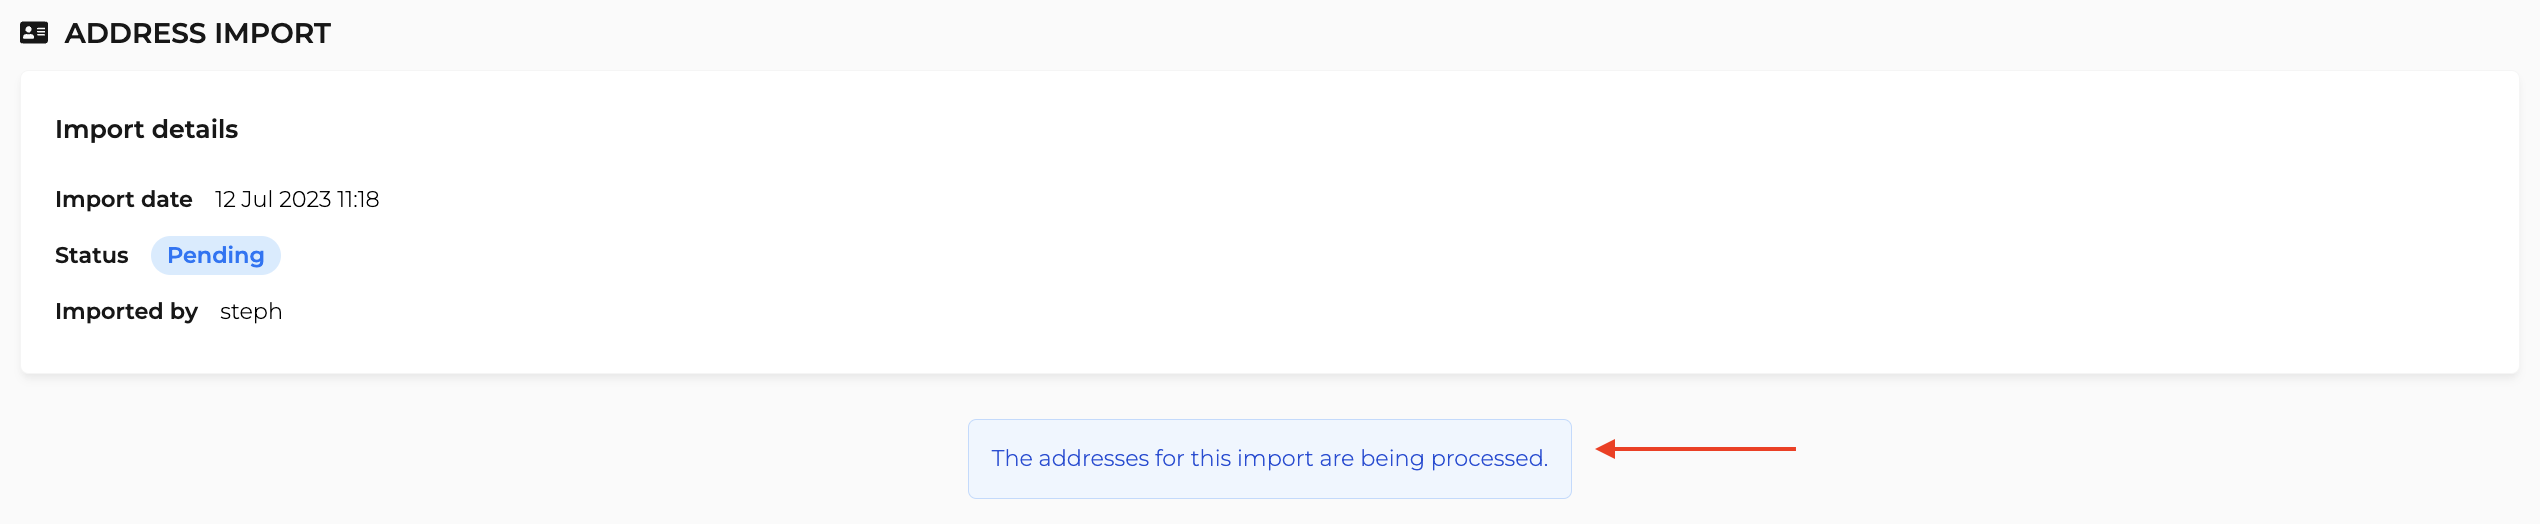
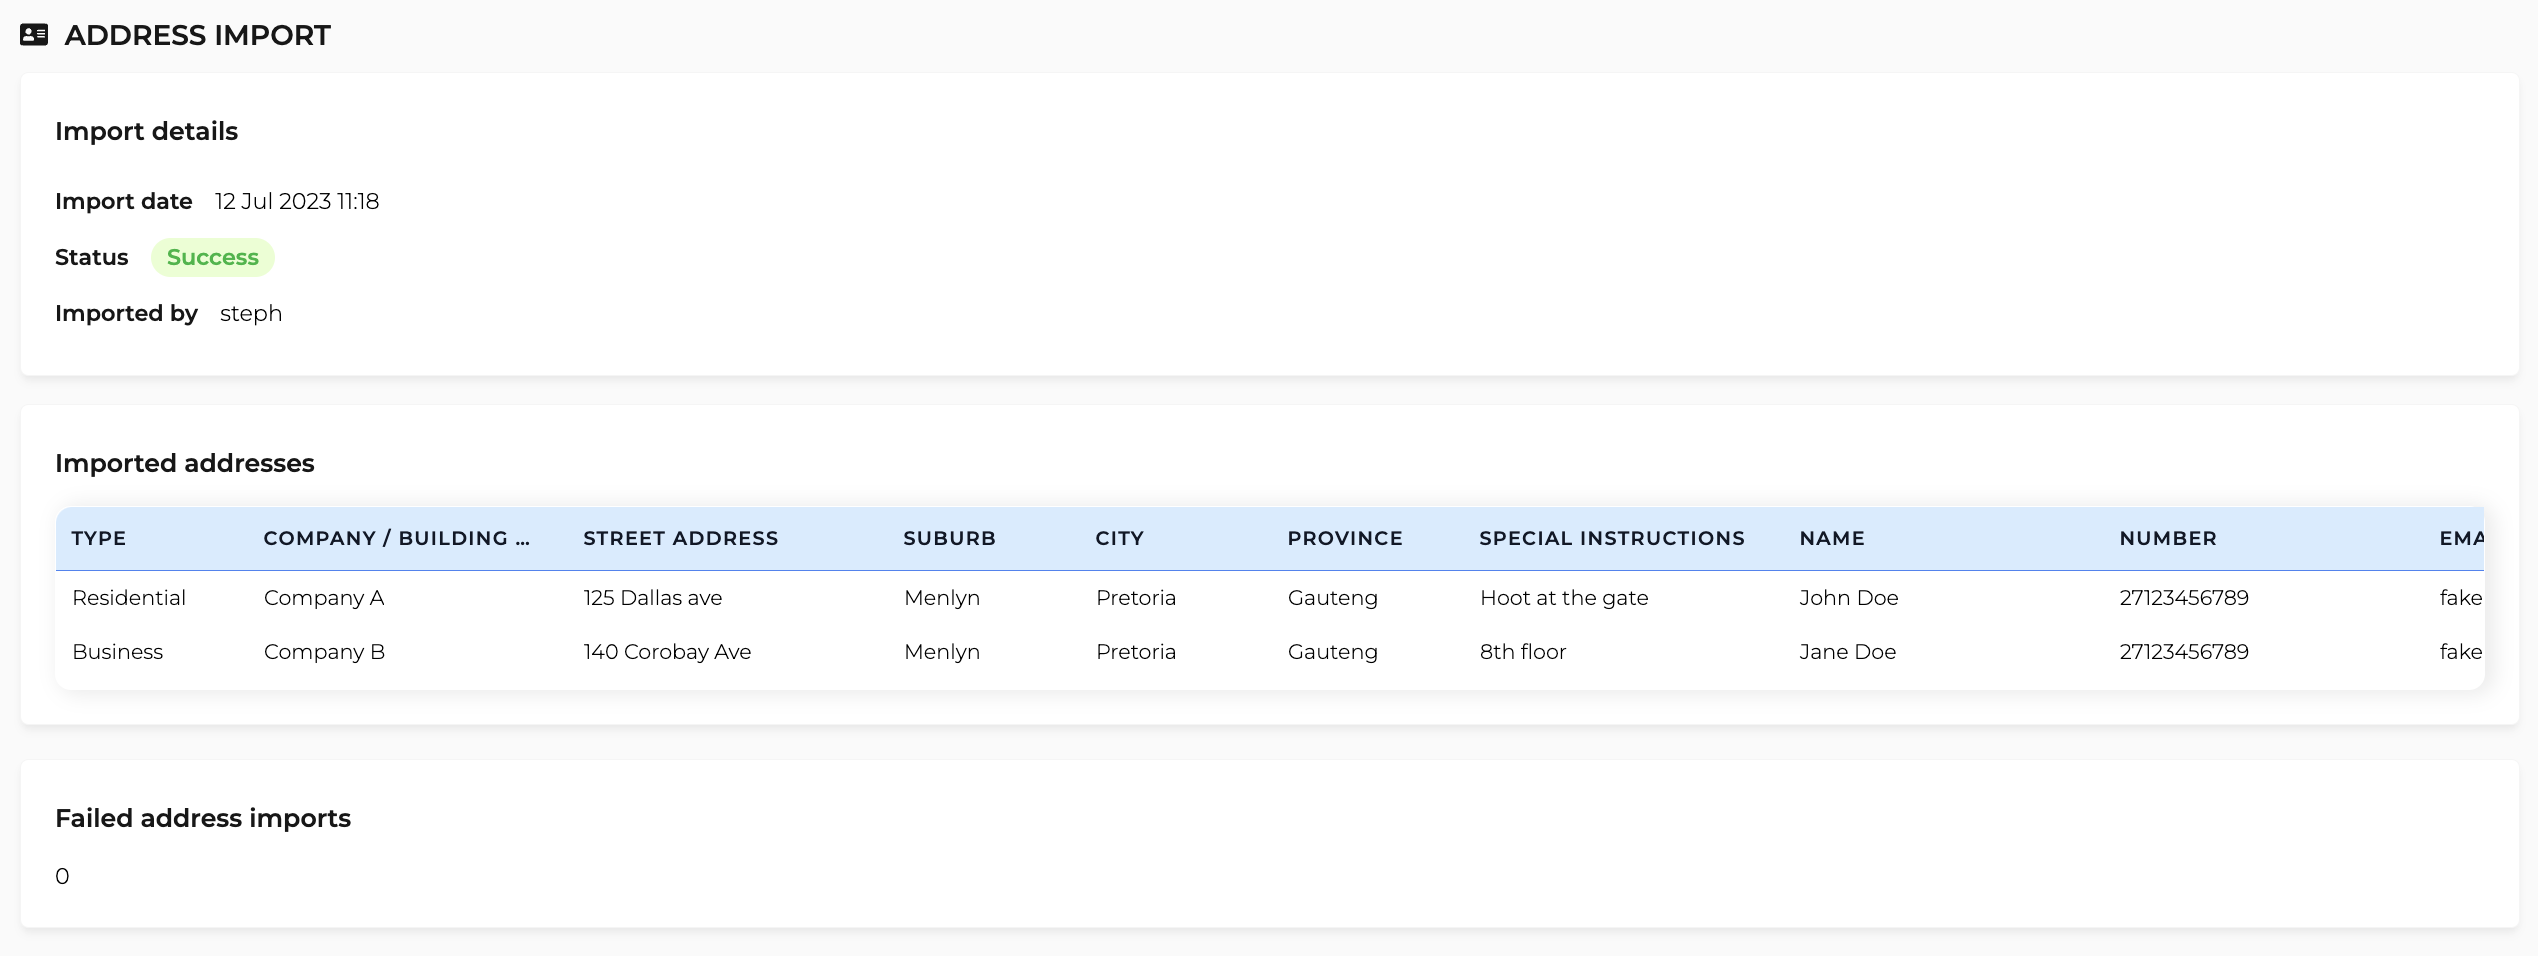
Your import will now be processed. This step might take a few minutes depending on the amount of addresses that you are importing.
![]()
Tip: Refresh your page to monitor the status of your upload. It should change from Pending to Success

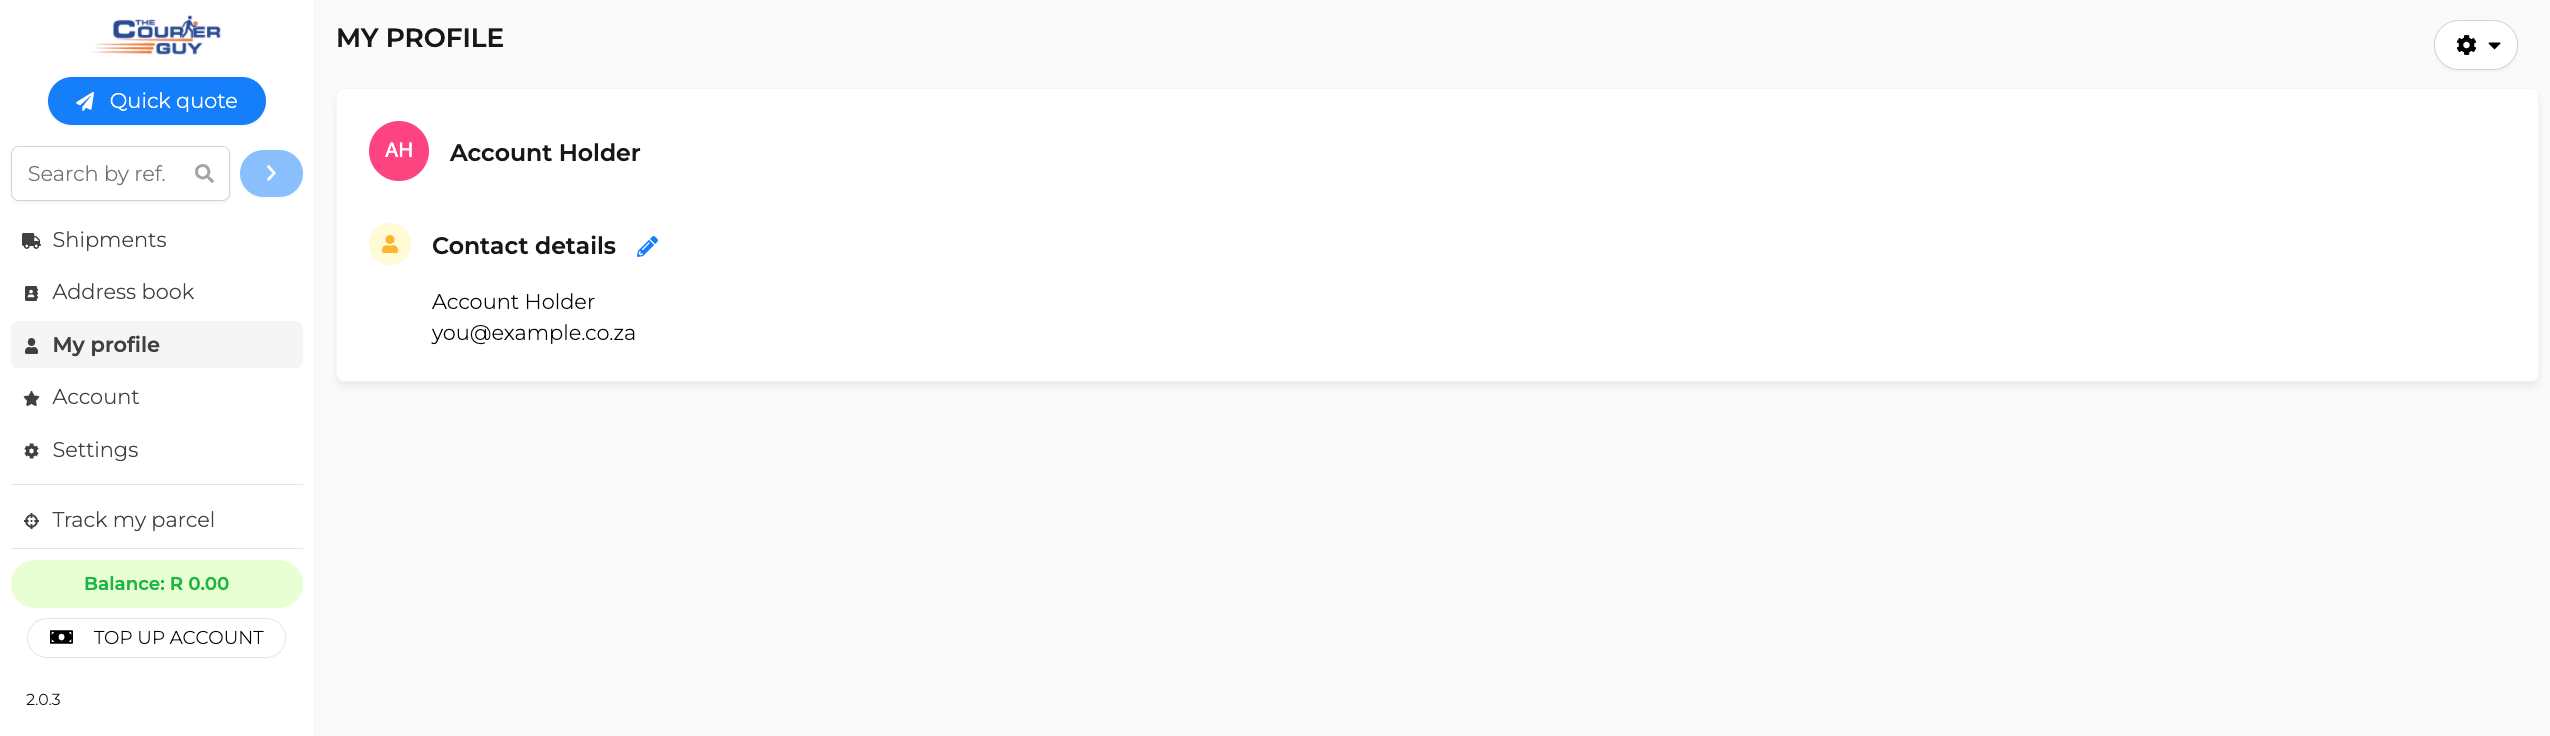
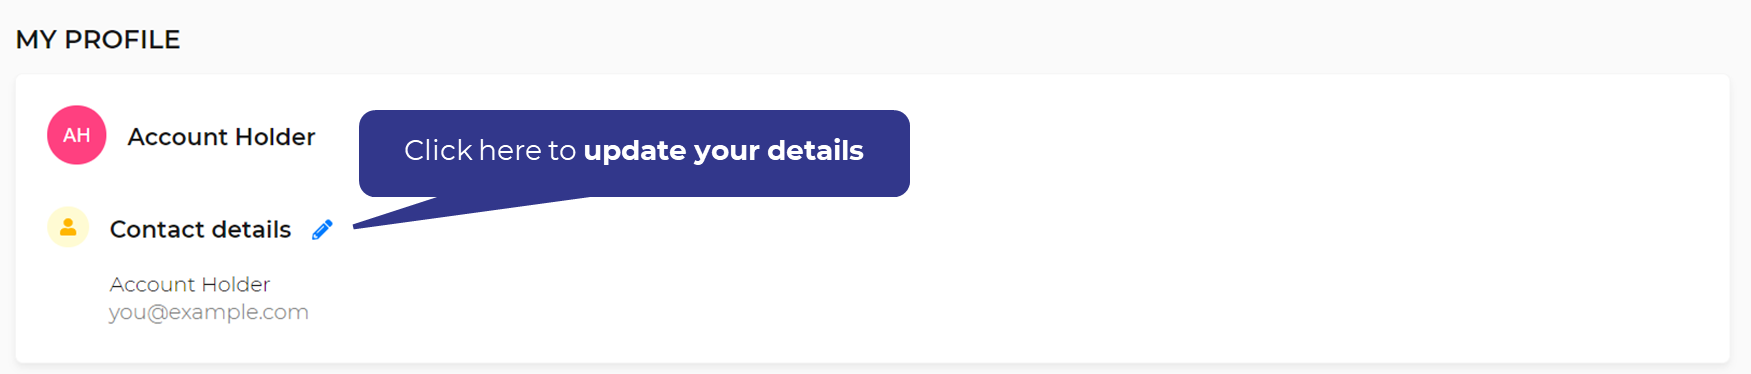
Go to My profile in the left-hand navigation menu.
Click on the blue pencil icon ![]() next to Contact details to edit.
next to Contact details to edit.
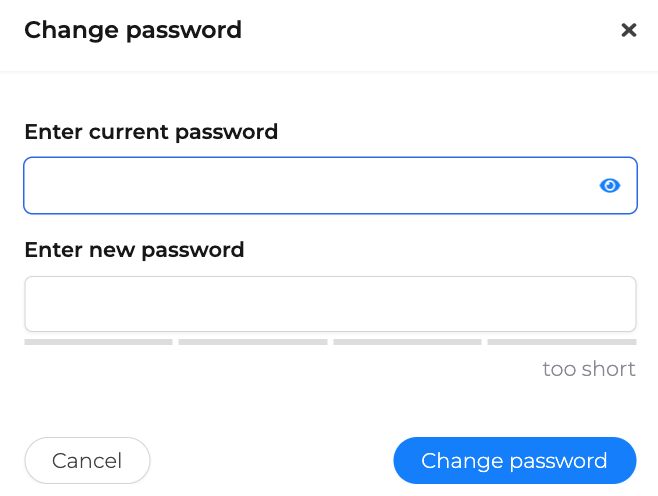
Go to My profile in the left-hand navigation menu.
Open your profile settings ![]() in the right-hand corner of the page and click on Change password
in the right-hand corner of the page and click on Change password

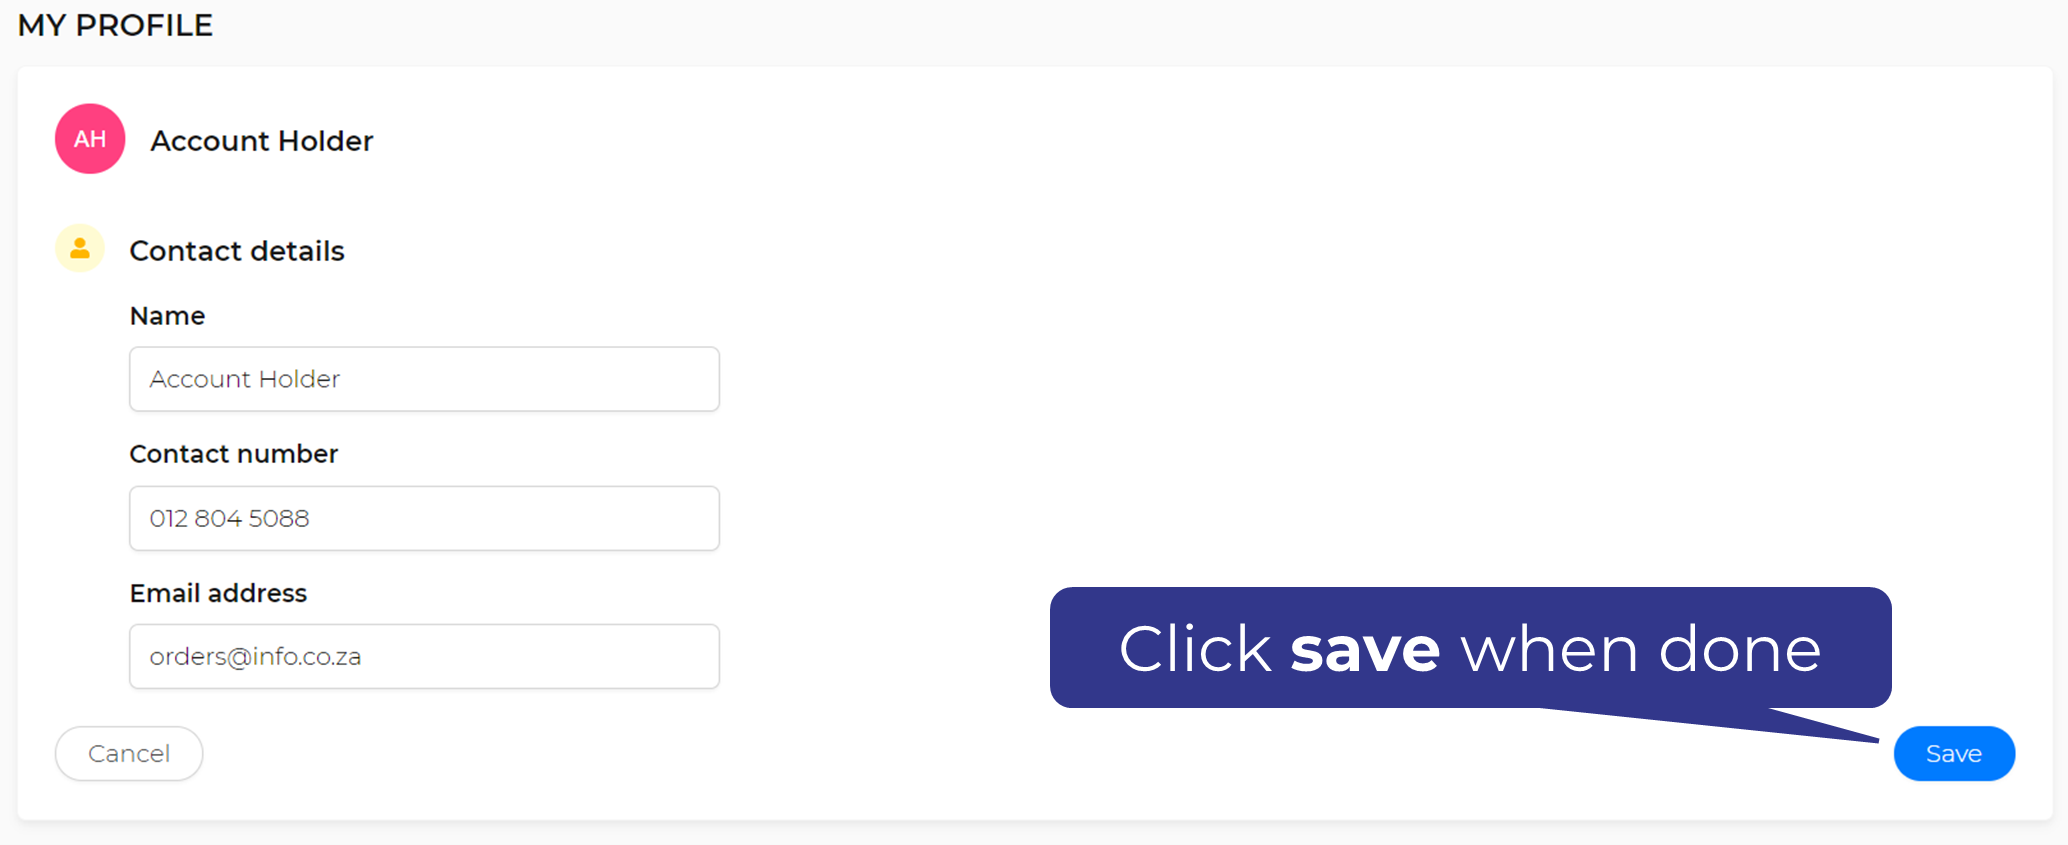
Confirm your current password and then enter your new password.
Click on Change password to save.
![]() Your new password will be required next time you log in
Your new password will be required next time you log in


![]() Instant EFT
Instant EFT
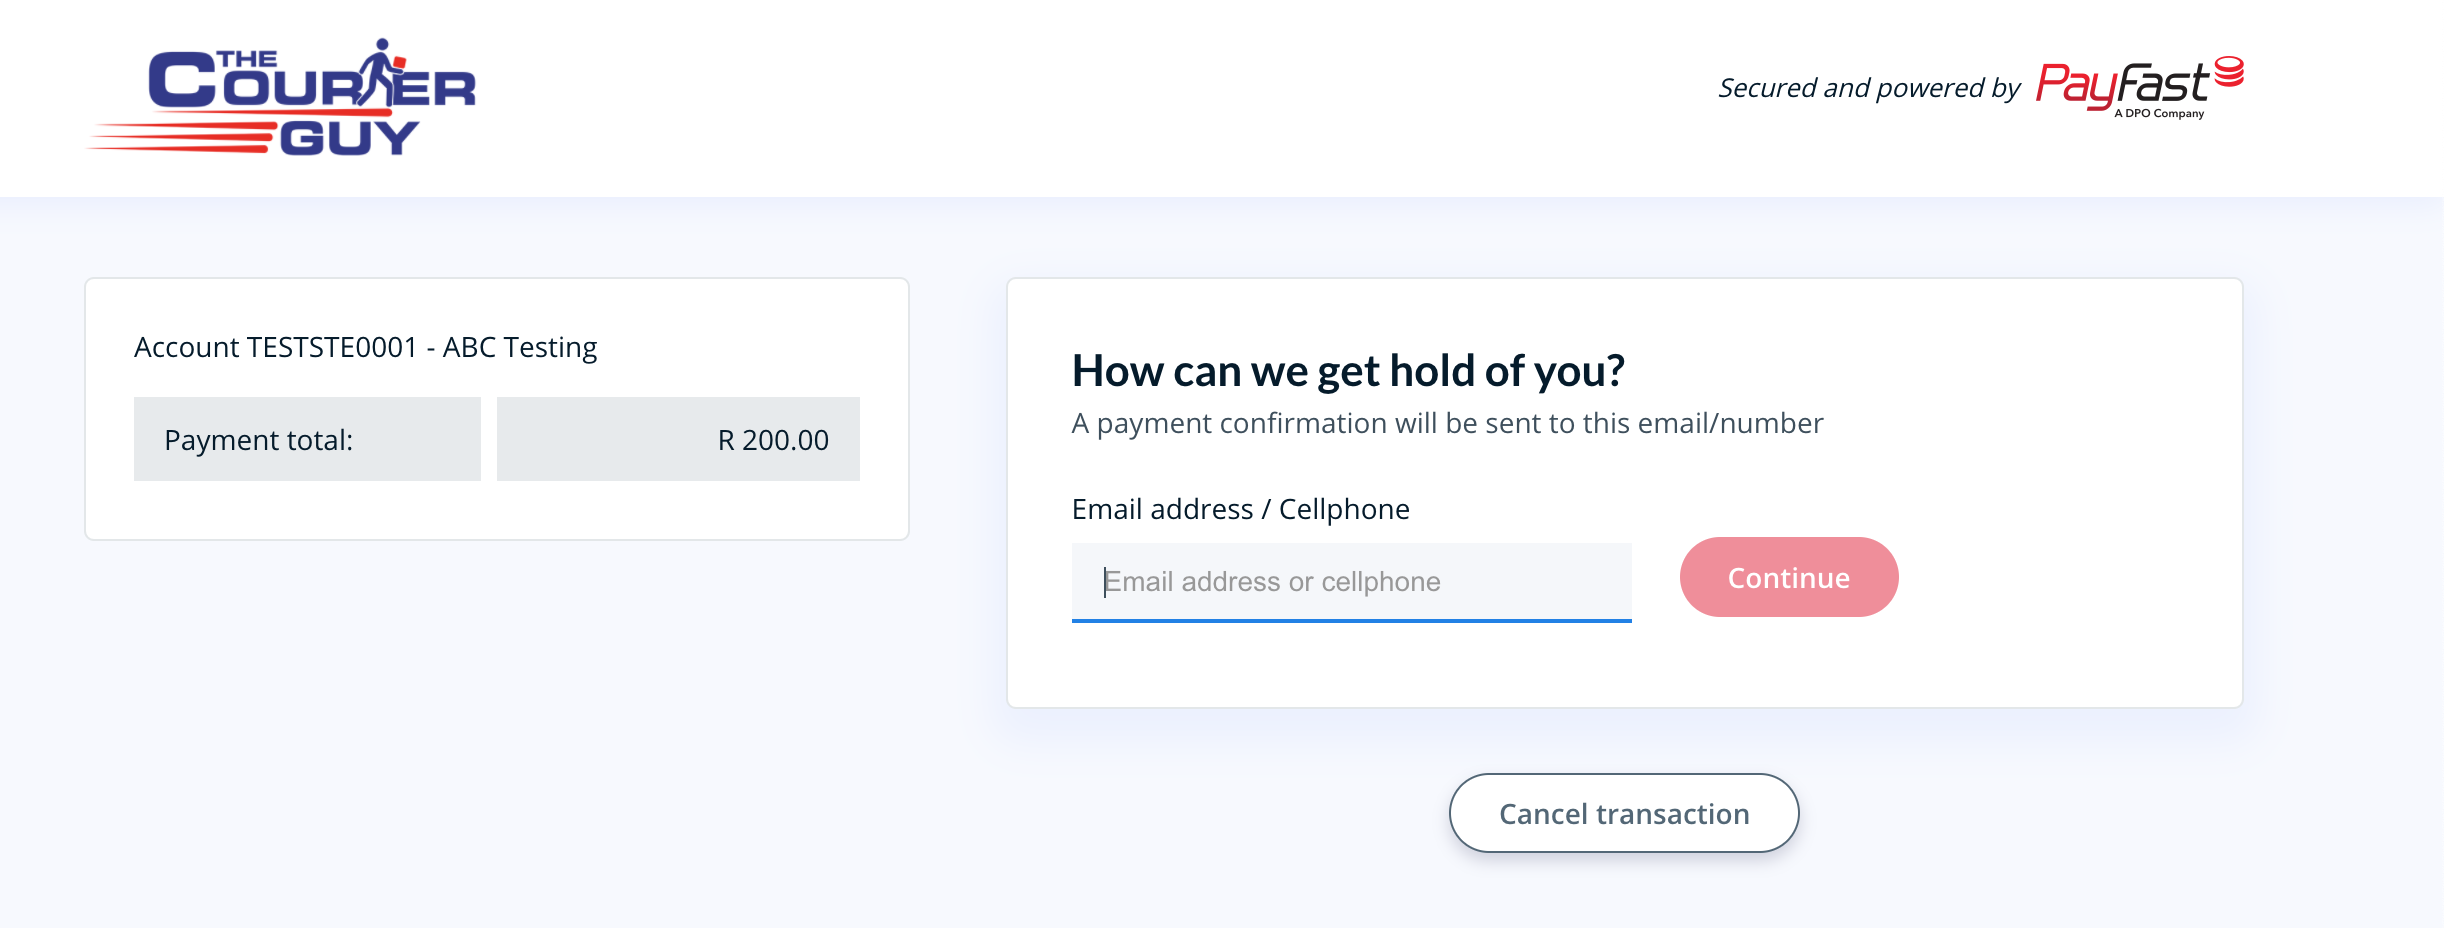
![]() You will be redirected to the PayFast payment portal to complete the top up. Once successful, return to your account page to view your new balance and start shipping immediately.
You will be redirected to the PayFast payment portal to complete the top up. Once successful, return to your account page to view your new balance and start shipping immediately.
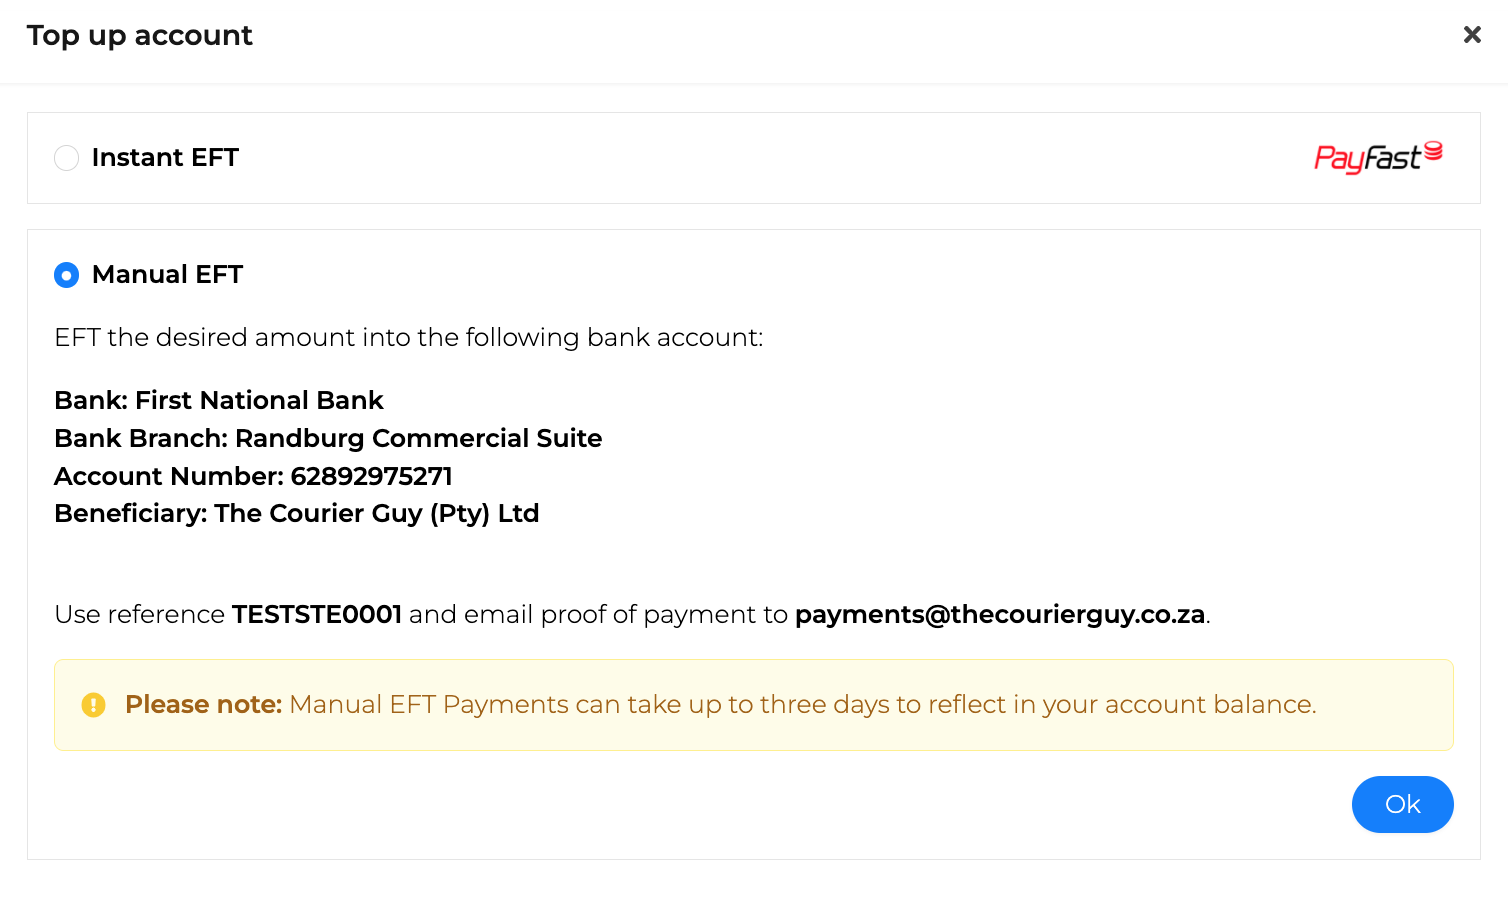
![]() Manual EFT
Manual EFT
![]() Please note that EFTs may take up to 48hours to reflect. Consult your bank to find out more.
Please note that EFTs may take up to 48hours to reflect. Consult your bank to find out more.
The Courier Guy will allocate payment once received.


![]() Account User: This role is limited to only Shipments and Address book
Account User: This role is limited to only Shipments and Address book
![]() Account SuperUser: This role can also access accounts and settings.
Account SuperUser: This role can also access accounts and settings.
![]() Account User (No billing): This role has the same rights as a normal account user with the exception of not seeing ANY rate information e.g no account balance or rates on service levels.
Account User (No billing): This role has the same rights as a normal account user with the exception of not seeing ANY rate information e.g no account balance or rates on service levels.

![]() Only an Account Super User can edit user details.
Only an Account Super User can edit user details.


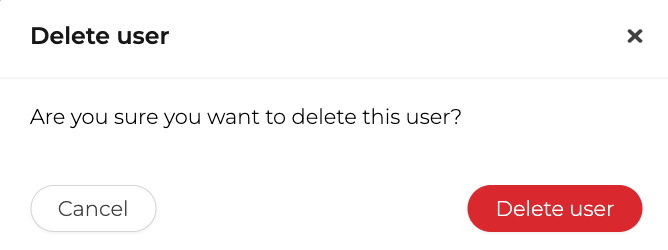
To completely remove the user from your account, click on the Delete this user button in the right-hand corner of your profile page. This will remove the user and their contact details from the system.
![]() Tip: The username cannot be used again as it is saved in historical shipment data. We recommend adding a numerical number to the new username should you need to re-create the same user e.g admin1
Tip: The username cannot be used again as it is saved in historical shipment data. We recommend adding a numerical number to the new username should you need to re-create the same user e.g admin1
![]() Please note: You cannot delete your own user.
Please note: You cannot delete your own user.

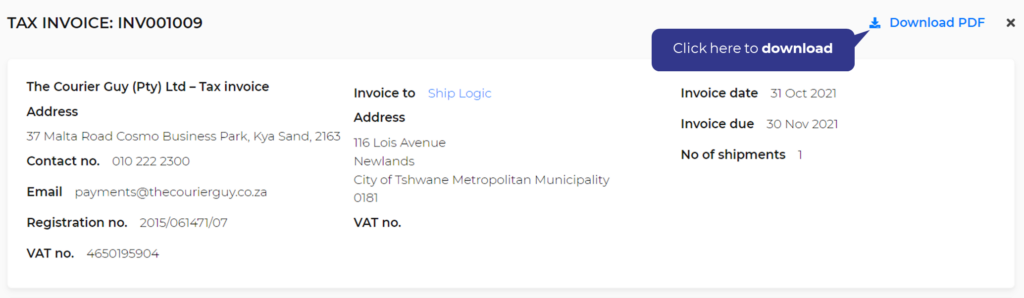
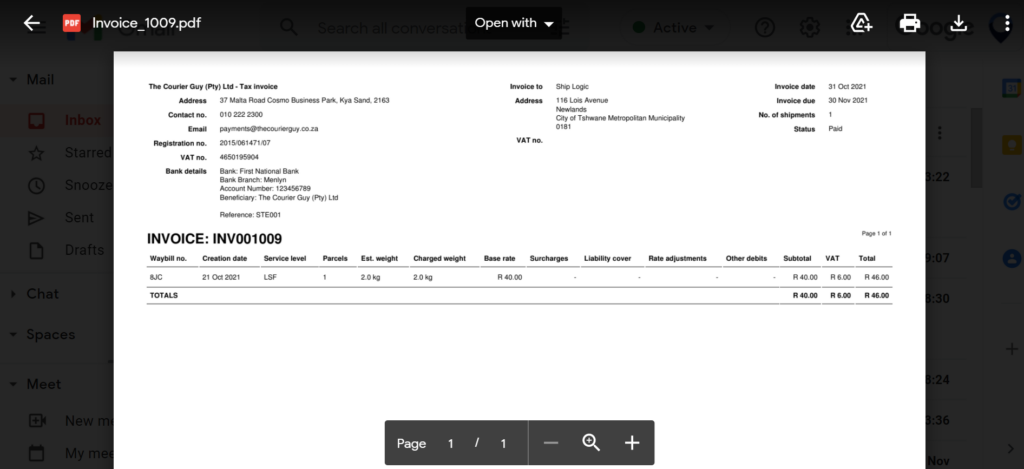

![]() A PDF document will download to your computer.
A PDF document will download to your computer.
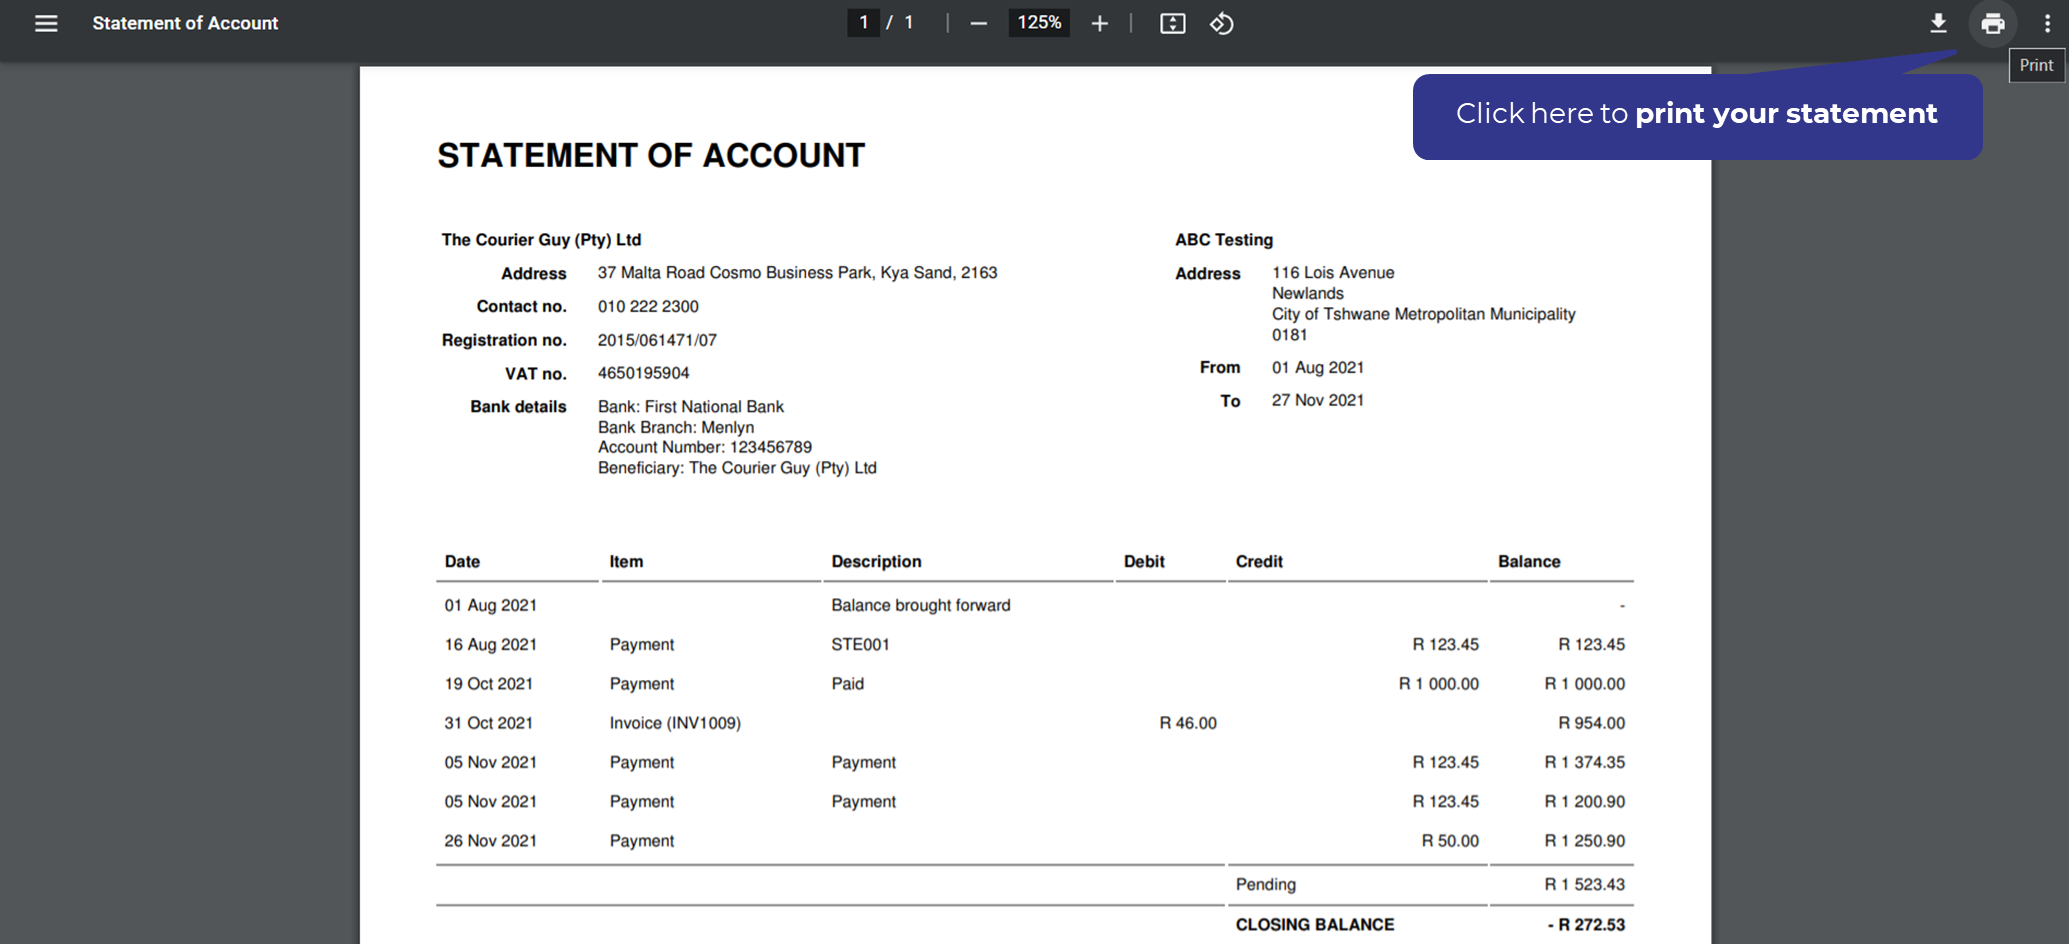
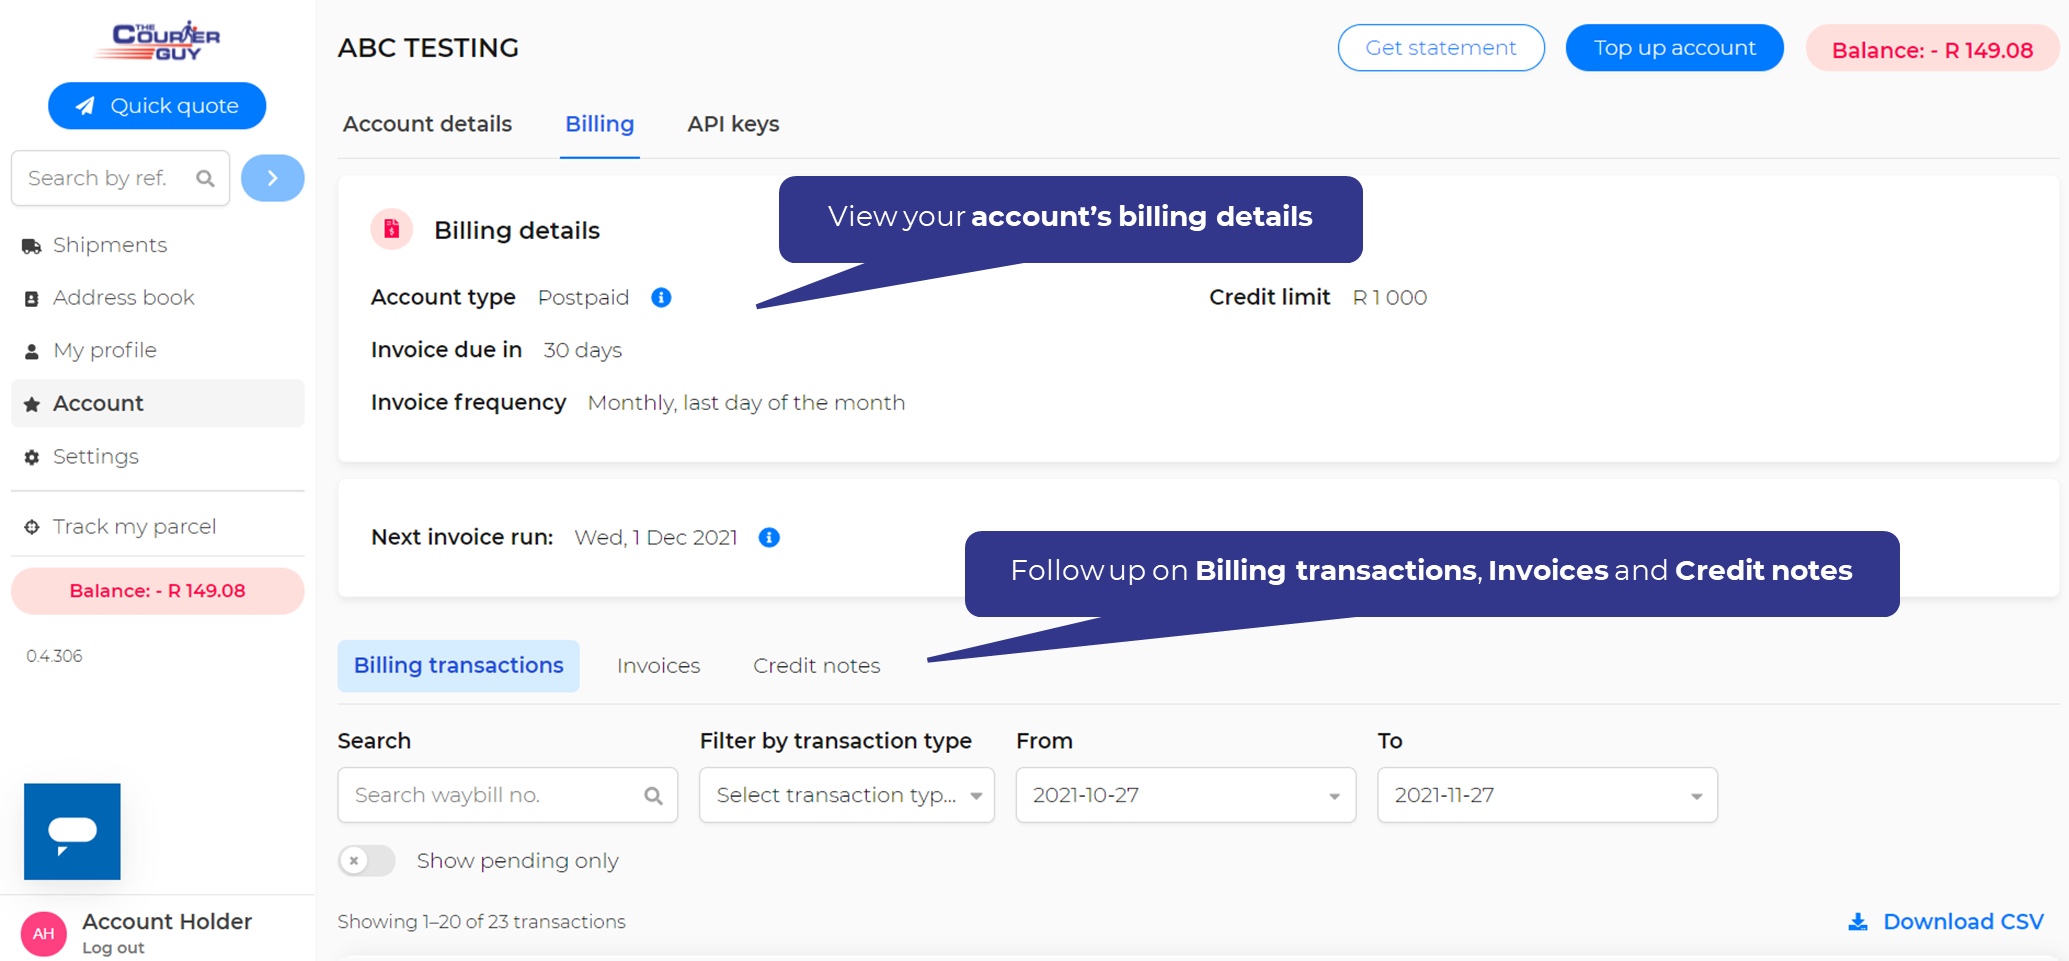
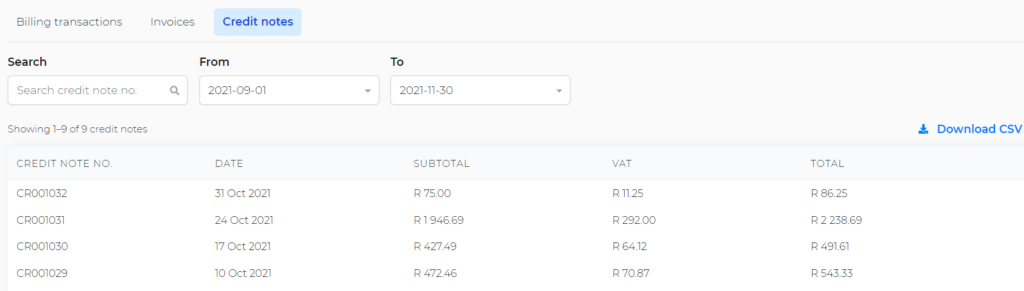
![]() An explanation of the different types of billing transactions available.
An explanation of the different types of billing transactions available.
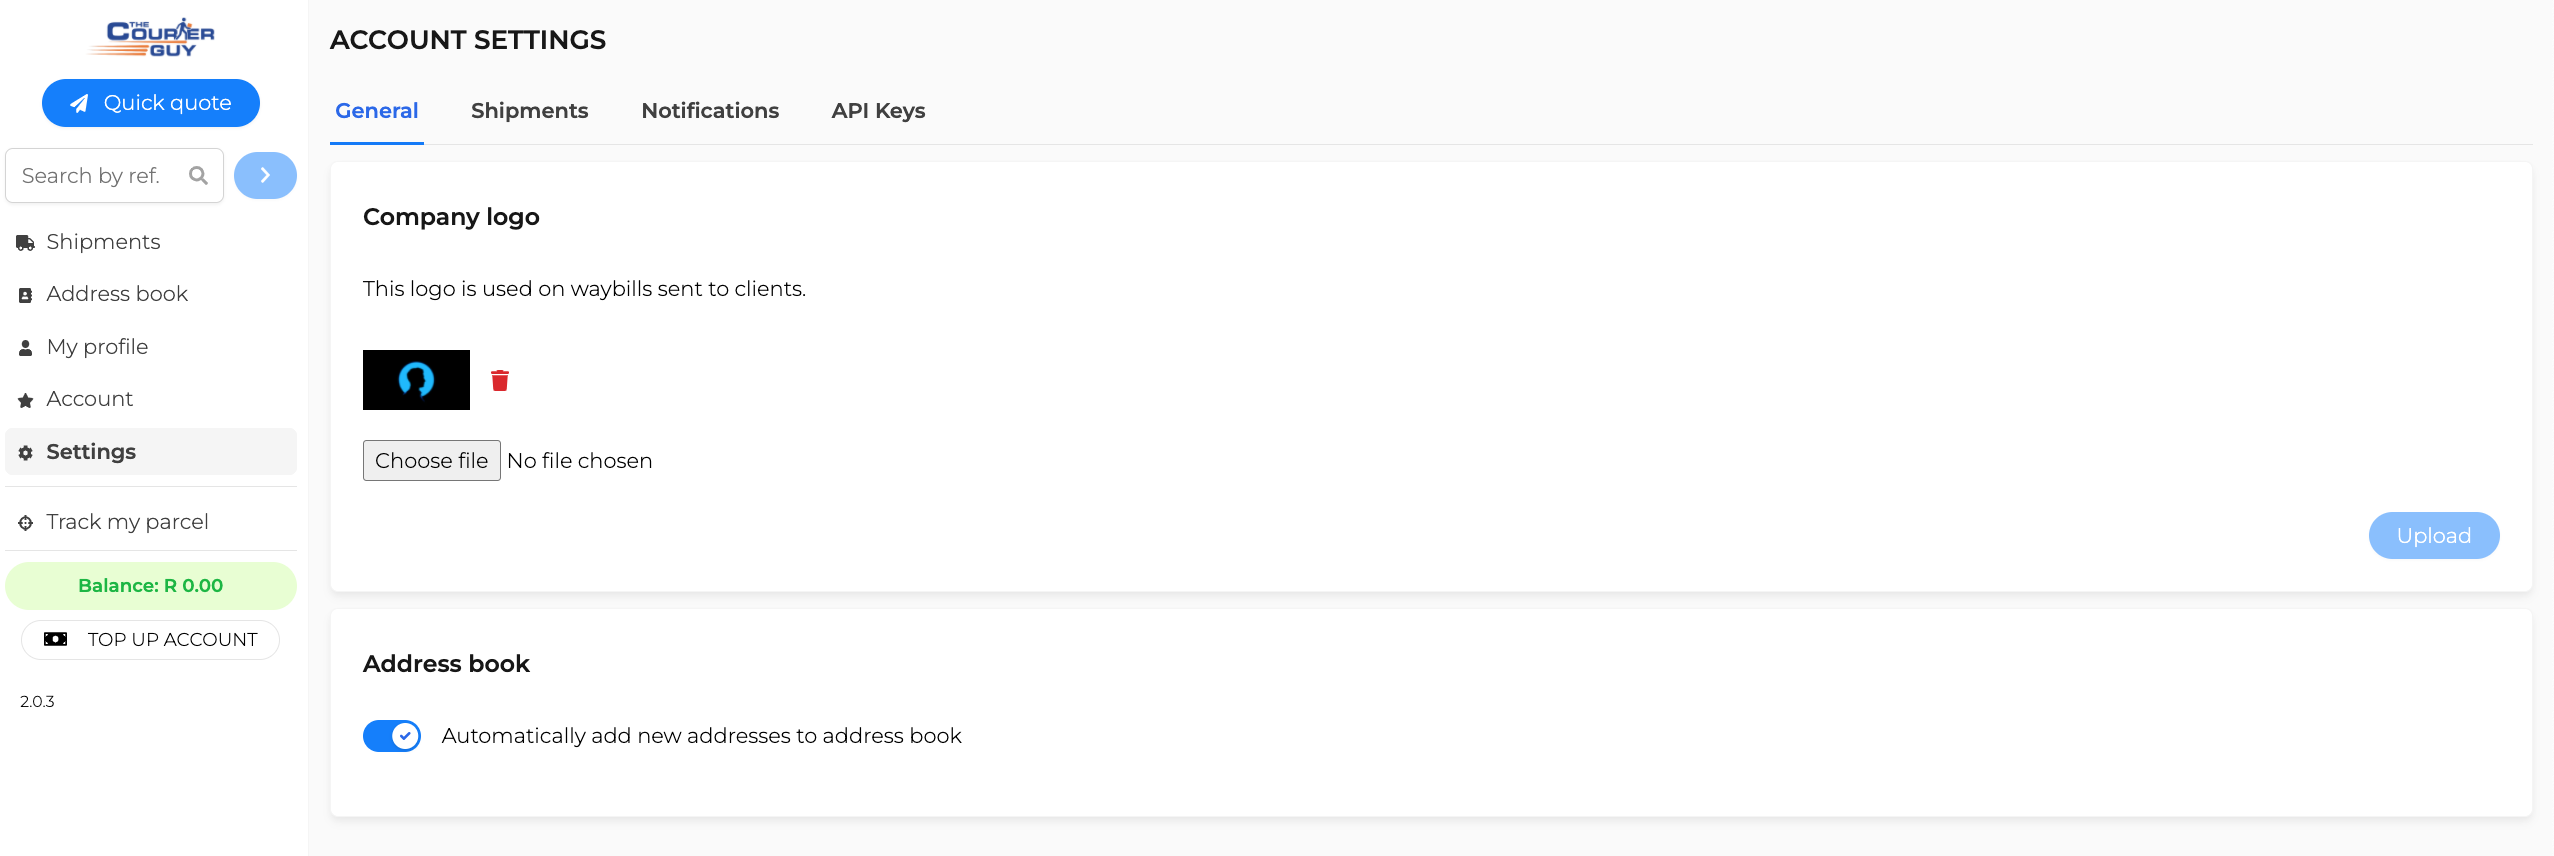
![]() Company logos will appear in shipment waybills and in emails sent by the system.
Company logos will appear in shipment waybills and in emails sent by the system.


Add characters to your waybill number to identify your shipments.
![]() This prefix is used at the beginning of all waybill numbers and needs to be three characters long.
This prefix is used at the beginning of all waybill numbers and needs to be three characters long.

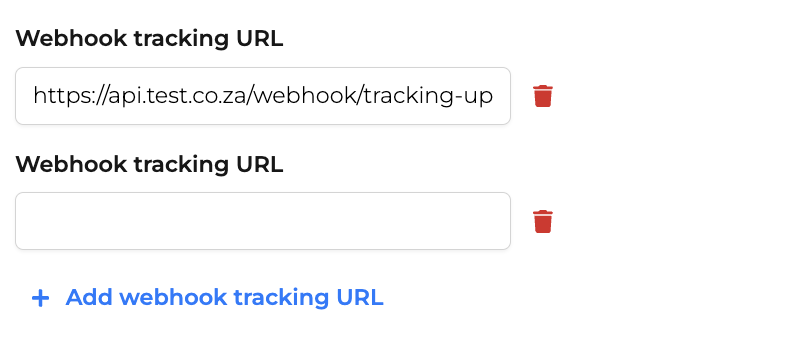
![]() You can add multiple webhooks to your account by clicking on “Add webhook tracking URL“
You can add multiple webhooks to your account by clicking on “Add webhook tracking URL“
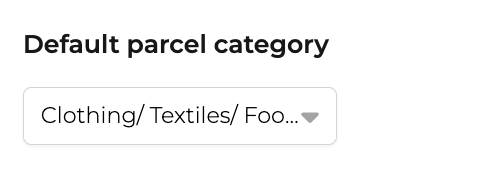
Easily set up predefined package types with specified dimensions and weights to make it easier and quicker to book your shipments.
![]() Choose these package types from a dropdown list when booking a shipment.
Choose these package types from a dropdown list when booking a shipment.

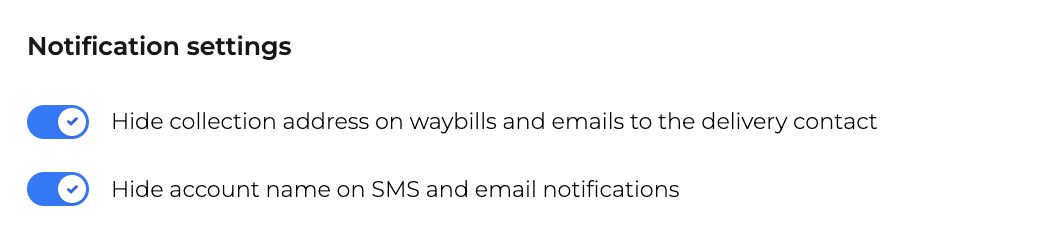
Scroll down to Notification settings and click on the toggle to enable the feature.
![]() Hiding your collection address will effectively hide all your collection address details from clients by removing the address information from all waybills and email communication sent to your delivery contact.
Hiding your collection address will effectively hide all your collection address details from clients by removing the address information from all waybills and email communication sent to your delivery contact.
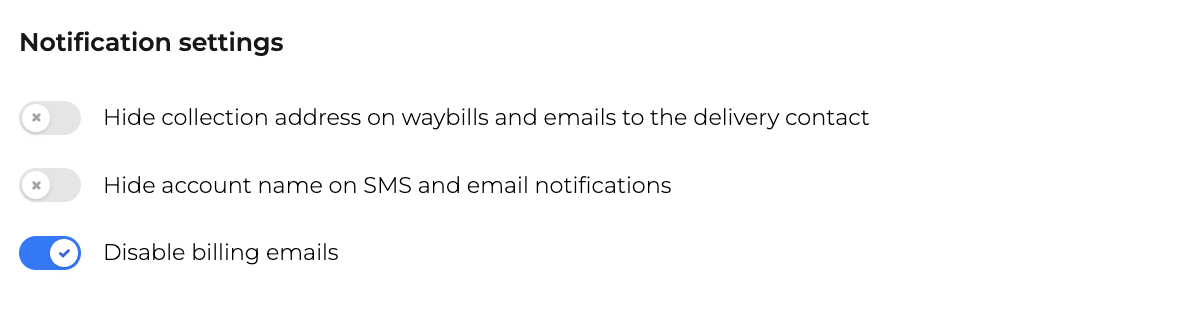
![]() Disabling your billing emails will result in no billing-related emails being sent to the billing contact. Statements, invoices and credit notes will have to be downloaded manually by logging into the account.
Disabling your billing emails will result in no billing-related emails being sent to the billing contact. Statements, invoices and credit notes will have to be downloaded manually by logging into the account.
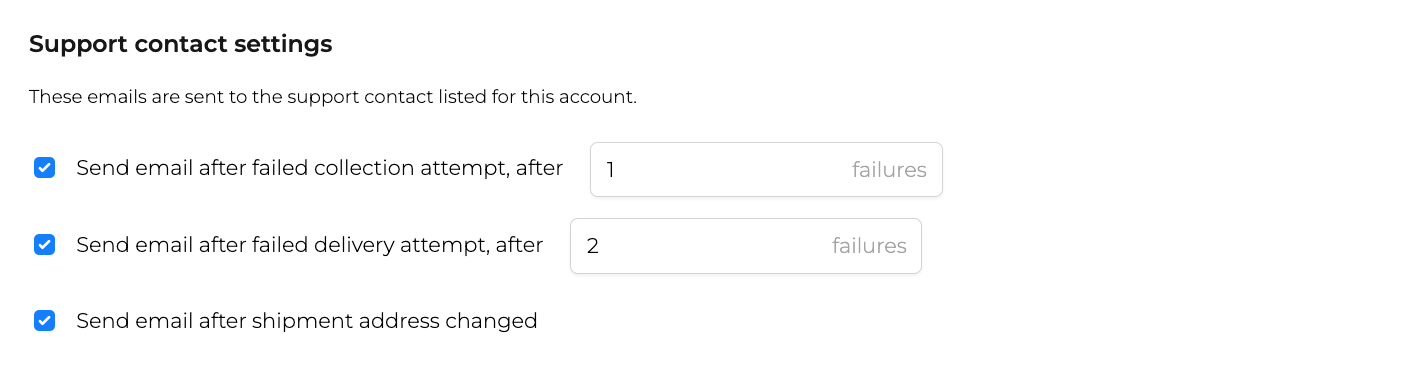
![]() These emails are sent to the support contact listed on the account. Please contact your courier to find out more about your support contact listed and how to change it.
These emails are sent to the support contact listed on the account. Please contact your courier to find out more about your support contact listed and how to change it.

![]() For your protection, you should never share your API key with anyone. If you lose or forget your key, you cannot retrieve it. Instead, create a new access key and make the old key inactive.
For your protection, you should never share your API key with anyone. If you lose or forget your key, you cannot retrieve it. Instead, create a new access key and make the old key inactive.

You can search for emails using the search bar.
![]() My inbox will only show emails sent to your logged in email address
My inbox will only show emails sent to your logged in email address
Click on any link within an email to open it in a new tab or to download the file from your browser.
![]() Download links have an expiry period of 7 days and will therefore not be shown after it has expired
Download links have an expiry period of 7 days and will therefore not be shown after it has expired
